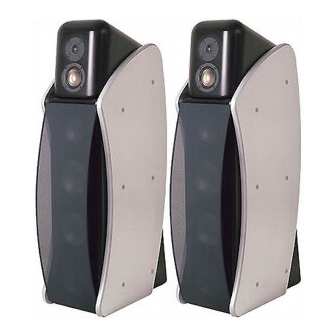
REVELL Ultima Salon User Manual
Revel ultima salon: user guide
Hide thumbs
Also See for Ultima Salon:
- Manual (32 pages) ,
- Owner's manual (34 pages) ,
- Owner's manual (32 pages)
Table of Contents
Advertisement
Advertisement
Table of Contents

Related Manuals for REVELL Ultima Salon


Summary of Contents for REVELL Ultima Salon
- Page 1 ™ Salon Loudspeaker...
-
Page 2: Table Of Contents
MIDBASS ...4 MIDRANGE ...5 TWEETERS...5 CROSSOVER NETWORK ...5 CABINET ...5 UNPACKING...6 PLACEMENT ...8 INSTALLING SPIKES...10 SPEAKER CONNECTIONS ...11 SINGLE-WIRED SYSTEM CONNECTIONS ...12 BI-WIRED SYSTEM CONNECTIONS ...13 BI-AMPLIFIED SYSTEM CONNECTIONS...14 SYSTEM OPTIMIZATION ...16 CABINET CARE...18 SPEAKERS AND POWER ...18 PANEL REPLACEMENT...19 SPECIFICATIONS...21... -
Page 3: Introduction
Save these instructions for future reference. Revel SALON speakers are covered by a limited 5-year warranty, so save the bill of sale to protect your purchase and aid in any service- related questions. -
Page 4: Description
LF Compensation Rear Tweeter Level Install straps for Level Control single-wired operation Install straps for single-wired operation Remove straps Low Frequency Input or bi-amp for bi-wire High Frequency Input Serial Number xxxx Revel Corporation Chatsworth, California Made in U.S.A. SALON Rear... -
Page 5: Midrange
• External level controls for both the front and rear tweeters via calibrated switched precision resistors for ideal imaging. • External LF tilt control for speaker placement optimization. CABINET The cabinet offers exquisite appearance and aids in overall system performance. -
Page 6: Unpacking
UNPACKING IMPORTANT! Do not attempt to lift a SALON from its pack- ing carton alone – at least two strong people will be needed to unpack the product properly. To avoid injury, use extreme care during unpacking. Always stand as straight as possible and use your leg muscles to lift a SALON. - Page 7 Keep all packing materials for future shipping. In the unlikely event a product will need repair, Revel will only accept a unit in its original shipping carton. Using any other packing materials may result in damage to the product and is not covered by the warranty.
-
Page 8: Placement
PLACEMENT Sound quality is heavily dependent on the accuracy of your speak- ers, their placement in the listening room, and the acoustics of the room itself. Since the SALON speakers are extremely accurate, experimenting with their placement is the most significant way to optimize their performance in a given environment. - Page 9 • Ideally, the listening room should be acoustically neutral, nei- ther producing any distinct echoes nor sounding completely “dead” and lifeless. If needed, consult your Revel dealer for spe- cific recommendations on room acoustics. • After choosing a final placement, add the spikes (and covers, if desired) as described in Installing Spikes on the next page.
-
Page 10: Installing Spikes
4. Tilt the SALON in the other direction and install the other pair of spikes in the same manner. NOTE: If the speaker is to be used on a hardwood or tile floor, use supplied spike covers. Further adjustment of spike may be necessary due to uneven floors. -
Page 11: Speaker Connections
Use high-quality connectors on the speaker cables. Consult your Revel dealer as to specific recommenda- tions for your application. • Turn off all audio system power before making any connections. -
Page 12: Single-Wired System Connections
Install straps for single-wired operation Install straps for single-wired operation Low Frequency Input High Frequency Input Serial Number xxxx Revel Corporation Chatsworth, California Made in U.S.A. Front Tweeter Level LF Compensation Rear Tweeter Level (one channel shown) Install straps for... -
Page 13: Bi-Wired System Connections
HIGH FREQUENCY INPUT terminals and the other pair of wires to the LOW FREQUENCY INPUT terminals, as shown in Figure 10. Check with your Revel dealer for recom- mendations and possible benefits for your application. CAUTION: Failure to remove the shorting straps when bi-wiring may damage some amplifiers. -
Page 14: Bi-Amplified System Connections
Front Tweeter Level LF Compensation Rear Tweeter Level wht red Low Frequency Input High Frequency Input Serial Number xxxx Revel Corporation Chatsworth, California Made in U.S.A. Front Tweeter Level LF Compensation Rear Tweeter Level (one channel shown) Install straps for... - Page 15 Made in U.S.A. NOTE: If the “gain factor” of the two amplifier channels is not identi- cal, a means of adjusting the input level of at least one of the channels is required. Consult your Revel dealer for specific recommendations. Pre-Amplifier (rear)
-
Page 16: System Optimization
Low Frequency Input or bi-amp High Frequency Input Serial Number xxxx Revel Corporation Chatsworth, California Made in U.S.A. 2. Set the LF COMPENSATION control as follows (refer to Figure 13): • Use the “0” setting during initial setup. - Page 17 4. If desired, experiment with placement and try other LF COM- PENSATION control settings to achieve the best overall tonal balance, image specificity, and spaciousness. There is no right or wrong placement or setting – only what sounds best. NOTE: Rotating the LF PLACEMENT COMPENSATION control to the left increases low-frequency output (see Figures 13 and 14).
-
Page 18: Cabinet Care
“clear.” If the sound becomes distorted or strained, reduce the volume level immediately to avoid damage. If you are unsure of the suitability of current or planned amplifier components, please ask your Revel dealer to review them before connecting your SALON speakers. SALON... -
Page 19: Panel Replacement
4. Lay the SALON on its other side, onto a soft surface. Use the enclosed hex wrench to untighten the side panel bolts and remove. Remove the panel. 5. Install the speaker grille, as shown in Figure 16 (on the next page). Insert the grille tips into panel cups. Bolt... - Page 20 7. Stand the reassembled SALON upright. Repeat steps 1 through 6 to install new side panels on the other SALON. SALON Owner’s Manual Figure 16. Installing the SALON speaker grille. Figure 17. Installing the other SALON side panel.
-
Page 21: Specifications
SPECIFICATIONS Revel utilizes proprietary measurement methods in the design and specification of our loudspeakers. Our research has developed a series of tests that represent a great leap forward in making mea- surements that dramatically contribute to our goal of accurately reproducing music or film. - Page 22 240 lb (108.9 kg) each carton Revel constantly strives to update and improve existing products, as well as create new ones. Therefore the specifi- cations and construction details in this and related Revel publications are subject to change without notice. Salon is a trademark of Revel, Inc.
-
Page 23: Service Information
Your Revel dealer can order a new set of shipping materials if you no longer have the original cartons. Since there will be a charge for this service, we strongly recommend saving all packing materials. - Page 24 19748 D EARBORN TREET , CA 91311 HATSWORTH PH: (818) 717-0770 • FAX: (818) 701-3755 www.revelspeakers.com P/N 9301137-001...
Need help?
Do you have a question about the Ultima Salon and is the answer not in the manual?
Questions and answers