REVELL Ultima Studio User Manual
Revel ultima studio: user guide
Hide thumbs
Also See for Ultima Studio:
- User manual (19 pages) ,
- Unpacking instructions (2 pages) ,
- Owner's manual (34 pages)
Table of Contents
Advertisement
Advertisement
Table of Contents

Related Manuals for REVELL Ultima Studio


Summary of Contents for REVELL Ultima Studio
- Page 1 Revel Ultima Studio™ Loudspeaker...
-
Page 2: Table Of Contents
CABINET ...5 UNPACKING...6 PLACEMENT ...8 ROOM ACOUSTICS...9 ROOM TREATMENT...10 INSTALLING SPIKES...11 CONNECTIONS...12 SINGLE-WIRED SYSTEM CONNECTIONS ...13 BI-WIRED SYSTEM CONNECTIONS ...14 BI-AMPLIFIED SYSTEM CONNECTIONS...15 SYSTEM OPTIMIZATION ...17 CABINET CARE...18 LOUDSPEAKERS AND POWER...18 PANEL REPLACEMENT...19 SPECIFICATIONS...21 SERVICE INFORMATION...23 REVEL ULTIMA STUDIO Owner’s Manual... -
Page 3: Introduction
For example, to insure compression-free operation during the most demanding pas- sages, the REVEL ULTIMA STUDIO includes large voice coils in each transducer, judiciously selected crossover points, and true 24 dB per octave networks. While the true test of any loudspeaker is the sound it reproduces, we think you’ll agree that this “clean... -
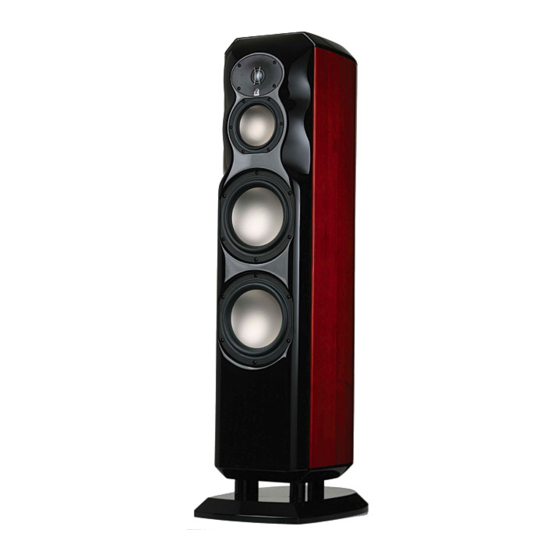
Page 4: Description
DESCRIPTION REVEL ULTIMA STUDIO features a transducer complement (see Figure 2) of two 8-inch woofers, a 5.25-inch midrange driver, and 1.1-inch tweeter. A second 0.75-inch tweeter (on the rear) provides added high-frequency energy to enhance overall “room response.” Tweeter Midrange... -
Page 5: Tweeters
• The cast magnesium frame provides optimum voice coil cooling and minimum reflections, while offering excellent rigidity. TWEETERS Each REVEL ULTIMA STUDIO also includes a pair of high-performance tweeters with these features: • True pistonic behavior throughout its entire operating range for a new level of freedom from coloration. -
Page 6: Unpacking
REVEL ULTIMA STUDIO. Do not lift it while bending from the waist. Each REVEL ULTIMA STUDIO is packed in its own carton with a shipping weight of 164 pounds (74.5 kg). To avoid personal injury and possible product damage, we strongly urge you to enlist additional help before unpacking either carton. - Page 7 Keep all packing materials for future shipping. In the unlikely event a product will need repair, Revel will only accept a unit in its original shipping carton. Using any other packing materials may result in damage to the product and is not covered by the warranty.
-
Page 8: Placement
NOTE: Set all loudspeaker controls to “zero” position during place- ment experimentation. If needed, refer to Figure 13 on page 17. • For best stereo imaging, place the REVEL ULTIMA STUDIO loudspeakers at equal distances from the main listening position and in symmetry with the room, as shown in Figure 6. -
Page 9: Room Acoustics
Here’s where real-world experience counts. We suggest consulting your Revel dealer for help in determining the optimum loudspeak- er and listener placement for your listening room. REVEL ULTIMA STUDIO... -
Page 10: Room Treatment
PLACEMENT (CONTINUED) ROOM TREATMENT REVEL ULTIMA STUDIO loudspeakers have very accurate off- axis response, which minimizes any degradation caused by overly “live” rooms. However, far superior performance will be achieved by placing at least minimal acoustic treatment materials at the pri- mary reflection points. -
Page 11: Installing Spikes
Spike 3. Assemble and tighten locking rings onto the front spikes. 4. Tilt the REVEL ULTIMA STUDIO in the other direction and install the other pair of spikes in the same manner. NOTE: If the loudspeaker is to be used on a hardwood or tile floor, use supplied spike covers. -
Page 12: Connections
Failure to do so will cause poor imaging and diminished bass response. • For bi-wired or bi-amplified applications, remove the shorting straps on the rear of each REVEL ULTIMA STUDIO loud- speaker (refer to Figures 9, 10, and 11 on the next three pages). (AWG) -
Page 13: Single-Wired System Connections
For single-wired applications, simply leave the shorting straps in place and connect the + and - from a single amplifier channel to the + and – terminals on the rear of the REVEL ULTIMA STUDIO, as shown in Figure 9. -
Page 14: Bi-Wired System Connections
BI-WIRED SYSTEM CONNECTIONS A bi-wired system involves two pairs of loudspeaker wires connected to a single amplifier channel. On the rear of the REVEL ULTIMA STUDIO, remove the shorting straps and connect the and of one pair of wires to the HIGH FREQUENCY INPUT terminals and the and of the other pair of wires to the LOW FRE- QUENCY INPUT terminals, as shown in Figure 10. -
Page 15: Bi-Amplified System Connections
VERTICAL BI-AMPLIFIED SYSTEM Using two identical amplifier channels, remove the shorting straps from the rear panel; then connect the REVEL ULTIMA STUDIO loudspeakers, as shown in Figure 11. CAUTION: Failure to remove the shorting straps when bi- amplifying may damage some amplifiers. - Page 16 CONNECTIONS (CONTINUED) HORIZONTAL BI-AMPLIFIED SYSTEM Using two amplifier channels, remove the shorting straps from the rear panel; then connect each REVEL ULTIMA STUDIO, as shown in Figure 12. CAUTION: Failure to remove the shorting straps when bi- amplifying may damage some amplifiers.
-
Page 17: System Optimization
STUDIO level control locations and initial settings. SYSTEM OPTIMIZATION 1. After connecting the REVEL ULTIMA STUDIO loudspeakers, initially set both HIGH FREQUENCY LEVEL controls on both rear panels to the “0” position, as shown in Figure 13. Set Both Tweeter... -
Page 18: Cabinet Care
CABINET CARE Each REVEL ULTIMA STUDIO loudspeaker cabinet has a paint finish and does not require any routine maintenance. Use a soft cloth, dampened with water only, to remove any fingerprints or to wipe off dust. Clean the grille by gentle vacuuming. -
Page 19: Panel Replacement
1. Lay a REVEL ULTIMA STUDIO on one side, on a soft sur- 2. Use the enclosed hex wrench to untighten the exposed side 3. Install a new side panel, as shown in Figure 14. Start all six bolts Figure 14. - Page 20 Be careful not to overtighten. Bolt Trim Ring 7. Stand the reassembled REVEL ULTIMA STUDIO upright. Repeat steps 1 through 6 to install new side panels on the other REVEL ULTIMA STUDIO. REVEL ULTIMA STUDIO Owner’s Manual Figure 15.
-
Page 21: Specifications
Sensitivity provides an indication of how much amplifier power is required for the loudspeaker to play at satisfactory volume levels. This conservatively-rated specification indicates moderate sensitivity and denotes that REVEL ULTIMA STUDIO does not require huge amplifiers to achieve realistic levels in all but the largest rooms. Impedance:... - Page 22 164 lb (74.4 kg) each carton Revel constantly strives to update and improve existing products, as well as create new ones. Therefore the specifi- cations and construction details in this and related Revel publications are subject to change without notice. Revel is a registered trademark of Revel, Inc.
-
Page 23: Service Information
Your Revel dealer can order a new set of shipping materials if you no longer have the original cartons. Since there will be a charge for this service, we strongly recommend saving all packing materials. - Page 24 8500 B ALBOA OULEVARD , CA 91329 ORTHRIDGE PH: (818) 830-8777 • FAX: (818) 892-4960 www.revelspeakers.com P/N 9301484-001...
Need help?
Do you have a question about the Ultima Studio and is the answer not in the manual?
Questions and answers