Table of Contents
Advertisement
Quick Links
Advertisement
Table of Contents

Related Manuals for Trumpf TruTool F 305 (1A2)


Summary of Contents for Trumpf TruTool F 305 (1A2)
- Page 1 Operator's manual TruTool F 305 (1A2) English...
-
Page 3: Table Of Contents
Contents Safety ..................4 General safety information...........4 Specific safety information...........4 Description .................5 Intended use ................6 Technical data of the TruTool F 305........7 Lock seams................8 Setting work ..............10 Installing the exhaust hose ..........10 Setting the tool..............11 Operation ................12 Operating the TruTool F 305 ..........12 Maintenance ..............15 Tightening screws with torque ...........16 Supplying with power and guaranteeing lubrication ..17... -
Page 4: Safety
Do not operate the machine above your head. Damage to property due to improper handling! Machine will be damaged or destroyed. Have servicing and inspections of hand-held compressed air Caution tools carried out by a qualified technician. Only use original accessories provided by TRUMPF. Safety E608EN_01.DOC... -
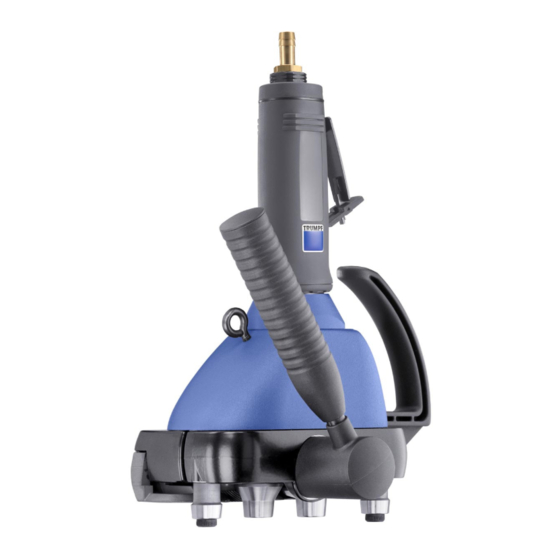
Page 5: Description
Description Setting lever for position: "Tool 18 Driver roller 75° 60 Suspension eyelet open" and "Tool in work position" 21 Guide rail 61 Lever 15 Supporting roller 25 Roller (horizontal) 62 Safety lever 17 Driver roller 30° 42 Handle 347 Sleeve Seam locker TruTool F 305 Fig. -
Page 6: Intended Use
Only use the machine for the tasks and materials described in "Intended use". Warning The TRUMPF TruTool F 305 seam locker is a hand-held device powered by compressed air used for the following applications: • Closing of Pittsburgh lock joints on correspondingly pre- machined workpieces, e.g. -
Page 7: Technical Data Of The Trutool F 305
Technical data of the TruTool F 305 Other countries Value Value Max. material thickness of steel 0.45-0.75 mm 0.018-0.03 in 400N/mm² Height of flange 5 mm 0.197 in Working speed 5-8 m/min 16-26 ft/min Nominal power consumption 600 W 600 W Weight 5.2 kg 11.5 lbs... -
Page 8: Lock Seams
Lock seams Material thickness range Height of Illustration "Pittsburgh flange (B) lock seam" geometry [mm] [in] [mm] 0.45-0.75 0.018-0.03 Height of flange Lock seam height "Pittsburgh lock seam" geometry Table 4 Note The lock seam quality depends essentially on the height of the flange B. - Page 9 Folding process sequence 30° 90° 75° First stage Third stage Second stage Folding process Fig. 13416 Description E608EN_01.DOC...
-
Page 10: Setting Work
Setting work Installing the exhaust hose The exhaust hose reduces noise emissions and guides the exhaust air away from the operator. Adapter Hose clip Teflon tape Exhaust hose Sleeve Spring ring compressed air hose Exhaust hose Fig. 52422 1. Put the exhaust hose (6) and the hose clip (5) over the compressed air hose (4). -
Page 11: Setting The Tool
Setting the tool The clearance between the rollers and the guide rails can be locked into place in two positions in order to be able to place the machine at the desired position of the channel or to be able to remove it from the machining position at the end of the channel: •... -
Page 12: Operation
Operation Risk of injury due to improper handling! Make sure the machine is always in a stable position when operating it. Warning Never touch the tool while the machine is running. Always move the machine during work away from your body. Do not operate the machine above your head. - Page 13 Advance direction Setting lever Fig. 13415 1. Move setting lever (1) in direction of feed to end position ("Tool in work position"). 2. Switch on machine and place against the beginning of the channel. The curved guide rail ensures a simple placement of the –...
- Page 14 Flange at the beginning of The machine cannot be placed up against the beginning of the channel. the channel Preparation of the channel so that the machine can be brought into position. Preformed suspension lug Fig. 13412 Move setting lever (1) into position against the direction of feed ("Tool open").
-
Page 15: Maintenance
Maintenance Risk of injury due to uncontrolled machine movements. Remove the compressed air hose when changing tools and before performing any maintenance work on the machine. Warning Risk of injury due to repair work not being carried out properly! Machine does not work properly. Warning Repair work may only be carried out by a qualified technician. -
Page 16: Tightening Screws With Torque
Tightening screws with torque 13 Roller (30°) 22 Slotted nut 14 Roller (75°) 23 Cylindrical pin 5 m 6x24 17 Driver roller (30°) DIN 6325 18 Driver roller (75°) View of the TruTool F 305 seam locker from below, Fig. 14423 the guide rail is dismounted. -
Page 17: Supplying With Power And Guaranteeing Lubrication
Supplying with power and guaranteeing lubrication Damage to property due to improper handling! Failure of the compressed air motor. Do not exceed the maximum operating pressure. Caution Regularly lubricate the compressed air motor. Install an oil mist lubrication device into the compressed air line. Supplying compressed air Condition •... -
Page 18: Replacing Fins
Hold a piece of paper in front of the exhaust air vent in the Checking the oil supply motor housing when the machine is running. The oil supply is sufficient when oil spots appear. When there is no oil mist lubrication device available: Fill the air inlet bore hole with 0.5-1 ccm of oil every two hours. -
Page 19: Cleaning The Strainer
Cleaning the strainer Dirty strainers decrease machine performance. Muffler Air inlet with strainer Housing ring Air inlet Fig. 52402 1. Remove the air inlet with strainer. 2. Clean the strainer or replace the complete air inlet. 3. Reinstall the air inlet. Changing mufflers Change the mufflers as needed (see Fig. -
Page 20: Original Accessories And Wearing Parts
– Desired delivery type (e.g. air mail, courier, express mail, – ordinary freight, parcel post). 4. Send the order to your TRUMPF representative. Refer to the address list at the end of the document for TRUMPF service addresses. Disposal For disposal, completely disassemble the machine, degrease and recycle according to the type of material.
Need help?
Do you have a question about the TruTool F 305 (1A2) and is the answer not in the manual?
Questions and answers