Table of Contents
Advertisement
Quick Links
Advertisement
Table of Contents

Related Manuals for TESmart HMA0404A40


Summary of Contents for TESmart HMA0404A40
- Page 1 User 4x4 HDMI Matrix Manual HMA0404A40 English...
- Page 3 If you have any questions, comments or suggestions, you can contact us via the following email: support@tesmart.com. Copyright Notice The user manual, compiled by Tesla Elec Technology, shall not be duplicated or translated by any person or organizations without written permission.
-
Page 4: Table Of Contents
Contents 1. Safety Tips and Warnings·························································································································01 2. Battery Description································································································································02 3. Warranty Information·····························································································································03 4. Preface···············································································································································04 5. Features··············································································································································05 6. Packing List·············································································································································06 7. Panel Description··································································································································07 8. Connection Description··························································································································09 8.1 Connection Diagram··························································································································09 8.2 Connection Steps·····························································································································10 9. Operation Method·································································································································11 9.1 Front Panel Button Switching Method····································································································11 9.2 IR Remote Control·····························································································································12 9.3 RS232 Control··································································································································14... -
Page 5: Safety Tips And Warnings
1. Safety Tips and Warnings Tips: Read the safety tips and warnings for HDMI Matrix comprehensively before use. Use this produce in accordance with its instructions, safety tips and warnings to prevent unnecessary damage to the product and potential dangers to users. Keep the product away from water. -
Page 6: Battery Description
2. Battery Description Tips: By default, the remote control is not equipped with batteries, due to the safety requirements of some express companies. Install CR2025 cell before use. Caution: Improper disposal of the lithium battery may cause an explosion. Do not throw the battery into fire. -
Page 7: Warranty Information
3. Warranty Information We warrant this product as free of defects in material and workmanship for a period of one (1) year from the date of shipment. If during the period of warranty this product proves defective under normal use, we will repair or replace this product, provided that this product has not been subjected to mechanical, electrical, or other abuse or modifications. -
Page 8: Preface
You can switch input ports with front panel buttons, IR signals and RS232 port. Tips: If you need to control more devices or conduct more complex and professional switching, you can also choose other products of our company. For more details, you can visit our official website: www.tesmart.com. -
Page 9: Features
5. Features Each HDMI output can share same input or select standalone input Ÿ Support resolution up to 3840x2160@30Hz Ÿ HDCP1.4 compliant Ÿ Support PCM, Dolby AC3, DTS5.1 and DSD audio format Ÿ Matrix status could be memorized after power down, automatically restore previous Ÿ... -
Page 10: Packing List
6. Packing List 1 * 4x4 HDMI Matrix Ÿ 1 * IR Remote Control Ÿ 1 * DC 12V Power Adapter Ÿ 1 * User Manual Ÿ Tips: After receiving the product, please check the packing list carefully to make sure that no components have been lost and no damage to the product has been caused during transportation. -
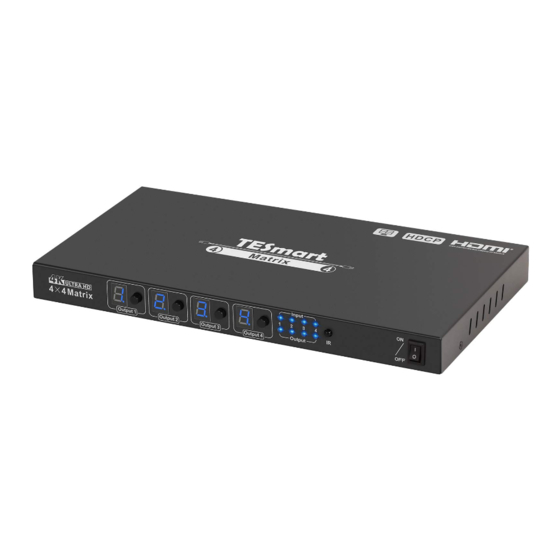
Page 11: Panel Description
7. Panel Description Name Description Name Description The LEDs are on to indicate that the Output Digital Display current selected input source corresponding HDMI output device has been connection display number. connected to the output port and the device status has been recognized. - Page 12 Name Description DC 12V DC 12V power supply. HDMI input ports Connect HDMI source devices. HDMI output ports Connect to HDMI displays. Connect this port to control termination. Use RS232 commands to select input RS232 port sources.
-
Page 13: Connection Description
8. Connection Description 8.1 Connection Diagram UHD TV UHD TV UHD TV UHD TV RS232 Tips: Please refer to Chapter 9.3 for how to use the RS232 port. Control Terminal... -
Page 14: Connection Steps
8.2 Connection Steps 1. Connect the input devices to the input ports using 4 HDMI cables. 2. Connect the output ports to the display devices using 4 HDMI cables. 3. Connect the power cable to the HDMI Matrix's DC 12V port and plug it to a power socket. -
Page 15: Operation Method
9. Operation Method 9.1 Front Panel Button Switching Method The digital display shows the input port number selected by the current output port, and the button beside every digital display is the input selection button. Select the output channel you want to control on the front panel (one of "Output 1 ~ Output 4"), continuously press the input selection button beside its digital display, the digital display will cycle from 1 to 4, until the digital display of the output channel shows the input port number you want. -
Page 16: Ir Remote Control
9.2 IR Remote Control 1 to 1 switch: Step 1: Press any key in ① to select the output port. Step 2: Press any key in ③ to select the source which you want to be displayed on selected output. 1 to all switch: Step 1: Press the key ②... - Page 17 Preset routing for scenes: Save preset: Step 1: Press the key in ⑤. Step 2: Press any key in ⑤ to save current routing status to user preset memory 1/2/3/4. Load preset: Step 1: Press the key in ⑤. Step 2: Press any key in ⑤ to load routing status from user preset memory 1/2/3/4 and apply to current routing.
-
Page 18: Rs232 Control
9.3 RS232 Control A. Connect RS232 port Follow the diagram below to connect RS232 port on the HDMI Matrix to your PC. RS232 Control Terminal... - Page 19 B. Communication protocol Baud rate: 9600 bps Stop bit: 1 bit Data length: 8 bits The commends are as the following form: Index Commend strings Parameter description Remark Direction PC→ MT00SW0000NT Mirrored output 1→1, 2→2… Matrix PC→ MT00SW 00NT XX: input port number(01~04) 1 input to all outputs Matrix XX: input port number(01~04)...
- Page 20 C. RS232 port usage: Step 1: Use RS232 cable connect PC to HDMI Matrix. Step 2: Running the HDMI Matrix Controller. Select page 'General' and click 'Serial control'. Step 3: Select the serial communication port number which is connected to the HDMI Matrix. Step 4: Click 'Connect' to connect to the HDMI Matrix.
- Page 21 Windows OS. you can visit our official website to download it: www.tesmart.com. Yo u c a n a l s o d e ve l o p d e d i c a t e d controllers for each platform by referring to the control protocol in Section B.
- Page 22 Page 'Matrix Control' : This page is used for switching and simple system setup. You can conveniently match input and output devices according to your needs. 1-Switch control panel Tips: The LED display timeout part of the software has no practical function.
- Page 23 31.00.0416-V008...
- Page 24 To Enjoy Smart HMA0404A40 Tesla Elec Technology Co.,Ltd WEEK-Reg.-Nr. DE 66784279...
Need help?
Do you have a question about the HMA0404A40 and is the answer not in the manual?
Questions and answers