Table of Contents
Advertisement
Available languages
Available languages
Quick Links
Advertisement
Table of Contents

Related Manuals for Lupine SL MINI MAX


Summary of Contents for Lupine SL MINI MAX
- Page 1 MINI MAX...
-
Page 2: Montage
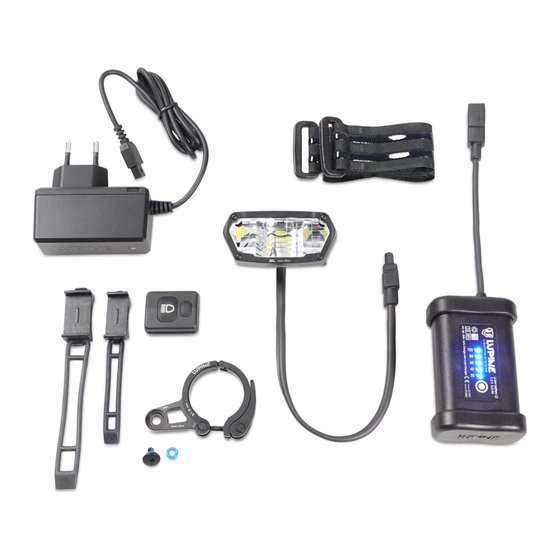
Sicherheitshinweise Montage Warnung! Niemals absichtlich den Lichtstrahl in die eigenen oder in die Augen anderer Personen richten. Falls ein Lichtstrahl in die Augen trifft, sind die Augen bewusst zu schließen und der Kopf aus dem Lichtstrahl zu bewegen. Es dürfen keine op- tisch stark bündelnden Instrumente zur Betrachtung des Lichtstrahls verwendet werden. - Page 3 Montage Kabelgebundener Taster Wie unten im Bild dargestellt, muss die Fernbedienung im Sichtbereich neben dem Griff montiert werden. Anschließend die Schraube mit Hilfe des beiliegen- 4. Richte die Lampe mit Halter den Werkzeugs befestigen. (31.8mm) vorsichtig aus und schraube sie mit dem beiliegenden 2,5er Sechs- kantschlüssel mit max.
-
Page 4: Bedienung
Leistung / Spannung Kompatibilität prüfen, Der Antrieb ist mit der Helligkeitssensor Bemerkung siehe www.lupine.de Lampe nicht kom- Modus Der Sensor ist aktiviert. Bei aktiviertem Abblendlicht: Umschalten in patibel die Fernlichtfunktion über den kabel- gebundenen Taster möglich. Die Lampe schaltet Abblendlicht ist nicht aktiv (Umschalten nur bei ... - Page 5 Individuelle Einstellungen über den Taster der Fernbedienung: Taster gedrückt halten Verfügbare Einstellungen Erklärung bis die Lampe auf- leuchtet (loslassen zur Auswahl) 22W Modus Fernlichtfunktion: 22W, Abblendlicht: 8W, 2W Tagfahrlichtfunktion 1x aufleuchtet Hinweis: Nicht für Bosch Systeme empfohlen, da diese zu wenig Leistung zu Verfügung stellen 2x aufleuchtet Verzögerung Das sensorgesteuerte Umschalten von Abblendlicht auf Tagfahrlichtfunktion...
-
Page 6: Technische Daten
Im Falle eines Defekts, selbst dann wenn nur eine LED ausgefallen ist, geht die Leuchte aus und muss ersetzt werden. Selbst dann wenn nur eine LED ausge- Linsensystem Reflector System fallen ist. Ein Tausch bzw. Reparatur ist nur bei Lupine möglich. Baugröße LxBxH 37 x 69 x 34mm Material Aluminium 6061-T6, CNC gefräst... -
Page 7: Safety Instructions
Safety instructions Assembly Warning! Avoid looking directly into the light emitted by the light or shining the light into your own eyes or the eyes of another person. If the light accidentally shines into your eyes, close your eyes and move your head out of the light beam. - Page 8 Assembly Assembly 3. Position the lamp together 5. Bend the wired remote control with the the clamp at the prefe- open a bit and pull it over the red side of the stem. Then bring handlebar. both halfs of the mount together. Adjustment of the lamp: 4.
-
Page 9: Wired Remote
Wired remote As shown in the picture down below, the wire remote should be mounted right Turn on: next to the handle. Then attach the screw with the enclosed hex key size 1.5. 1. Activate the light at the display. 2. -
Page 10: Operation
Operation Customizing the settings via the button on the wired remote: Keep the button Available settings Explanation pressed until it lights (let go to select) Lights up 1x 22W mode High beam: 22W, Low beam: 8W, 2W daytime running light Note: Not recommended for Bosch systems, because they don‘t provide enough power. -
Page 11: Troubleshooting
The light does not Low beam is not activated. Approval StVZO K2258 switch to high beam (Only in the dark, it‘s possible to switch to high beam) Display shows error Set back to factory setting. code Check compatibility, www.lupine.de ... - Page 12 Motor cut-off to avoid a deep discharge of the battery. Defects: Light source must be replaced in general if the light source (or one of the LEDs) is defective. Replacement or repair only at Lupine. More informations at www.lupine.de EC Declaration of Conformity: www.lupine.de/ce/...
- Page 13 Lupine lighting systems GmbH Im Zwiesel 9, 92318 Neumarkt, Germany Phone: +49 (0) 91 81 - 50 94 90 Fax: +49 (0) 91 81 - 50 94 915 E-Mail: info@lupine.de www.lupine.de...
Need help?
Do you have a question about the SL MINI MAX and is the answer not in the manual?
Questions and answers