Table of Contents
Advertisement
Available languages
Available languages
Quick Links
Advertisement
Table of Contents

Related Manuals for Lupine sl f nano classic


Summary of Contents for Lupine sl f nano classic
- Page 1 classic...
- Page 2 Sicherheitshinweise Warnung! Niemals absichtlich den Lichtstrahl in die eigenen oder in die Augen anderer Personen richten. Falls ein Lichtstrahl in die Augen trifft, sind die Augen bewusst zu schließen und der Kopf aus dem Lichtstrahl zu bewegen. Es dürfen keine op- tisch stark bündelnden Instrumente zur Betrachtung des Lichtstrahls verwendet werden.
-
Page 3: Montage
Montage 1. Befestige das Schutzblech und den Adapter mit der bereits vorhandenen 3. Positioniere nun den Classic Mount an dem zuvor montierten Adapter Schraube an der Gabelbrücke / Gabelkrone. und ziehe die beiden TX15 Schrauben handfest an. 2. Fixiere den Classic Mount mit den beiden beiliegenden TX15 Schrauben an 4. - Page 4 Bedienung und Programmierung Kabelgebundener Taster Wie unten im Bild dargestellt, wird der kabelgebundene Taster neben dem Einschalten: Griff montiert. Anschließend die Schraube mit Hilfe des beiliegenden M2 Inbus 1. Aktivieren des Lichtausgangs über das Display. befestigen. 2. Einschalten der Leuchte an der Fernbedienung. Leuchtprogramme Der Taster leuchtet nicht Nach dem Einschalten leuchtet die Lampe, je nach Umgebungslicht, im Tag-...
-
Page 5: Fehlerbehebung
An der Fernbedienung lassen. freigeschalten. Kompatibilität prüfen, Der Antrieb ist mit der Leuchtmittel 2x Osram Automotive LEDs siehe www.lupine.de Lampe nicht kom- patibel. Linsensystem Bikonische TIR Linse Baugröße LxBxH 30 x 41 x 41mm Auf Werkseinstellung Der ECO Modus ist ... -
Page 6: Safety Instructions
Abblendlicht inkl. der Fernlichtfunktion deaktiviert. Ein Tausch bzw. Reparatur the LEDs) is defective. ist nur bei Lupine möglich. Heat generation: The housing of SL may heat up; so make sure that you always keep the light at a safe distance to any combustible or flammable materials. - Page 7 Assembly 1. Use the existing screw to mount the mudguard and the adapter to the 3. Position the classic mount at the already mounted adapter, screw it on fork crown / triple clamp. using both TX15 screws. 2. Mount the classic mount to the lamp, using two of the enclosed TX15 4.
-
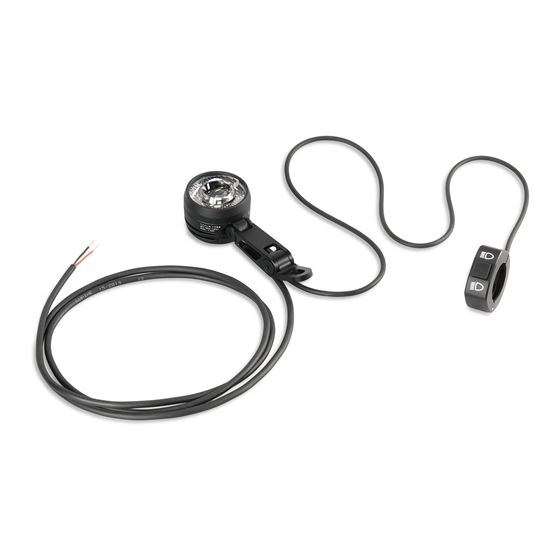
Page 8: Wired Remote
Operation Wired remote As shown in the picture down below, the wire remote should be mounted right Turn on: next to the handle. Then attach the screw with the enclosed allen key size 2. 1. Activate the light at the display. 2. -
Page 9: Troubleshooting
Operation Wired remote is too low. Check compatibility, The drive unit is not Lamp www.lupine.de compatible with the 2x Osram Automotive LEDs lamp. Lens system Biconical TIR Lens Reset to factory The output is darker ECO mode is activated ... - Page 10 Motor cut-off to avoid a deep discharge of the battery. Defects: Light source must be replaced in general if the light source (or one of the LEDs) is defective. Replacement or repair only at Lupine. More informations at www.lupine.de EC Declaration of Conformity: www.lupine.de/ce/...
- Page 11 Lupine lighting systems GmbH Im Zwiesel 9, 92318 Neumarkt, Germany Phone: +49 (0) 91 81 - 50 94 90 Fax: +49 (0) 91 81 - 50 94 915 E-Mail: info@lupine.de www.lupine.de...
Need help?
Do you have a question about the sl f nano classic and is the answer not in the manual?
Questions and answers