Table of Contents
Advertisement
Available languages
Available languages
Quick Links
Advertisement
Table of Contents

Related Manuals for Lupine SL Mono


Summary of Contents for Lupine SL Mono
- Page 1 MONO...
- Page 2 Sicherheitshinweise Warnung! Niemals absichtlich den Lichtstrahl in die eigenen oder in die Verhalten bei Defekten: Im Falle eines Defekts muss der Scheinwerfern Augen anderer Personen richten. Falls ein Lichtstrahl in die Augen trifft, bzw. Lichtquelle generell ersetzt werden. Selbst dann wenn nur eine sind die Augen bewusst zu schließen und der Kopf aus dem Lichtstrahl LED ausgefallen ist.
-
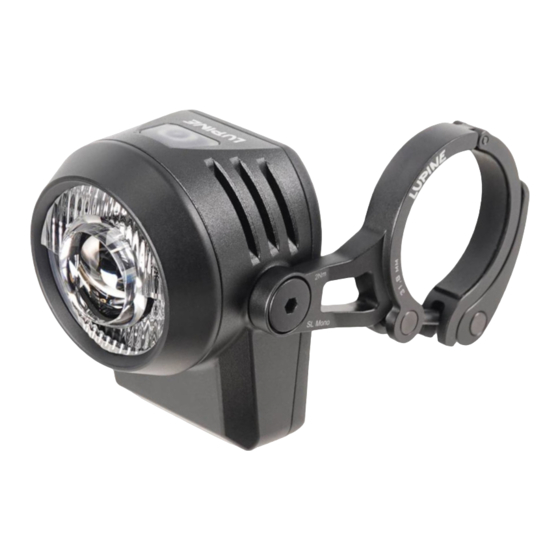
Page 3: Montage
Montage Montage Montage des Schnellspanners: Montage am Lenker: Zur Feinjustierung an dem Die Lampe mittig am Lenker Sowohl zwischen Lampenkopf und Halter, als auch zwischen Hebel des Schnellspanners Halter und Schraube muss je ein O-Ring platziert werden. montieren und die Schelle des drehen. -
Page 4: Bedienung
Bedienung Bedienung Einschalten: Helligkeitssensor: Durch einen schnellen Doppelklick wird der Scheinwerfer Ist der Helligkeitssensor aktiviert, wechselt die Lampe je nach Umgebungslicht automatisch zwischen Tagfahrmodus und eingeschaltet. Abblendlicht. Ist das Abblendlicht aktiv kann über den Taster Umschalten: am Lampenkopf in ein gedimmtes Abblendlicht gewechselt Mit einem kurzen Tastendruck werden die verschiedenen werden, der Sensor ist weiterhin aktiv. - Page 5 Bedienung Pflege, Lagerung und Laden Akkuwarnung am Lampenkopf während des Betriebs: Lampe: Bei Verschmutzung reinigen Sie den Scheinwerfer äußerlich 1. Warnung, geringe Restkapazität. Taster leuchtet rot: mit warmem Wasser und etwas Spülmittel. 2. Warnung, sehr geringe Restkapazität, Taster blinkt rot: sofort nachladen.
-
Page 6: Fehlerbehebung
- Akku ist alt - Austauschen zu gering 3300mAh / 3.7V Li-Po / 12.2 Wh IP68 - Sehr tiefe - Akku warm halten Temperaturen Ladezeit: Einsatzbereich: 3.5h -5°C bis +50°C Gewicht: Zulassung: 115g StVZO K1824 Mehr Informationen unter www.lupine.de EG Konformitätserklärung: www.lupine.de/ce/... -
Page 7: Safety Instructions
Technische Daten Safety instructions Warning! Avoid looking directly into the light emitted by the light or shi- Regelungen: ning the light into your own eyes or the eyes of another person. If the Die Verwendung dieses Beleuchtungssystems für bestimmte light accidentally shines into your eyes, close your eyes and move your head out of the light beam. - Page 8 Safety instructions Assembly instrucions Assemble the quickrelease to the lamphead: Heat generation: The housing of SL may heat up; so make sure that you always keep the light at a safe distance to any combustible or flamma- ble materials. Could cause fire or death! However, quiescent operation (without cooling the light housing via airflow or the like) is possible at any time and will not damage the product.
-
Page 9: Operation
Keep the button pressed until the lamp lights up as many For proper setup screw on Position the SL Mono centric at times you‘ll need it to, let go to select. Note: It will take about 6 the lever of the quick- re- the handlebar. - Page 10 Operation Operation Light sensor : Battery warning at the lamphead in operation: If the light sensor is activated, the lamp will switch between 1. Warning, low capacity remaining. Button lights red: daytime running light and low beam automatically, depending to the ambient light. If low beam is activated you can switch 2.
-
Page 11: Troubleshooting
- Charge battery little dishsoap. The lamp doesn‘t discharged come on - LED is broken - Contact Lupine Battery: Before longer periods of not using the lamp, fully charge the The runtime is - Battery is empty - Charge battery lamp and store it in a cool, dry place such as a basement, etc. -
Page 12: Technical Data
The warranty does not Weight: Approval: include the battery, however. In addition, any modification or 115g StVZO K1824 improper use of the product will void the warranty. More informations at www.lupine.de EC Declaration of Conformity: www.lupine.de/ce/... - Page 13 Lupine Lighting Systems GmbH Im Zwiesel 9, 92318 Neumarkt, Germany Phone: +49 (0) 91 81 - 50 94 90 Fax: +49 (0) 91 81 - 50 94 915 E-mail: info@lupine.de www.lupine.de SL A...
Need help?
Do you have a question about the SL Mono and is the answer not in the manual?
Questions and answers