Table of Contents
Advertisement
Quick Links
Advertisement
Table of Contents

Related Manuals for Pro-Ject Audio Systems X8


Summary of Contents for Pro-Ject Audio Systems X8
- Page 1 INSTRUCTIONS FOR USE...
-
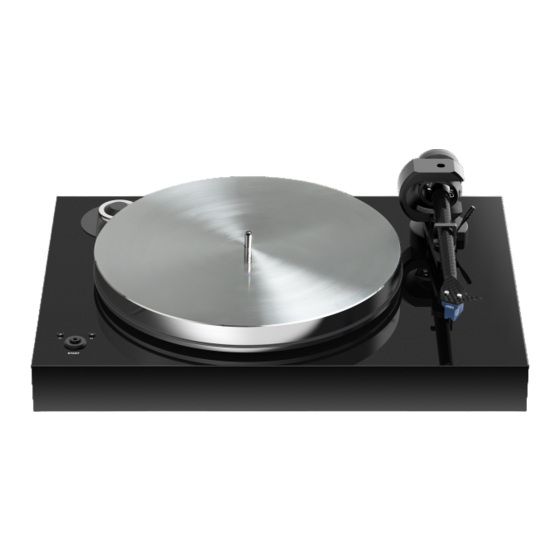
Page 2: Turntable Overview
© Pro-Ject Audio Systems · Pro-Ject X8 · Revision 2022.02.01... -
Page 3: Accessories Overview
Allen key 1.5mm Allen key 3mm Counterweight no. 46 for cartridges with weight between 7 - 10g Single adaptor Connect IT E 5P 1,23m Power supply (10) White cotton gloves © Pro-Ject Audio Systems · Pro-Ject X8 · Revision 2022.02.01... -
Page 4: Table Of Contents
8. SWITCHING ON AND OFF 9. CHANGING REPLAY SPEED 10. ADJUSTING THE VERTICAL TRACKING ANGLE (VTA) 11. ADJUSTING THE AZIMUTH 12. USEFUL TIPS 13. MAINTENANCE AND CLEANING TECHNICAL SPECIFICATIONS WARRANTY, SERVICE PACKAGING © Pro-Ject Audio Systems · Pro-Ject X8 · Revision 2022.02.01... -
Page 5: Setup And Installation
Please check immediately to make sure that neither the packaging nor the device was damaged in transit. SETUP AND INSTALLATION PLATTER AND DRIVE BELT ASSEMBLY Install the drive belt (4) and the platter (1) as shown in following ilustration. © Pro-Ject Audio Systems · Pro-Ject X8 · Revision 2022.02.01... -
Page 6: Mounting And Connecting The Cartridge
The full sound quality of the record player can only be achieved if the cartridge is adjusted correctly. Particular tools like the Pro-Ject Audio Systems alignment tool are required to accomplish this job properly. If you are not well acquainted with the adjustment of cartridges, please call for the willing help of your Pro- Ject Audio Systems dealer. -
Page 7: Connection To The Amplifier
MM or MC cartridges is required. It has to be connected between record player and a free line level input of the amplifier. For detailed product information regarding Pro-Ject Audio Systems interconnect cables and phono amplifiers please visit our website: www.project-audio.com... -
Page 8: Changing Replay Speed
A small screw at the bearing end of the arm allows incorrect azimuth to be corrected. Slacken off the screw just enough to be able to revolve the arm tube without applying force. Note! Do not remove this screw completely! © Pro-Ject Audio Systems · Pro-Ject X8 · Revision 2022.02.01... -
Page 9: Useful Tips
Outboard power supply 15V/ 0.8 A DC, universal power supply Dimensions (W x H x D) 465 x 150 x 350mm, dust cover open 465 x 415 x 420mm Weight 15 kg © Pro-Ject Audio Systems · Pro-Ject X8 · Revision 2022.02.01... -
Page 10: Warranty, Service
This guide was produced by: Pro-Ject Audio Systems deemed necessary to uphold the ongoing process of © Copyright 2022. All rights reserved. technical development. © Pro-Ject Audio Systems · Pro-Ject X8 · Revision 2022.02.01... - Page 11 © Pro-Ject Audio Systems · Pro-Ject X8 · Revision 2022.02.01...
- Page 12 In case of damage due to alternative packaging, your dealer cannot guarantee a full refund. • complete manual: www.project-audio.com/en/product/x8 Unpack all items from accessory bag: Remove dust cover carton from the box. Lift the wrapped turntable out of the box.
- Page 13 Find your dealer here: www.project-audio.com/en/find-a-dealer/ A Pro-Ject Audio Systems warranty relates to claims of defects in materials and/or workmanship at the time of purchase. It does not cover: Service Should you encounter a problem which you are not able to alleviate or identify despite the above information, please contact your dealer for further •...
Need help?
Do you have a question about the X8 and is the answer not in the manual?
Questions and answers