Table of Contents
Advertisement
Quick Links
Advertisement
Table of Contents

Subscribe to Our Youtube Channel
Related Manuals for Hyundai H-CDM8015


Summary of Contents for Hyundai H-CDM8015
- Page 1 H-CDM8015 CD/MP3-RECEIVER CD/MP3- Instruction manual...
-
Page 2: Table Of Contents
Dear customer! Thank you for purchasing our product. For safety, it is strongly recommended to read this manual carefully before connecting, operating and/or adjusting the product and keep the manual for reference in the future. Table of contents Table of contents ..............................2 Important safeguards..............................3 Installation/Connections............................5 Panel controls.................................8... -
Page 3: Important Safeguards
Important safeguards Read carefully through this manual to familiarize yourself with this high-quality sound system. Use only in a 12-volt DC negative-ground electrical system. Disconnect the vehicle's negative battery terminal while mounting and connecting the unit. When replacing the fuse, be sure to use one with an identical amperage rating. Using a fuse with a higher amperage rating may cause serious damage to the unit. - Page 4 When extending the ignition, memory backup or ground cable, use diameter of 0.75mm (AWG18) or more automotive grade cable to avoid wire deterioration or damage to the wire coating...
-
Page 5: Installation/Connections
Installation/Connections Din front-mount (method 1) After inserting the holder into the dashboard, select the appropriate tab and bend them inwards to secure to the place Insert fingers into the groove in the front of frame and remove it. Insert the levers supplied with the unit to the grooves at both sides. The unit can be installed or removed from the dashboard. - Page 6 1. Dashboard 2. Nut (5mm) 3. Spring washer 4. Screw (5 x 25mm) 5. Screw 6. Strap 7. Plain washer Din rear-mount (method 2) Installation using the screw holes at both sides of the unit. 1. Select a position where the screw holes of the main unit are fitted for aligned, and tighten the screws at 2 positions at each sides.
- Page 7 Electrical connections...
-
Page 8: Panel Controls
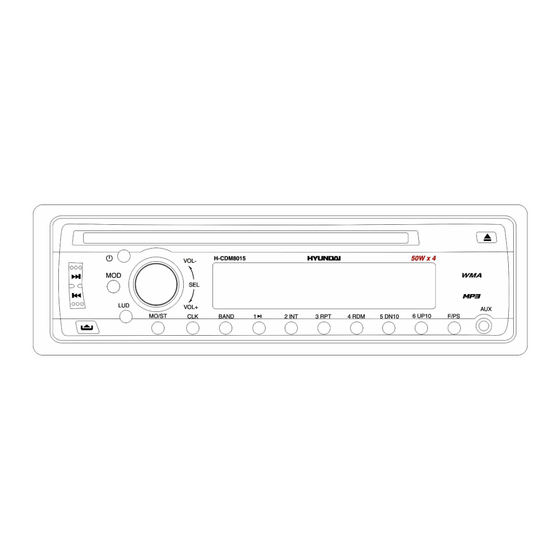
Panel controls 1. PREVIOUS/NEXT button 2. POWER button 3. VOLUME knob/SEL button 4. Disc slot 5. EJECT button 6. AUX in 7. F/PS button 8. 6/UP 10 button 9. 5/DN 10 button 10. 4/RDM button 11. 3/RPT button 12. 2/INT button 13. -
Page 9: General Functions
General functions Turning on/off Press any key on the front panel to turn the unit on. Press POWER button again to turn the unit off. Mode Press MODE button to select between Aux, Radio mode and CD/MP3 mode. Volume control The volume level can be adjusted at any time by rotating VOLUME knob. - Page 10 DSP mode Press and hold SEL button for 2 seconds, the display will show DSP OFF. Rotate VOLUME knob to choose EQ effect: ROCK CLASSIC FLAT DSP OFF After you have reached your desired effect, leave the unit idle in order for the new setting to take effect. Clock setting The clock can be set anytime when the power is on.
-
Page 11: Radio Operations
Radio operations Choose Radio Band Press BAND button to operate the radio function. (Even when CD is playing). Total 3 sets of FM Band (FM1, FM2, FM3) and 2 sets or MW Band (MW1, MW2) are available. In each set of bands can be stored up to 6 preset stations, making total 30 preset memory stations. - Page 12 MULT This unit can read multi-session CDs. The multi-session reading will be activated automatically if the player detects a file that is written in multi-session format. Press and hold SEL button, then press SEL button to cycle through the menu selections until "MULT OFF" is shown. Use VOLUME knob to choose "MULT ON" or "MULT OFF". The default is MULT OFF.
-
Page 13: Mp3/Cd Play Back
MP3/CD Play back Electronic Shock Protection (ESP) CD Electronic Shock Protection The electronic shock protection is ideal for driving uneven road. Press SEL button for 2 seconds, the display will show “DSP OFF”. Press the button again so that “ESP 12” will be shown on the display indicating that Electronic Shock Protection for 12 seconds will be activated. - Page 14 Character search Press F/PS button for thrice, the display will show “CHAR SCH”. This is for searching the computer file names of the MP3 songs. At this moment, press SEL button so that the letters will blink on the display. Rotate the knob to select the character and press SEL button once to advance to the next.
-
Page 15: Mp3 Overview
MP3 Overview Notes on MP3 MP3 is short for MPEG Audio Layer 3 and refers to an audio compression technology standard. This product allows playback of MP3 files on CD-ROM, CD-R or CD-RW discs. The unit can read MP3 files written in the format compliant with ISO 9660. However it does not support the MP3 data written by the method of packet write. - Page 16 disc. You should not write non-MP3 files or unneeded folders along with MP3 files on the disc otherwise it takes a long time until the unit starts to play MP3 files. With some CD-R or CD-RW media, data may not be properly written depending on their manufacturing quality.
-
Page 17: Anti-Theft System
Anti-Theft System This unit is equipped with a slide-down detachable panel. Removing this panel makes the radio totally inoperable. Place the detachable panel into the case. 1. Switch off the power of the unit. 2. Remove the detachable panel. 3. Gently press the button of the case and open the cover. 4. -
Page 18: Handling Compact Discs
Handling compact discs Dirty, scratched or warped discs may cause skip ping or noise. Handle the disc only by the edges. To keep clean do not touch its surface. Discs should be stored in their cases after use to avoid scratches. Do not expose discs to direct sunlight, high humidity, high temperature or dust. -
Page 19: Components
Components Nut 5 mm 1 pc. Spring washer 2 pcs. Screw M5x25 mm 1 pc. Screw 1 pc. Plain washer 2 pcs. Strap 1 pc. 2 pcs. Mounting collar 1 pc. Wire connector 1 pc. Removable face plate case 1 pc. Trim plate 1 pc. -
Page 20: Troubleshooting Guide
Troubleshooting guide No power or no sound Car's engine switch is not on. Turn your car's key to ACC or ON. Cable is not correctly connected. Check connection. Fuse is burnt. Replace fuse. Check volume or mute on/off. If above solutions cannot help, press RESET button. Disc is inside but no sound Disc is upside down. -
Page 21: Specification
Specification General Power supply: 12V DC (11V-16V), Test voltage 14.4V, negative ground Maximum power output: 50Wx4 channels Rated power output (RMS): 25Wx4 channels (4 10% T.H.D.) Suitable speaker impedance: 4-8 ohm Pre-Amp output voltage: 2.0V(CD play mode: 1KHz, 0 dB, 10 K load) Fuse: 10A/1A Dimensions (WxHxD) / Weight... - Page 22 Frequency response: 20 Hz - 20 kHz Signal/noise ratio: >80 dB Total harmonic distortion: Less than 0.2 %(1 kHz) Wow and flutter: Below measurable limits Channel separation: >55 dB Specifications are subject to change without notice. Mass and dimension are approximate.
- Page 23 ................................23 ...........................24 .............................26 ..........................30 ............................31 ...............................33 MP3 ............................35 3................................38 ..........................40 ..........................41 ..............................42 ..............................43 ....................44 ..........................45...
- Page 24 12 .
- Page 27 (5 x 25 (4 8...
- Page 30 PREVIOUS/NEXT POWER VOLUME/ EJECT F/PS 6/UP 10 5/DN 10 4/RDM 3/RPT 2/INT 1/PLAY/PAUSE BAND MO/ST LOUD MODE RELEASE...
- Page 31 POWER MODE, Aux, CD/MP3 : bass ( ), treble ( balance ( fader ( VOLUME, BEEP VOLUME «DSP OFF». SEL, «BEEP OFF», VOLUME BEEP ON ( BEEP OFF (...
- Page 32 LOUD LOUD, DSP. VOLUME ROCK CLASSIC FLAT DSP OFF CLK, VOLUME VOLUME CLK,...
- Page 33 BAND 3 FM (FM1, FM2, FM3) (MW1, MW2). PREVIOUS/NEXT PREVIOUS/NEXT; MO/ST, STEREO MONO F/PS F/PS,...
- Page 34 LOC ( LOC, (LOC ON- (LOC OFF- LOC. SEL, SEL, MULT “MULT ON” ( “MULT OFF” ( “MULT OFF”. (SEEK) “SEEK 1” “SEEK 2”. Seek 1 PREVIOUS NEXT. Seek 2 PREVIOUS NEXT. (Color) COLOR 1 COLOR 2 (...
- Page 35 (ESP) CD (12 "DSP OFF". "ESP 12" , "ESP 45". PREVIOUS/NEXT 5/DN10 6/UP10 F/PS, “TRK SCH”. SEL, “TRK” F/PS “FILE SCH”. SEL,...
- Page 36 F/PS “CHAR SCH”. SEL, NEXT NEXT PREVIOUS PREVIOUS 1/PLAY/PAUSE 2/INT "RPT ON.".
- Page 37 3/RPT «RPT ON» ( 4/RDM «RDM» ( «RDM ON» (...
- Page 38 MPEG 3 CD-ROM, CD-R CD-RW. ISO 9660. “.mp3”. “.mp3”, “ MP3” “ ”, PC “ ” “ ” 256. . VBR:...
- Page 39 CD-R CD-RW, MP3. 44,1 ISO 9660, CD-R MP3 CD-R CD-RW CD-R CD-RW CD-R CD-RW 1. ID3TAG.
- Page 40 POWER RELEASE,...
- Page 43 (5 25...
- Page 44 30 , NO FILE: ERR-7: ERR-10: ERR-11: ERR-3: ERR-4: EJECT EJECT, RESET EJECT...
- Page 45 – 16 14,4 , (RMS): 10 % .D.) 4 – 8 10 /1 CD: 1 , 10 178 50 162 ESP: CD (40 ), MP3 (120 ) 87.5 – 108.0 = 50 – 15...
- Page 46 522-1620 = 20 - 20 > 80 0.2 % (1 > 55...
Need help?
Do you have a question about the H-CDM8015 and is the answer not in the manual?
Questions and answers