Advertisement
Available languages
Available languages
Quick Links
Advertisement

Subscribe to Our Youtube Channel
Related Manuals for auna Connect 90


Summary of Contents for auna Connect 90
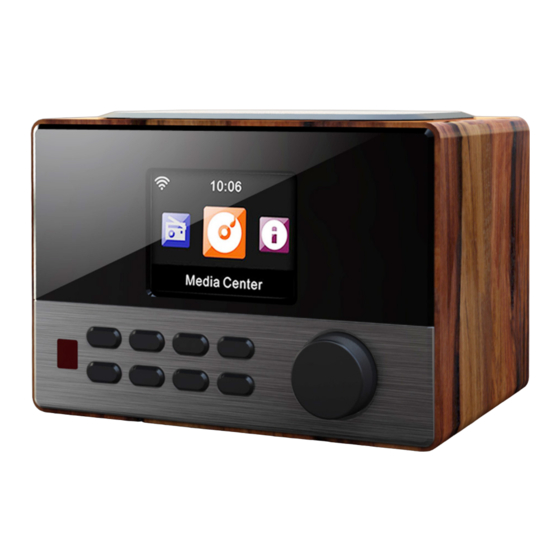
- Page 1 Connect 90 Internet Radio, AUX, USB 10030416 10030417 www.auna-multimedia.com...
- Page 2 Sehr geehrter Kunde, zunächst möchten wir Ihnen zum Erwerb Ihres Gerätes gratulieren. Bitte lesen Sie die folgenden Anschluss- und Anwendungshinweise sorgfältig durch und befolgen Sie diese um möglichen technischen Schäden vorzubeugen. Warnung • Diese Bedienungsanleitung dient dazu, Sie mit der Funktionsweise dieses Produktes vertraut zu ma- chen.
- Page 3 Technische Daten Artikelnr. 10030416, 10030417 Stromversorgung DC 5.9V/2A (Netzteil für AC 220-240V, 50-60Hz im Lieferumfang enthalten) 802.11b/g/n(WLAN) Netzwerk Verschlüsselungsprofile: WEP, WPA, WPA2 (PSK), WPS Streaming UPnP, DLNA Unterstützte Dateitypen WMA, MP3, OGG Anschlüsse DC, USB Ladeanschluss (5V 0,5A), 3,5mm AUX-In, 3,5mm Line-Out Maße 176 x 120 x 123mm Lieferumfang Gerät, Netzteil, Fernbedienung, Bedienungsanleitung...
- Page 4 Bedienelemente...
- Page 5 IR Sensor FORWARD VOL/NAV/OK: rotate = VOL/scroll STANDBY / ON press = select SLEEP Display MODE POWER ALARM DC-IN PRESET Line-Out (3.5mm) BACK AUX-In (3.5mm) MENU (enter menu for current mode) USB socket Fernbedienung: • Setzen Sie zwei Batterien des Typs AAA ein. Beachten Sie beim Einsetzen und beim Batteriewechsel unbedingt die korrekte Polarität (auf der Innenseite des Batteriefachs angegeben).
- Page 6 Erste Inbetriebnahme • Nutzen Sie das mitgelieferte Netzteil, um das Gerät mit einer Netzsteckdose zu verbinden. • Schalten Sie das Gerät ein (rückseitiger Netzschalter auf EIN, POWER an der Front drücken). • Beim ersten Einschalten sucht das Gerät zunächst nach verfügbaren Funknetzwerken. Dabei wird ein Verlaufsbalken auf dem Display angezeigt.
- Page 7 Energieverwaltung Sleep Timer Buffer Weather Show on Standby | Temp Unit | Location <--> Local Radio Setup Country | City <--> Playback Setup Off / Repeat All / Repeat 1 / Shuffle <--> DLNA Setup Rename (AirMusic) <--> Equalizer Resume When Pwr On On/Off <-->...
- Page 8 Menüfunktionen • Schalten Sie das Gerät ein und drehen Sie NAV, um das Hauptmenü und seine Menüpunkte aufzurufen • Drücken Sie NAV/OK, um die jeweiligen Einstellungen bzw. Untermenües aufzurufen (rechte Spalte) und drehen Sie wiederum, um zu blättern. Drücken Sie BACK zum Zurückkehren ins vorige Menü. •...
- Page 9 • Zuletzt gehörte Sender: Die zehn zuletzt gehörten Sender werden hier aufgelistet. • Service: Suchen Sie über Sender Suchen Radiosender nach Schlüsselwörtern oder fügen Sie Sender Ihrer Favoritenliste über die Funktion Sender Hinzufügen hinzu. AUX (Line input) Wählen Sie den AUX-Modus per NAV/OK oder mit dem MODE Button. Schließen Sie einen externen Medi- en-Player (Smartphone, MP3-Player o.ä.) per 3,5mm-Audiokabel an der AUX-Buchse an und steuern Sie die Musikwiedergabe über dieses Gerät.
- Page 10 Information Center Nur wenn Netzwerk & Internet verbunden. Rufen Sie das Informations-Center per NAV/OK aus dem Hauptmenü auf. • Wetter Wählen Sie Ihren Standort aus, um eine Wettervorhersage für die nächsten vier Tage anzuzeigen (Back/Forward für nächster/voriger Tag). Im Standby werden dann Wetter und Uhrzeit im Wechsel angezeigt.
- Page 11 • Wecker 1 (ein/aus/Wiederholung/Zeit/Sound) • Wecker 2 (ein/aus/Wiederholung/Zeit/Sound) • Schlummer-Wecker (aus/5min (Standard) /10min/20min/.../120min) Wecker • Wecker-Lautstärke • You can set up the alarm volume by “Alarm Volume”.(Volume 7is acquiescent) Countdown-Timer (max. 100min) Timer English / Deutsch / Espanol / Francais / Portugese / Nederlands / Italiano/ Pyccknn / Svenska / Norske / Dansk / magyar / Cesky / slovensky / polski / Turkce Sprache / Suomi...
- Page 12 DLNA Streaming und App-Steuerung Nutzen Sie Ihren Computer als Medien-Server und streamen Sie Audio-Inhalte via DLNA über das Radio. Sie können Dateien in der Formaten MP3, WMA, WAV und AAC streamen. UPnP • Stellen Sie sicher, dass Ihr Computer mit demselben Netzwerk verbunden ist, wie Ihr Radio. •...
- Page 13 Hinweise zur Entsorgung Elektroaltgeräte Befindet sich die diese Abbildung (durchgestrichene Mülltonne auf Rädern) auf dem Pro- dukt, gilt die Europäische Richtlinie 2002/96/EG. Diese Produkte dürfen nicht mit dem normalen Hausmüll entsorgt werden. Informieren Sie sich über die örtlichen Regelungen zur getrennten Sammlung elektrischer und elektronischer Gerätschaften. Richten Sie sich nach den örtlichen Regelungen und entsorgen Sie Altgeräte nicht über den Hausmüll.
- Page 14 Dear Customer, Congratulations on purchasing this product. Please read and follow these instructions, in order to avoid damaging the item. We do not cover any damages that may arise from improper use of the item or the disregard of the safety instructions. Important Safety Advice •...
- Page 15 Technical Data Item no. 10030416, 10030417 Power supply DC 5.9V/2A (mains adaptor for AC 220-240V, 50-60Hz supplied) 802.11b/g/n(WLAN) Network Encryption: WEP, WPA, WPA2 (PSK), WPS Streaming UPnP, DLNA Supported filetypes WMA, MP3, OGG Connections DC, USB (charging 5V 0,5A), 3.5mm AUX-In, 3.5mm Line-Out Dimensions 176 x 120 x 123mm Scope of delivery Device, mains adaptor, RC, user manual...
- Page 16 Overview...
- Page 17 IR Sensor FORWARD VOL/NAV/OK: rotate = VOL/scroll STANDBY / ON press = select SLEEP Display MODE POWER ALARM DC-IN PRESET Line-Out (3.5mm) BACK AUX-In (3.5mm) MENU (enter menu for current mode) USB socket Remote Control: • Insert two batteries (type AAA) into the battery compartment of the remote control, minding the cor- rect polarity as indicated inside the battery compartment.
- Page 18 Initial Use • Use the supplied mains adaptor to connect the device to a household mains socket • Switch the device on with the power switch on the rear. The press STANDBY on the front to wake the device up from standby mode. •...
- Page 19 Timer Language Dimmer Power Saving / On <--> Display Color / Monochrome <--> Engergy saving Sleep Timer Buffer Weather Show on Standby | Temp Unit | Location <--> Local Radio Setup Country | City <--> Playback Setup Off / Repeat All / Repeat 1 / Shuffle <-->...
- Page 20 Menu / Functions • Switch on (STANDBY) and rotate NAV to scroll through the main menu. Press OK (to enter sub menues or confirm settings) • Press BACK to return to the previous menu. Internet Radio After the connection of any station is succeeded, the bit rate and the format of the station will display on the playing screen.
- Page 21 AUX (Line input) Aux in mode plays audio from an external source such as an MP3 player. To play audio with Aux in mode: • Turn the volume low on both the Radio and, if adjustable, the audio source device. •...
- Page 22 Information Center • Weather There are weather information and forecasts for 2000 cities. Select the country and then the city for the weather details. Press <- / -> to see the weather forecasts. The device is able to display the weather information on the standby mode.
- Page 23 There are three independent alarms - 2 alarms of absolute time setting (Alarm 1 and Alarm 2) and 1 alarm for relative time setting (Alarm NAP). Press Alarm on the remote control to enter this menu directly. Note that the alarm source is from the preset Internet radio if Alarm Sound is set to be Internet Radio.
- Page 24 Select the playback mode of media center – Off (no repeat or shuffle), Repeat all, Playback Setup Repeat one, or Shuffle. Default device name for DLNA is CONNECT 90. You may rename it for DLNA setup DLNA Setup on the PC or mobile.
- Page 25 • Connect the mobile to the network • Search and install media sharing apps from Google Play. • Add the audio files from your mobile you want to share. • After setup the shared server, choose the music and control playback on the Radio. DLNA Besides UPnP, Radio supports DLNA function, you share the music files from PC or Android mobile, and you use your PC, Android mobile or iPhone / iPad to control music playback on the Radio.
- Page 26 Environment Concerns According to the European waste regulation 2002/96/EG this symbol on the product or on its packaging indicates that this product may not be treated as household waste. Instead it should be taken to the appropriate collection point for the recycling of electrical and electronic equipment.
- Page 27 Chère cliente, cher client, Toutes nos félicitations pour l’acquisition de ce nouvel appareil. Veuillez lire attentivement et respecter les consignes suivantes de branchements et d’utilisation pour éviter d’éventuels dommages techniques. Avertissement • Ce mode d’emploi sert à vous familiariser aux fonctions de ce produit. Conservez-le bien afin de pouvoir vous y référer à...
- Page 28 Fiche technique Numéro d’article 10030416, 10030417 DC 5.9 V /2A (bloc d’alimentation pour AC 220-240 V ~ 50-60 Hz fourni dans Alimentation électrique l’emballage) Réseau 802.11b/g/n(WLAN) Streaming Clé de sécurité : WEP, WPA, WPA2 (PSK), WPS Formats de fichier com- UPnP, DLNA patibles Connecteurs WMA, MP3, WAV...
- Page 29 Éléments de commande...
- Page 30 Capteur IR FORWARD VOL/NAV/OK : tourner = VOL /faire défiler ; STANDBY / ON appuyer = sélectionner SLEEP Affichage MODE POWER ALARM DC-IN PRESET Line-out (3,5 mm) BACK AUX-In (3,5 mm) MENU (appuyer sur menu pour le mode Prise USB actuel) Télécommande: •...
- Page 31 Première mise en marche • Utiliser le bloc d’alimentation fourni dans l’emballage pour brancher l’appareil à une prise de courant. • Mettre l’appareil en marche (mettre l’interrupteur arrière en marche et appuyer sur la touche POW- ER de la façade). •...
- Page 32 Gestion de l’alimentation Minuteur d’endormissement Mémoire-tampon Afficher en veille | Unité de température Météo <--> | Lieu Paramètres de radio Pays | Ville <--> locale Off / Répétition tous / Répétition 1 / Paramètres de lecture <--> Aléatoire Paramètres Renommer (AirMusic) <-->...
- Page 33 Fonctions du menu • Mettre l’appareil en marche et tourner le bouton NAV pour accéder au menu principal et ses sous- menus. • Appuyer sur NAV/OK pour sélectionner les options et les sous-menus (colonne du milieu et de droite et tourner de nouveau pour passer les options en revue. Radio internet Une fois la connexion à...
- Page 34 • Stations dernièrement écoutées : les dix dernières stations écoutées sont listées ici. • Service : chercher des stations radio en entrant un mot-clé avec Rechercher une station ou ajouter des stations à la liste des favoris en utilisant la fonction Ajouter une station. AUX (Line input) Sélectionner le mode AUX avec NAV/OK ou avec le bouton MODE.
- Page 35 Centre des informations Seulement lorsqu’Internet et Réseaux sont connectés. Ouvrir le centre des informations depuis le menu principal en appuyant sur NAV/OK. • Météo Sélectionner la localité pour afficher une prévision météorologique pour les quatre jours prochains (retour/avance pour les jours prochains/précédents). En mode veille, l’affiche alterne entre la météo et l’heure.
- Page 36 • Réveil 1 (marche/arrêt/répétition/durée/son) • Réveil 2 (marche/arrêt/répétition/durée/son) • Réveil répété (désactivé/5min (Standard)/10min/20min/…/120min) Réveil • Volume du réveil • Il est possible de modifier le volume du réveil avec « Alarm volume) Minuteur avec compte à rebours (max. 100 min) Minuteur English / Deutsch / Espanol / Francais / Portugese / Nederlands / Italiano/ Pyc- cknn / Svenska / Norske / Dansk / magyar / Cesky / slovensky / polski / Turkce...
- Page 37 Streaming DLNA et commande d’application Utiliser un ordinateur comme serveur multimédia et effectuer un streaming de contenus audio par DLNA ou via la radio. Il est possible de streamer des fichiers au format MP3, WMA, WAV et AAC. UPnP • S’assurer que l’ordinateur est connecté au même réseau que la radio. •...
- Page 38 Information sur le recyclage Appareils électriques et électroniques usagés Vous trouverez sur le produit l’image ci-contre (une poubelle sur roues, barrée d‘une croix), ce qui indique que le produit se trouve soumis à la directive européenne 2002/96/ CE. Renseignez-vous sur les dispositions en vigueur dans votre région concernant la coll- ecte séparée des appareils électriques et électroniques.
- Page 39 EU-Konformitätserklärung Wir, die CHAL-TEC GmbH Wallstraße 16 10179 Berlin erklären hiermit, dass der nachfolgend bezeichnete Funkanlagentyp: Auna Radio Connect 90 Artikelnr. 10030416 & 10030417 allen folgenden einschlägigen Bestimmungen entspricht: RED-Richtlinie 2014/53/EU LVD-Richtlinie 2014/35/EU RoHS-Richtlinie 2011/65/EU Angewandte harmonisierte Normen: EN 62311:2008 EN 60065:2014 EN 301 489-1 V2.2.0:2017...
Need help?
Do you have a question about the Connect 90 and is the answer not in the manual?
Questions and answers