Table of Contents
Advertisement
Available languages
Available languages
Advertisement
Chapters
Table of Contents

Related Manuals for auna Connect 120 Series


Summary of Contents for auna Connect 120 Series
-
Page 3: Table Of Contents
Sehr geehrter Kunde, wir gratulieren Ihnen zum Erwerb Ihres Gerätes. Lesen Sie die folgenden Hinweise sorgfältig durch und befolgen Sie diese, um möglichen Schäden vorzubeugen. Für Schäden, die durch Missachtung der Hinweise und unsachgemäßen Gebrauch entstehen, übernehmen wir keine Haftung. Scannen Sie den QR-Code, um Zugriff auf die aktuellste Bedienungsanleitung und weitere Informationen rund um das Produkt zu erhalten. -
Page 4: Technische Daten
TECHNISCHE DATEN Artikelnummer 10029866, 10029867 Stromversorgung 100 – 240V AC, 50/60 Hz, 1.5A Anzeige 2.8", 320 x 240, TFT Farbdisplay Unterstützte Netwerke WiFi IEEE 802.11b/g/n wireless; BT (BT 4.2, Unterstützung von A2DP- und AVRCP-Profilen) Frequenzband WiFi : 2.400 - 2.4835 GHz; BT: 2.4 - 2.48 GHz Maxiamale Funkleistung WiFi: <20dBm;... - Page 5 WARNUNG VORSICHT: DAS GEHÄUSE NICHT ÖFFNEN, UM EINEN STROMSCHLAG UND ERNSTE PERSONENVERLETZUNGEN ZU VERMEIDEN. IM INNEREN KEINE VOM KUNDEN ZU WARTENDEN KOMPONENTEN. WENDEN SIE SICH AUSSCHLIESSLICH AN QUALIFIZIERTE FACHLEUTE. WARNUNG. UM DIE GEFAHR EINES BRANDS ODER EINES STROMSCHLAGS ZU VERRINGERN, DAS GERÄT NICHT IN WASSER, REGEN ODER FEUCHTIGKEIT AUSZUSETZEN.
-
Page 6: Sicherheitshinweise
SICHERHEITSHINWEISE Lesen Sie sich die Bedienungsanleitung vor der Installation und Inbetriebnahme des Geräts aufmerksam durch und bewahren Sie diese für den zukünftigen Gebrauch auf. Allgemeine Sicherheitshinweise • Achten Sie darauf, dass sich das Gerät und die Gerätebestandteile außerhalb der Reichweite von Kindern befinden. •... - Page 7 Feuchtigkeit und Wasser • Zur Vermeidung der Brand- und Stromschlaggefahr: • Stellen Sie dieses Gerät nicht in der Nähe von Wasser oder Feuchtigkeit auf. • Stellen Sie dieses Gerät nicht in der Nähe von Badewannen oder Waschbecken, in der Nähe eines Swimmingpools oder an sonstigen orten auf, welche Wasser enthalten oder feucht sind.
-
Page 8: Geräteübersicht
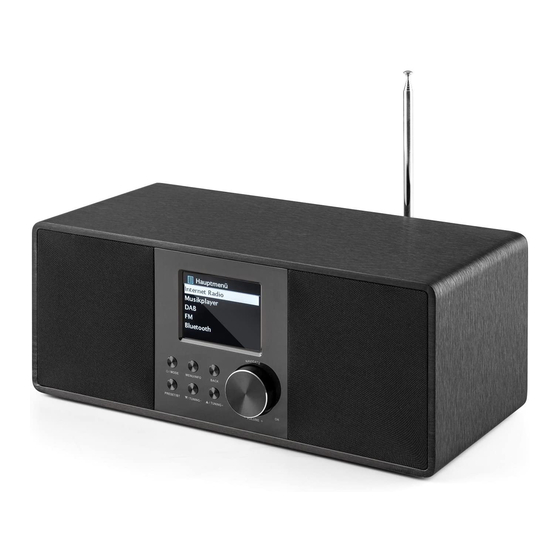
GERÄTEÜBERSICHT BACK (Zurück) TUNING/Sendersuchlauf vor MENU/INFO (Menü) TUNING/Sendersuchlauf zurück STANDBY/MODE (Modus) FAV/BT Kopplung 2,8“ Farbdisplay VOLUME -/+ (Lautstärkeregler) FM/DAB+-Antenne 10 Line-Out-Anschluss AUX-IN-Anschluss 12 Kopfhörerausgang 13 DC-IN-Anschluss 14 USB-Anschluss... - Page 9 Fernbedienung Ein-/Ausschalten/ Alarm 13 13 SHUFFLE/REPEAT deaktivieren) (Zufallswiedergabe/ MODE (Modus) Wiederholen) MENU (Menü) 14 ALARM (Weckeinstellung) Titel zurück, schnell zurück 15 BT PAIR (BT koppeln) Wiedergabe/ Pause 16 Titel vor, schnell vor EQ (Equalizer) 17 + (Lautstärke erhöhen) nach oben; FM: Frequenz 18 - (Lautstärke senken) einstellen 19 stummschalten aktivieren/...
-
Page 10: Inbetriebnahme
INBETRIEBNAHME Verbindungsherstellung und Vorbereitung Schließen Sie das eine Ende des Netzadapters an das Gerät an und stecken Sie den Netzstecker auf der anderen Seite des Netzkabels in die Steckdose. Schalten Sie das Gerät ein. Ziehen Sie die DAB-/FM-Antenne vollständig aus, um einen besser Radioempfang zu bekommen. -
Page 11: Bedienung
BEDIENUNG Drehen Sie zur Lautstärkeanpassung am Lautstärkeregler des Geräts oder drücken Sie die Tasten der Fernbedienung. Schalten Sie die Lautstärke durch Drücken der Taste stumm. • Drücken Sie zur Modusauswahl die Taste MODE. • Drücken Sie zum Öffnen des Menüs die Taste MENU. Drücken Sie diese Taste erneut, um die Menüanzeige zu schließen und zum Wiedergabemodus zurückzukehren. - Page 12 Modus es sich befindet, kann es vorkommen, dass das Gerät viele Daten verarbeiten muss. Dies kann zum Einfrieren des Bildschirms oder zu Fehlfunktionen führen. • Starten Sie das Gerät, falls notwendig, neu. Erstmalige Inbetriebnahme des Geräts • Wenn Sie das Gerät zum ersten Mal einschalten, werden die Informationen zur Datenschutzerklärung angezeigt.
- Page 13 Netzwerkeinstellungen Zunächst fragt das Gerät, ob das Netzwerk verbunden bleiben soll. Wenn Sie das Gerät in allen Kontrollmodi via App kontrollieren möchten, wählen Sie „YES“ aus. Wenn Sie „NO“ auswählen, können Sie das Gerät in den Kontrollmodi (Standby, AUX IN, FM, DAB) nicht via App kontrollieren. Beachten Sie, dass der Stromverbrauch im Standbymodus höher ist, wenn die Netzwerkverbindung aufrechterhalten wird.
- Page 14 Internetradio, Podcasts Das Gerät kann tausende Radiosender und Podcasts von der ganzen Welt via Breitbandinternetverbindung empfangen. Wenn Sie den Internetradio- oder Podcastmodus auswählen, stellt das Gerät eine direkte Verbindung zum „Frontier Smart Technologies Portal“ her, um eine Liste von Sendern oder Podcasts zu erhalten.
-
Page 15: Dab+ Radio
DAB+ RADIO Im DAB-Modus kann DAB/DAB+ digitales Radio empfangen werden. Auf dem Bildschirm werden Sender-, Stream- und Titelinformationen angezeigt. Sendersuche Wenn Sie den DAB-Modus das erste Mal auswählen oder wenn die Senderliste leer ist, startet das Gerät einen automatischen Sendersuchlauf, um fest zu stellen, welche Sender verfügbar sind. -
Page 16: Einstellungen
EINSTELLUNGEN Sucheinstellung: Die FM-Sendersuche stoppt, sobald ein verfügbarer Sender gefunden wurde. Dies kann dazu führen, dass das Gerät bei Sendern stoppt, die auf Grund eines schlechten Empfangs rauschen. Sie können die Sucheinstellung dahingehend ändern, dass Sie einstellen, dass das Gerät nur bei Sendern mit gutem Empfang stoppt. -
Page 17: Alarm
Zeit ausgewählt haben, kehrt das Gerät zum Wiedergabebildschirm zurück. ALARM • Es gibt zwei verfügbare Wecker mit Schlummerfunktion. Für jeden Alarm kann ein bestimmter Modus eingestellt werden. • Wählen Sie im Hauptmenü einen Alarm aus oder verändern Sie die Uhrzeit eines Alarms. Drücken Sie alternativ die Taste ALARM auf der Fernbedienung um den Wecker anzupassen. -
Page 18: Systemeinstellungen
Stellen Sie vor der Verwendung der App UNDOK sicher, dass sich das Smartphone/ Tablet sich im selben drahtlosen Netzwerk befindet wie das Radio. Starten Sie die App. Die App wird gestartet und sucht das Internetradio im Netzwerk. Drücken Sie auf das Gerät, um die Verbindung herzustellen. Geben Sie, falls benötigt, den aktuellen PIN ein. - Page 19 Radio verbinden möchten. Netzwerkprofile: Das Gerät speichert die letzten vier Netzwerke, mit denen es verbunden wurde, automatisch und versucht automatisch, sich mit einem dieser Netzwerke zu verbinden. In diesem Menüpunkt wird Ihnen eine Liste der registrierten Netzwerke angezeigt. Sie können bei Bedarf ungewünschte Netzwerke löschen.
-
Page 20: Reinigung Und Pflege
Hinweis: Stellen Sie vor dem Durchführen eines Softwareupdates sicher, dass sich der Netzstecker des Geräts in der Steckdose befindet und das die Stromverbindung stabil ist. Ein Ziehen des Netzsteckers während eines Softwareupdates kann das Gerät permanent beschädigen. Einstellungsassistent Mit dieser Funktion kann der Einstellungsassistent jederzeit gestartet werden. -
Page 21: Fehlersuche Und Fehlerbehebung
FEHLERSUCHE UND FEHLERBEHEBUNG Fehler Lösung Das Gerät lässt sich nicht Überprüfen Sie, ob der Netzstecker richtig einschalten. in der Steckdose steckt. Kein Ton. 1. Der Ton könnte stummgeschaltet sein. Drehen Sie den Ton auf. 2. Erhöhen Sie die Lautstärke. 3. Ziehen Sie das Kopfhörer- oder Lautsprecherkabel aus dem entsprechenden Anschluss heraus. - Page 22 Rauschen im FM-Modus. 1. Überprüfen Sie die FM-Antenne und richten Sie diese neu aus. 2. Stellen Sie das Gerät an einen anderen Ort. Keine Sender 1. Stellen Sie das Gerät an einen anderen verfügbar/ Rauschen/ Ort. Unterbrechungen im DAB- 2. Suchen Sie ausschließlich nach lokalen Modus.
-
Page 23: Hinweise Zur Entsorgung
HINWEISE ZUR ENTSORGUNG Befindet sich die linke Abbildung (durchgestrichene Mülltonne auf Rädern) auf dem Produkt, gilt die Europäische Richtlinie 2012/19/EU. Diese Produkte dürfen nicht mit dem normalen Hausmüll entsorgt werden. Informieren Sie sich über die örtlichen Regelungen zur getrennten Sammlung elektrischer und elektronischer Gerätschaften. - Page 25 Dear Customer, Congratulations on purchasing this equipment. Please read this manual carefully and take care of the following hints to avoid damages. Any failure caused by ignoring the items and cautions mentioned in the instruction manual are not covered by our warranty and any liability. Scan the QR code to get access to the latest user manual and other information about the product.
-
Page 26: Technical Data
TECHNICAL DATA Item number 10029866, 10029867 Power input (power adapter) 100 – 240V AC, 50/60 Hz, 1.5A Display 2.8", 320 x 240, TFT colour display Network supported WiFi IEEE 802.11b/g/n wireless; BT (BT 4.2, Supports A2DP, AVRCP profiles) Frequency band WiFi : 2.400 - 2.4835 GHz;... - Page 27 WARNINGS CAUTION: TO REDUCE THE RISK OF ELECTRIC SHOCK AND SERIOUS PERSONAL INJURY, DO NOT REMOVE ANY COVER. NO USER-SERVICABLE PARTS INSIDE. REFER SERVICING TO QUALIFIED SERVICE PERSONNEL ONLY. WARNING. TO REDUCE THE RISK OF FIRE OR ELECTRICAL SHOCK, DO NOT EXPOSE THIS PRODUCT TO WATER, RAIN OR MOISTURE.
-
Page 28: Safety Instruction
SAFETY INSTRUCTION Please read these instructions fully before installing or operating. General safety information • Keep the product and all its parts out of reach of small children. • This product is not intended for use by persons (including children) with reduced physical, sensory or mental capabilities, or lack of experience and knowledge, unless they have been given supervision or instruction concerning the use of the appliance by a person responsible for their... - Page 29 • Do not place objects filled with water, such as a vase, on or near the product. • Keep it dry. Avoid exposure to precipitation, humidity and liquids which could all affect the product circuitry. Heat sources and flames • Do not leave this product in high temperatures as electronic devices and plastic parts may warp in heat.
-
Page 30: Overview
OVERVIEW Button: Back Button : /TUNING+ Button : MENU/INFO Button : /TUNING- Button : Standby/MODE Button : FAV/BT PAIR 2.8” TFT color display Reel : Navigate / Volume / Press to OK FM/DAB+ antenna 10 Line Out socket AUX IN socket 12 Earphone out socket 13 DC IN socket 14 USB port... - Page 31 Remote control Device power on/off; alarm off 14 Alarm setting Open, close mode selection 15 Press and hold to BT Press to open, close menu discoverable under BT mode Select track, hold down to seek 16 Select track Start playback, pause 17 Increase volume Select equalizer preset 18 Decrease volume...
-
Page 32: Getting Started
GETTING STARTED Connection and Preparation Connect the power adaptor to the back of device and plug it into power socket. Switch on the device, it starts up. Pull out the rod DAB/FM antenna for DAB and FM reception. Connecting to the network •... - Page 33 Press the volume knob on the device or press on the remote control to switch to standby mode. The time, date and any active alarm times display on the screen. Switch on with the same button. When album cover is displayed on the playing screen, press OK (SCAN) to view the full screen size of the picture.
- Page 34 After this, the following options are available, to define if the time to be synchronized from radios: Update from DAB, Update from FM, Update from Network or No update If you choose “Update from Network” you must indicate your time zone in the next window.
-
Page 35: Menu Operation
MENU OPERATION Internet Radio, Podcasts Device can play thousands of radio stations and podcasts from around the world though a broadband Internet connection. When you select Internet radio or Podcasts mode, the device directly contacts the Frontier Smart Technologies portal to get a list of stations or podcasts.The list menu is provided from the portal, so it is only accessible when the device is connected to the Internet. -
Page 36: Dab+ Radio
DAB+ RADIO DAB mode receives DAB/DAB+ digital radio and displays information about the station, stream and track playing. Scanning for stations The first time you select DAB radio mode, or if the station list is empty, the radio automatically performs a full scan to see what stations are available. You may also need to start a scan manually to update the list of stations. -
Page 37: Aux In
stations, this may result in a poor signal-to-noise ratio (hiss). To play weak stations in mono, select FM weak reception: Listen in mono only and then YES. In BT mode, you can turn on the BT of your BT device. Go to the menu and turn BT discoverable. -
Page 38: Undok
remote control. You can change the snooze period. The radio returns to standby for the set period, with the silenced alarm icon flashing. Press the VOLUME knob OR press or ALARM on the remote control to turn off the alarm. UNDOK The device gives a feature of network remote by smartphone or tablet in iOS or Android system. -
Page 39: System Settings
SYSTEM SETTINGS Equaliser Several preset EQ modes are available: Normal, Flat, Jazz, Rock, Movie, Classic, Pop, News and My EQ. Press EQ to select. A user-defined setting is available; create your own EQ with custom bass, treble settings. Network Network wizard: Enter to search AP SSID, then input the WEP / WPA key or choose Push Button/Pin/Skip WPS to connect to the wireless network. - Page 40 Inactive standby You may set the radio to inactive and go to standby. The duration you can choose as Off/2 hours/ 4hours/ 5 hours/ 6hours. Language The default language is English. Change it as your preference. Available languages: English, Danish, Dutch, Finnish, French, German, Italian, Norwegian, Polish, Portuguese, Spanish, Swedish, Turkish.
-
Page 41: Troubleshooting
TROUBLESHOOTING Error Remedy The device does not switch Check it the power adaptor is connected properly. No sound. 1. Turn on the sound as it may be muted 2. Increase the volume. 3. Pull any connected headphone or speaker from the connector jack. No network connection can 1. - Page 42 Alarm does not work. 1. Switch on the alarm. 2. Due to the volume setting, refer to the solutions of “No sound”. 3. The source of alarm was set to be station but there is no network connection. Change the source of alarm or reconfigure the connection.
-
Page 43: Disposal Considerations
DISPOSAL CONSIDERATIONS According to the European waste regulation 2012/19/EU this symbol on the product or on its packaging indicates that this product may not be treated as household waste. Instead it should be taken to the appropriate collection point for the recycling of electrical and electronic equipment.
Need help?
Do you have a question about the Connect 120 Series and is the answer not in the manual?
Questions and answers