Table of Contents
Advertisement
Available languages
Available languages
Quick Links
Advertisement
Chapters
Table of Contents

Related Manuals for auna Radio Gaga 2.0


Summary of Contents for auna Radio Gaga 2.0
-
Page 3: Table Of Contents
Sehr geehrter Kunde, wir gratulieren Ihnen zum Erwerb Ihres Gerätes. Lesen Sie die folgenden Hinweise sorgfältig durch und befolgen Sie diese, um möglichen Schäden vorzubeugen. Für Schäden, die durch Missachtung der Hinweise und unsachgemäßen Gebrauch entstehen, übernehmen wir keine Haftung. Scannen Sie den folgenden QR-Code, um Zugriff auf die aktuellste Bedienungsanleitung und weitere Informationen rund um das Produkt zu erhalten:... -
Page 4: Sicherheitshinweise
SICHERHEITSHINWEISE • Beachten Sie alle in der Bedienungsanleitung aufgeführten Hinweise. • Das Gerät darf nicht in der Nähe von Wasser oder in feuchter Umgebung verwendet werden. • Achten Sie darauf, dass keine Flüssigkeit über dem Gerät und den Geräteöff nungen verschüttet wird. •... -
Page 5: Bedienfeld Und Anschlüsse
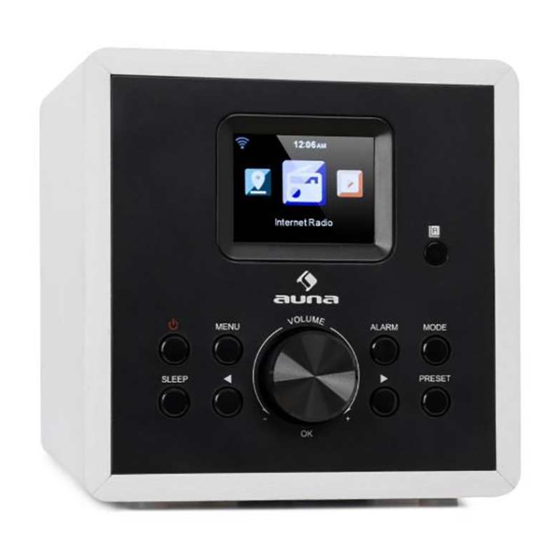
BEDIENFELD UND ANSCHLÜSSE Bedienfeld Display Fernbedienungs- Sensor Lautstärkeregler/ OK-Taste 4 Menu-Taste 5 Standby-Taste 6 Sleep-Taste Links-Taste 8 Alarm-Taste Mode-Taste 10 Preset-Taste 11 Rechts-Taste Anschlüsse Antenne AUX-Anschluss Stromanschluss... -
Page 6: Fernbedienung Und Tastenfunktionen
FERNBEDIENUNG UND TASTENFUNKTIONEN Standby-Taste Menu-Taste Schlüssel-Taste Hoch-Taste... - Page 7 Links-Taste Stummschalten-Taste Runter-Taste Info-Taste Lautstärke verringern OK-Taste Play/Pause-Taste Rechts-Taste Zurück-Taste Lautstärke erhöhen Alarm-Taste Vor-Taste Sleep-Taste EQ-Taste Nummern-/Buchstaben- Favoriten-Taste Tasten WPS-Taste Dimmer-Taste STANDBY Drücken Sie die STANDBY-Taste auf der Fernbedienung oder drücken Sie die STANDBY-Taste auf der Gerätevorderseite, um das Gerät zu aktivieren oder in den Standby-Modus zu versetzen.
- Page 8 OK und PFEILTASTEN Drücken Sie die Pfeiltasten auf der Fernbedienung oder die Tasten LINKS/ RECHTS auf der Vorderseite, um durch die Auswahl zu blättern, und drücken Sie die Taste OK, um die Auswahl zu bestätigen. VOL+ und VOL- Um die Lautstärke einzustellen, können Sie die Tasten VOL+ & VOL- drücken oder den Lautstärkeregler direkt drehen.
-
Page 9: Allgemeine Bedienung
ALLGEMEINE BEDIENUNG Inbetriebnahme Ihres Internetradios • Stecken Sie den Netzstecker in die Steckdose, „Willkommen“ wird auf dem Bildschirm angezeigt. Stellen Sie sicher, dass die Antenne so weit wie möglich ausgefahren ist. So erhalten Sie das bestmögliche Signal. • Wenn Sie Ihr Radio zum ersten Mal benutzen, können Sie nach dem Begrüßungsbildschirm die Sprache durch Scrollen mit dem Lautstärkeregler auswählen und Ihre Auswahl durch Drücken der OK- Taste bestätigen. -
Page 10: Internetradio
INTERNETRADIO Verwenden Sie die Tasten LINKS/RECHTS oder drehen Sie den Lautstärkeregler, um „Internetradio“ auf dem Bildschirm auszuwählen, drücken Sie die OK-Taste, um das Internetradio aufzurufen, und es werden mehrere Optionen angezeigt: Speichern Sie Ihre Lieblings-Internetradiosender Wenn Sie den gewünschten Sender gefunden haben, halten Sie die FAVOR-Taste oder die PRESET-Taste gedrückt, um zur Einstellung „Zu meine Favoriten hinzufügen“... -
Page 11: Media Center
MEDIA CENTER Verwenden Sie die Tasten LINKS/RECHTS oder drehen Sie den Lautstärkeregler, um „Media Center“ auf dem Bildschirm auszuwählen, drücken Sie die OK-Taste, um das Media Center aufzurufen UPnP: Universal Plug and Play ermöglicht es Ihnen, eine Verbindung zu einem anderen Gerät herzustellen, um Ihre Musik abzuspielen, wie z.B. -
Page 12: Fm Radio
FM RADIO Der Bereich der FM-Frequenz reicht von 87,5 MHz bis 108,00 MHz. Die Antenne ausfahren, um das stärkste Signal für jede Station zu finden. Verwenden Sie die Tasten LINKS/RECHTS oder drehen Sie den Lautstärkeregler, um „FM Radio“ auf dem Hauptbildschirm auszuwählen, drücken Sie die OK-Taste, um das FM Radio aufzurufen. -
Page 13: Dab/Dab
DAB/DAB+ Verwenden Sie die Tasten LINKS/RECHTS oder drehen Sie den Lautstärkeregler, um „DAB/DAB+“ auf dem Bildschirm auszuwählen, drücken Sie die OK-Taste, um DAB/DAB+ aufzurufen Bei der ersten Verwendung von DAB auf Ihrem Radio beginnt die Suche nach DAB-Sendern und zeigt „Scanning“ auf dem Bildschirm an. Es wird angezeigt, wie viele Sender gefunden wurden, während die Suche weitergeht. -
Page 14: Informationszentrum
INFORMATIONSZENTRUM Verwenden Sie die Tasten LINKS/RECHTS oder drehen Sie den Lautstärkeregler, um das „Informationszentrum“ auf dem Bildschirm auszuwählen, drücken Sie die OK-Taste, um das Informationszentrum aufzurufen Wetterinformationen: Um die Wetterinformationen für einen gewünschten Ort auszuwählen, verwenden Sie die Taste AUF/AB-Tasten, um durch die Kontinente zu blättern und mit der OK-Taste auszuwählen. -
Page 15: Bt Modus
OK-Taste, um die BT-Bedienung aufzurufen Unter den Geräteeinstellungen können Sie Ihr Gerät über BT mit dem Radio verbinden und das wird als „Radio Gaga 2.0“ angezeigt. 2. Wählen Sie die gewünschte Audiodatei auf Ihrem Gerät aus und spielen Sie sie ab. - Page 16 Netzwerk WLAN-Konfiguration In den Netzwerkeinstellungen können Sie eine WIFI-Verbindung einrichten, indem Sie drahtlose Netzwerkkonfiguration wählen. Das Radio sucht dann nach verfügbaren WIFI-Verbindungen. Suchen Sie Ihren WIFI-Anschluss und wählen Sie ihn mit der OK-Taste aus. Um Buchstaben/Zahlen einzugeben, verwenden Sie die Funktion des Lautstärkereglers oder drücken Sie die ZAHLEN/BUCHSTABEN-Tasten, bis die richtige Ziffer angezeigt wird, und drücken Sie die Taste RECHTS, um zur nächsten Ziffer zu gelangen.
- Page 17 Datum und Zeit Manuelle Einrichtung oder automatische Erkennung Es besteht die Möglichkeit, die Uhrzeit und das Datum manuell einzustellen, anstatt die automatische Erkennung zu verwenden. Drehen Sie den Lautstärkeregler oder drücken Sie die Zifferntasten, um die gewünschte Ziffer einzugeben. Sobald Sie die richtige Ziffer eingegeben haben, klicken Sie auf RECHTS, um zur Tageseinstellung zu gelangen.
- Page 18 • Sobald die Minuten den richtigen Wert erreicht haben, drücken Sie die RECHTS-Taste, um „AM“ oder „PM“ zu ändern, drücken Sie dann die OK-Taste zur Bestätigung und kehren Sie zu den Alarmeinstellungen zurück. • Scrollen Sie nun nach unten und wählen Sie „ Sound“ durch das Drücken der OK-Taste.
- Page 19 Mittagsschlaf-Alarm • Nach Auswahl der Option „Alarm“ in den Konfigurationseinstellungen oder der ALARM-Taste auf der Fernbedienung können Sie „NAP Alarm (aus)“ auswählen. • Wählen Sie, nach wie vielen Minuten Sie den Mittagsschlaf-Alarm einschalten möchten, mit den Optionen: Ausschalten, 5 Minuten, 10 Minuten, 20 Minuten, 30 Minuten, 60 Minuten, 90 Minuten, 120 Minuten.
- Page 20 Bildschirm Sie können den Bildschirm in Farbe oder Monochrom einstellen. Energieverwaltung Wählen Sie diese Option, um das Funkgerät so zu konfigurieren, dass es nach einer bestimmten Zeit der Inaktivität oder wenn kein WIFI-Signal empfangen wird, automatisch in den Standby-Modus wechselt. Sie können 5/15/30 Minuten wählen, um in den Standby-Modus zu wechseln, oder Sie können „Ausschalten“...
- Page 21 FM Einstellung • Modus: Sie können entweder den Modus „Mono“ oder „Stereo“ einstellen. • Schwellenwert für die Signalstärke: Wählen Sie die Einstellungen für den Schwellenwert (Suchschwelle/Stereo-Schwelle). Der Schwellenwert für die Signalstärke wird auf die automatische Umschaltung zwischen Mono- und Stereomodus eingestellt. Bei schwachem Empfang schaltet das System automatisch in den Mono-Modus, um die Hintergrundgeräusche des Senders zu reduzieren, so dass man besser verstehen kann.
-
Page 22: Fehlerbehebung
Wiederaufnahme nach dem Einschalten Schalten Sie die Funktion ein, damit das Radio nach dem Einschalten wieder funktioniert. Der Bildschirm bleibt dabei im Hauptmenü. Software Aktualisierung Zeigt hier an, ob eine Aktualisierung der Software für das Radio verfügbar ist. Falls vorhanden, klicken Sie bitte hier, um das Update zu starten. Auf Werkseinstellung zurücksetzen Wählen Sie diese Option, um Ihr Funkgerät zurückzusetzen und alle vorgenommenen Einstellungen und Voreinstellungen rückgängig zu... -
Page 23: Hinweise Zur Entsorgung
Problem Mögliche Ursache und Lösungsansatz Die Fernbedienung Prüfen Sie, ob die Batterie leer ist oder nicht. Bei funktioniert nicht Bedarf durch eine neue ersetzen. richtig Vergewissern Sie sich, dass sich kein Hindernis zwischen dem Fernbedienungssensor am Gerät und der Fernbedienung befindet. Keine WiFi-Verbindung Stellen Sie sicher, dass in den Einstellungen der WIFI-Modus ausgewählt ist und das richtige... -
Page 24: Konformitätserklärung
KONFORMITÄTSERKLÄRUNG Hersteller: Chal-Tec GmbH, Wallstraße 16, 10179 Berlin, Deutschland. Dieses Produkt entspricht den folgenden Europäischen Richtlinien: 2011/65/EU (RoHS) 2014/53/EU (RED) Die vollständige Konformitätserklärung des Herstellers finden Sie unter folgendem Link: https://use.berlin/10033145... - Page 25 Dear Customer, Congratulations purchasing this equipment. Please read this manual carefully and take care of the following hints to avoid damages. Any failure caused by ignoring the items and cautions mentioned in the instruction manual is not covered by our warranty and any liability.
-
Page 26: Safety Instructions
SAFETY INSTRUCTIONS • Observe all notes listed in the operating instructions. • Do not use the unit near water or in a humid environment. • Make sure that no liquid is spilled over the unit and the unit openings. • Move the unit carefully to avoid damaging it. -
Page 27: Control Panel And Connections
CONTROL PANEL AND CONNECTIONS Control Panel Display Screen Remote Sensor Volume Knob/ OK button MENU button STANDBY button SLEEP button LEFT button ALARM button MODE button PRESET button RIGHT button Connections Antenna AUX IN port DC power jack... -
Page 28: Control Pael And Key Functions
CONTROL PAEL AND KEY FUNCTIONS STANDBY button MENU button KEY button (UP) DIRECTION... - Page 29 (LEFT) DIRECTION MUTE button 1 (DOWN) DIRECTION INFO button VOL- OK button PLAY/PAUSE button (RIGHT) DIRECTION PREVIOUS button VOL+ ALARM button NEXT SLEEP button EQ button NUMBER/LETTER buttons FAVOR button WPS button DIMMER button STANDBY Press the STANDBY button on remote control or press the STANDBY button on the front panel to wake up the unit or switch to the standby mode.
- Page 30 OK & DIRECTION KEYS Drücken Sie die Pfeiltasten auf der Fernbedienung oder die Tasten LINKS/ RECHTS auf der Vorderseite, um durch die Auswahl zu blättern, und drücken Sie die Taste OK, um die Auswahl zu bestätigen. VOL+ und VOL- Press the DIRECTION buttons on the remote control or the LEFT/RIGHT buttons on the front panel to scroll through the choices and press down the OK button to confirm the selections.
-
Page 31: General Operation
GENERAL OPERATION Starting Up Your Internet Radio • Plug the adaptor connector into the DC Power Jack,“ Welcome” will be shown on the screen. Ensure the antenna is extended as far as possible. This will enable you to get the best signal you can. •... -
Page 32: Internet Radio
INTERNET RADIO Use the LEFT/RIGHT buttons or rotate the Volume Knob to choose “Internet Radio” in the screen, press down the OK button to enter the Internet Radio screen, and there will be multiple options: Save your favorite Internet Radio stations When you have found your desired station, press and hold the FAVOR button or PRESET button to go to the “Add to My Favorite”... -
Page 33: Media Center
MEDIA CENTER Use the LEFT/RIGHT buttons or rotate the Volume Knob to choose “Media Center” on the main display screen, press down the OK button to enter Media Center screen. UPnP: Universal Plug and Play allows you to connect to other device to play your music such as personal computers(windows media player), mobile(GooglePlay) and other devices. -
Page 34: Fm Radio
FM RADIO The range of FM frequency is from 87.5MHz to 108.00MHz. Extended the antenna to find the strongest signal for each station. Use the LEFT/RIGHT buttons or rotate the Volume Knob to choose “FM Radio” on the main display screen, press down the OK button to enter FM Radio screen. -
Page 35: Dab/Dab
DAB/DAB+ Use the LEFT/RIGHT buttons or rotate the Volume Knob to choose “DAB/ DAB+” on the main display screen, press down the OK button to enter DAB/ DAB+ screen. On first use of DAB on your radio, it will begin scanning for DAB stations and will show “Scanning”... -
Page 36: Information Center
INFORMATION CENTER Use the LEFT/RIGHT buttons or rotate the Volume Knob to choose “Information Center” on the main display screen, press down the OK button to enter Information Center screen. Weather Information: To select the weather information for a desired place, use the UP/DOWN buttons to scroll through the continrent and use the OK button to select. -
Page 37: Bt Mode
OK button to enter BT screen. Go to your device settings to connect your device to the radio via BT. The Internet radio’s device will display as “Radio Gaga 2.0“. 2. Select your chosen audio on your device and play. - Page 38 Network Wireless Network Configuration On the Network settings, you can set up a WIFI connection by selecting Wireless Network Configuration. The radio will then start searching for available WIFI connections. Find your WIFI connection and select it with OK button. To type letters/ numbers, use the Volume Knob or press the LETTER/NUMBER buttons until the correct digit is displayed, and press the RIGHT button to go to the next digit.
- Page 39 Date and Time Manual Setup or Auto Detect There is the option to manually set the time and date instead of using auto- detect to set this up. Rotate the Volume Knob or press the digit buttons to input your desired digit if the month. Once you have got the correct digit, click RIGHT button to go to the day setting.
- Page 40 • Once the minutes are at the correct value,press RIGHT button to change “AM” or “PM”,then press the OK buttonl to confirm and go back to alarm settings. • Now scroll down and select “ Sound” by pressing OK button. You can now choose between Beep, melody, Internet Radio, FM, or DAB/DAB+.
- Page 41 Nap Alarm • After selecting the “Alarm” option in Configuration settings, or the ALARM button on the remote control to select the “NAP Alarm(Turn Off)”. • Choose how many minutes you would like to have the nap alarm on with the option of: Turn Off, 5 Minutes, 10 Minutes, 20 Minutes, 30 Minutes, 60 Minutes, 90 Minutes, 120 Minutes.
- Page 42 Display Choose the display to be Color or Monochrome. Power Management Select this to configure the radio to go into Standby mode automatically after a set time of inactivity or if there is no WIFI signal. You can select 5/15/30 minutes to go into Standby mode, or you can select “Turn Off” to ignore this function.
- Page 43 FM Setup • Mode: You can set “Mono” or “Stereo” mode. • Threshold: Select threshold settings (seek threshold/Stereo threshold). Threshold is to set to the auto-switching between mono and stereo modes. When in a week reception place, the system will switch to the mono mode automatically to reduce the background noise of the station, so that to be more clearly listening.) Local Radio Setup...
-
Page 44: Troubleshooting
Resume when power on Turn on the function for the radio to resume when powered on. Instead, the screen will remain in main menu. Software Update Will show here if a software update is available for the radio. If one is available, please select for the update to initiate. -
Page 45: Hints On Disposal
Problem Possible Cause and Suggested Solution Remote control does Check whether the battery run out or not. not work properly Replaces a new one if necessary. Check whether there is obstacle on the front of remote sensor or not. WiFi not connecting Ensure WIFI mode is selected in settings and the correct passcode is being entered for the WIFI modem. - Page 46 DECLARATION OF CONFORMITY Producer: Chal-Tec GmbH, Wallstraße 16, 10179 Berlin, Germany. This product is conform to the following European Directives: 2011/65/EU (RoHS) 2014/53/EU (RED) The complete declaration of conformity of the manufacturer can be found at the following link: https://use.berlin/10033145...
- Page 47 Estimado cliente: Le felicitamos por la adquisición de este producto. atentamente siguiente manual siga cuidadosamente las instrucciones de uso con el fin de evitar posibles daños. La empresa no se responsabiliza de los daños ocasionados por un uso indebido del producto o por haber desatendido las indicaciones de seguridad.
-
Page 48: Indicaciones De Seguridad
INDICACIONES DE SEGURIDAD • Tenga en cuenta todas las indicaciones incluidas en el manual de instrucciones. • El aparato no debe utilizarse cerca del agua ni en entornos húmedos. • Asegúrese de que no se pulverice ningún líquido sobre el aparato ni sus orifi cios. -
Page 49: Panel De Control Y Conexiones
PANEL DE CONTROL Y CONEXIONES Panel de control Pantalla 2. Sensor de control remoto 3. Botón de control de volumen/OK 4. Botón de menú 5. Botón de Standby 6. Botón para el modo Sleep 7. Botón de flecha hacia la izquierda 8. -
Page 50: Control Remoto Y Funciones De Las Teclas
CONTROL REMOTO Y FUNCIONES DE LAS TECLAS Botón Standby Botón Menú Botón de llave Tecla de flecha arriba... - Page 51 Tecla de flecha izquierda Botón de silenciamiento Tecla de flecha abajo Botón Información Bajar el volumen Botón OK Botón Reproducir/Pausa Tecla de flecha derecha Botón Atrás Subir el volumen Botón Alarma Botón Siguiente Botón para el modo Sleep Botón EQ Teclas de cifras y letras Botón Favoritos Botón WPS...
- Page 52 Teclas OK y FLECHAS Pulse los botones de flecha del mando a distancia o los botones IZQUIERDA/DERECHA de la parte frontal para navegar por la selección y pulse el botón OK para confirmar la selección. VOL+ y VOL- Para ajustar el volumen, pulse los botones VOL+ y VOL- o gire el control de volumen directamente.
-
Page 53: Funcionamiento General
FUNCIONAMIENTO GENERAL Puesta en marcha de su radio por Internet • Enchufe la clavija de alimentación en la toma de corriente y en la pantalla aparecerá el mensaje „Welcome“ (Bienvenido). Asegúrese de que la antena esté lo más extendida posible. Esto le da la mejor señal posible. -
Page 54: Radio Por Internet
RADIO POR INTERNET Utilice los botones IZQUIERDA/DERECHA o gire el control de volumen para seleccionar „Radio por Internet“ en la pantalla, pulse el botón OK para activar la radio por Internet y aparecerán varias opciones: Guarda sus emisoras de radio por Internet favoritas Una vez que haya encontrado la emisora deseada, mantenga pulsada la tecla FAVOR o la tecla PRESET para acceder a la configuración „Añadir a mis favoritos“. -
Page 55: Centro Multimedia
CENTRO MULTIMEDIA Utilice los botones IZQUIERDA/DERECHA o gire el control de volumen para seleccionar „ Centro multimedia „ en la pantalla, pulse el botón OK para entrar en el centro multimedia. UPnP: La función Universal Plug and Play le permite conectarse a otro dispositivo para reproducir su música, como ordenadores personales (Reproductor de Windows Media), teléfonos móviles (GooglePlay) y otros dispositivos. -
Page 56: Radio Fm
RADIO FM La frecuencia de FM va de 87,5 MHz a 108,00 MHz. Extienda la antena para encontrar la señal más fuerte para cada emisora. Utilice los botones IZQUIERDA/DERECHA o gire el control de volumen para seleccionar „ Radio FM „ en la pantalla principal, pulse el botón OK para entrar en Radio FM. -
Page 57: Dab/Dab
DAB/DAB+ Utilice los botones IZQUIERDA/DERECHA o gire el control de volumen para seleccionar „DAB/DAB+“ en la pantalla, pulse el botón OK para entrar en el modo DAB/DAB+. La primera vez que utilice DAB en su radio, se iniciará la búsqueda de emisoras DAB y aparecerá... -
Page 58: Centro De Información
CENTRO DE INFORMACIÓN Utilice los botones IZQUIERDA/DERECHA o gire el control de volumen para acceder al „Centro de información“ en la pantalla, pulse el botón OK para entrar en el Centro de información. Información meteorológica: Para seleccionar la información meteorológica de la ubicación deseada, utilice los botones ARRIBA/ABAJO para desplazarse por los continentes y seleccione con el botón OK. -
Page 59: Modo Bt
„BT“ en la pantalla, pulse el botón OK para acceder a la función En la configuración del dispositivo puede conectar su dispositivo a la radio a través de BT y esta se muestra como „Radio Gaga 2.0“. 2. Seleccione el archivo de audio deseado en su dispositivo y reprodúzcalo. - Page 60 Configuración WiFi En los ajustes de red, puede configurar una conexión WIFI seleccionando Configuración de red inalámbrica. La radio busca las conexiones WIFI disponibles. Localice su conexión WIFI y selecciónela con el botón OK. Para introducir letras/números, utilice la función de control de volumen o pulse las teclas numéricas/letras hasta que aparezca el dígito correcto y pulse DERECHA para pasar al siguiente dígito.
- Page 61 Fecha y Tiempo Configuración manual o reconocimiento automático Es posible ajustar la hora y la fecha manualmente en lugar de utilizar el reconocimiento automático. Gire el control de volumen o pulse los botones numéricos para introducir el número deseado. Una vez que haya ingresado el dígito correcto, haga clic en el botón DERECHA para ir a la configuración de la fecha.
- Page 62 • Una vez que los minutos han llegado al valor correcto, presione el botón DERECHA para cambiar „AM“ o „PM“, luego presione el botón OK para confirmar y regresar a los ajustes de alarma. • Desplácese hacia abajo y seleccione „ Sonido „ pulsando el botón OK. Ahora puede elegir entre pitido, melodía, radio por Internet, FM o DAB/ DAB+.
- Page 63 Alarma de siesta • Después de seleccionar la opción „Alarma“ en los ajustes de configuración o mediante el botón ALARMA del control remoto, puede seleccionar „Alarma NAP (apagada)“. • Seleccione la duración de su siesta con las opciones: Apagar, 5 minutos, 10 minutos, 20 minutos, 30 minutos, 60 minutos, 90 minutos, 120 minutos.
- Page 64 Pantalla Puede configurar la pantalla en color o monocromo. Gestión de energía Seleccione esta opción para configurar la radio para que cambie automáticamente al modo de espera después de cierto tiempo de inactividad o cuando no se recibe ninguna señal WIFI. Puede seleccionar 5/15/30 minutos para cambiar al modo de espera, o puede seleccionar „Apagado“...
- Page 65 Ajuste FM • Modo: Puede ajustar el modo „Mono“ o „Stereo“. • Umbral para la intensidad de la señal: seleccione los ajustes para el umbral (umbral de búsqueda/umbral estéreo). El umbral de intensidad de la señal se ajusta para cambiar automáticamente entre los modos mono y estéreo.
-
Page 66: Solución De Problemas
Reanudación después del encendido Encienda la función para que la radio funcione de nuevo cuando la encienda. La pantalla permanece en el menú principal. Actualización de software Indica si hay una actualización del software disponible para la radio. Si está disponible, haga clic aquí... -
Page 67: Retirada Del Aparato
Problema Posible causa y solución de problema El control remoto Compruebe si la batería está agotada o no. no funciona Sustitúyalo por uno nuevo si es necesario. correctamente Asegúrese de que no haya obstáculos entre el sensor del mando a distancia de la unidad y el mando a distancia. - Page 68 DECLARACIÓN DE CONFORMIDAD Fabricante: Chal-Tec GmbH, Wallstraße 16, 10179 Berlín (Alemania). Este producto cumple con las siguientes directivas europeas: 2011/65/UE (refundición RoHS) 2014/53/UE (RED) Puede descargar la declaración de conformidad completa del fabricante en el siguiente enlace: https://use.berlin/10033145...
- Page 69 Cher client, Toutes nos félicitations pour l’acquisition de ce nouvel appareil. Veuillez lire attentivement les instructions suivantes de branchement et d’utilisation afin d’éviter d’éventuels dommages. Le fabricant ne saurait être tenu pour responsable des dommages dus au non-respect des consignes de sécurité et à la mauvaise utilisation de l’appareil.
-
Page 70: Consignes De Sécurité
CONSIGNES DE SÉCURITÉ • Respectez toutes les consignes fi gurant dans le mode d‘emploi. • L‘appareil ne doit pas être utilisé près de l‘eau ou dans un environnement humide. • Assurez-vous que jamais un liquide ne puisse être renversé sur l‘appareil ou dans les ouvertures de l‘appareil. -
Page 71: Panneau De Commande Et Connexions
PANNEAU DE COMMANDE ET CONNEXIONS Panneau de commande Écran Capteur de la télécommande Réglage du volume / touche OK 4 Touche de menu 5 Touche de veille 6 Touche sleep Touche gauche 8 Touche d‘alarme Touche de mode 10 Touche de préréglage 11 Touche droite Connexions Antenne... -
Page 72: Télécommande Et Fonctions Des Touches
TÉLÉCOMMANDE ET FONCTIONS DES TOUCHES Touche de veille (STANDBY) Touche de Menu Touche clé Touche haut... - Page 73 Touche gauche Fonction muet Touche bas Touche Info Réduire le volume Touche OK Touche Play/Pause Touche droite Touche retour Augmenter le volume Touche Alarme Touche avance Touche Sleep Touche EQ Touches numériques/ Touche favoris alphabétiques Touche réglage de la Touche WPS luminosité...
- Page 74 Touche OK et touches fléchées Appuyez sur les touches fléchées de la télécommande ou sur les touches GAUCHE/DROITE à l‘avant de l‘appareil pour parcourir les choix possibles, puis appuyez sur la touche OK pour confirmer votre sélection. VOL+ et VOL- Pour régler le volume, vous pouvez appuyer sur les touches VOL+ &...
-
Page 75: Fonctionnement Général
FONCTIONNEMENT GÉNÉRAL Mise en marche de votre radio Internet • Insérez la fiche secteur dans la prise, „Bienvenue“ s‘affiche à l‘écran. Assurez-vous que l’antenne est complètement déployée. Cela vous donnera le meilleur signal possible. • Lorsque vous utilisez votre radio pour la première fois, après l’écran de bienvenue, vous pouvez sélectionner la langue en défilant avec le bouton de volume et confirmer votre sélection en appuyant sur la touche OK. -
Page 76: Radio Internet
RADIO INTERNET Utilisez les touches GAUCHE/DROITE ou tournez le bouton de volume pour sélectionner „Internet Radio“ sur l’écran, appuyez sur le bouton OK pour accéder à la radio Internet et afficher plusieurs options : Mémorisez vos stations de radio Internet préférées Lorsque vous avez trouvé... -
Page 77: Media Center
MEDIA CENTER Utilisez les boutons GAUCHE/DROITE ou tournez le bouton de volume pour sélectionner „Media Center“ sur l’écran, appuyez sur le bouton OK pour entrer dans le Media Center. UPnP : Universal Plug and Play vous permet de vous connecter à un autre appareil pour lire votre musique, un PC par exemple (Windows Media Player), un téléphone mobile (Google Play) et d‘autres appareils. -
Page 78: Radio Fm
RADIO FM La plage de fréquence FM va de 87,5 MHz à 108,00 MHz. Déployez l’antenne pour trouver le signal le plus fort pour chaque station. Utilisez les touches GAUCHE / DROITE ou tournez le bouton de volume pour sélectionner „Radio FM“ sur l’écran principal, et appuyez sur la touche OK pour accéder à... -
Page 79: Dab/Dab
DAB/DAB+ Utilisez les touches GAUCHE/DROITE ou tournez le bouton de volume pour sélectionner „DAB/DAB+“ sur l’écran, appuyez sur la touche OK pour entrer DAB/DAB+ Lorsque DAB est utilisée pour la première fois sur votre radio, elle recherche les stations DAB et affiche „Scanning“ à l‘écran. Vous pouvez voir combien de stations ont été... -
Page 80: Centre D'informations
CENTRE D‘INFORMATIONS Utilisez les touches GAUCHE/DROITE ou tournez le bouton de volume pour sélectionner le „Centre d‘informations“ sur l‘écran, puis appuyez sur le bouton OK pour y accéder. Informations météo : Pour sélectionner les informations météo d‘un lieu donné, utilisez les touches HAUT/BAS pour faire défiler les continents et sélectionnez en appuyant sur le bouton OK. -
Page 81: Mode Bt
MODE BT Utilisez les touches GAUCHE/DROITE ou tournez le bouton de volume pour sélectionner „BT“ sur l’écran, appuyez sur la touche OK pour entrer en mode Sous „Paramètres du périphérique“, vous pouvez connecter votre appareil à la radio via BT, celle-ci apparaît sous le nom „Radio Gaga 2.0“. - Page 82 Réseau Configuration Wifi Dans les paramètres réseau, vous pouvez configurer une connexion WIFI en sélectionnant la configuration du réseau sans fil. La radio recherche alors les connexions WIFI disponibles. Trouvez votre connexion WIFI et sélectionnez-la avec le bouton OK. Pour entrer des lettres/chiffres, utilisez la fonction de contrôle du volume ou appuyez sur les touches CHIFFRES/LETTRES jusqu‘à...
- Page 83 Date et heure Configuration manuelle ou détection automatique Vous pouvez régler l‘heure et la date manuellement au lieu d‘utiliser la détection automatique. Tournez le bouton de volume ou appuyez sur les touches numériques pour entrer le numéro souhaité. Une fois que vous avez entré...
- Page 84 • Lorsque vous avez réglé les minutes, appuyez sur la touche DROITE pour changer „AM“ ou „PM“, puis appuyez sur la touche OK pour confirmer et revenir aux paramètres d‘alarme. • Maintenant, faites défiler et sélectionnez „Son“ en appuyant sur la touche OK.
- Page 85 Alarme de sieste • Après avoir sélectionné „Alarm“ dans les paramètres de configuration ou la touche ALARM de la télécommande, vous pouvez sélectionner „NAP Alarm (off)“. • Sélectionnez après combien de minutes vous souhaitez activer le réveil de sieste avec les options suivantes : désactivé, 5 minutes, 10 minutes, 20 minutes, 30 minutes, 60 minutes, 90 minutes, 120 minutes.
- Page 86 Écran Vous pouvez choisir d‘avoir un écran en couleur ou monochrome. Gestion de l‘alimentation Sélectionnez cette option pour configurer la mise en veille automatique de la radio après une période d‘inactivité ou quand aucun signal WIFI n‘est reçu. Vous pouvez choisir 5/15/30 minutes pour passer en mode veille ou vous pouvez choisir „Désactiver“...
- Page 87 Réglage FM • Mode : Vous pouvez définir le mode mono ou stéréo. • Seuil de puissance du signal : Sélectionnez les paramètres de seuil (seuil de recherche / seuil stéréo). Le seuil d‘intensité du signal est réglé pour basculer automatiquement entre les modes mono et stéréo.
-
Page 88: Résolution Des Problèmes
Reprise au démarrage Activez la fonction pour que la radio reprenne au démarrage suivant. L‘écran reste dans le menu principal. Actualisation du Software Indique si une mise à jour du logiciel est disponible pour la radio. Si disponible, cliquez ici pour commencer la mise à jour. Réinitialisation aux paramètres d‘usine Sélectionnez cette option pour réinitialiser votre radio et annuler tous les paramètres et préréglages. -
Page 89: Conseils Pour Le Recyclage
Problème Cause possible et solution La télécommande ne Vérifiez l'état de la pile. Si nécessaire remplacez- fonctionne pas bien Assurez-vous qu'il n'y a pas d'obstacle entre le capteur de télécommande sur l'appareil et la télécommande. Pas de connexion WiFi Assurez-vous que le mode WIFI est sélectionné dans les paramètres et que vous avez entré... -
Page 90: Déclaration De Conformité
DÉCLARATION DE CONFORMITÉ Fabricant : Chal-Tec GmbH, Wallstraße 16, 10179 Berlin, Allemagne. Ce produit est conforme aux directives européennes suivantes : 2011/65/UE (RoHS) 2014/53/UE (RED) La déclaration complète de conformité du fabricant est accessible par le lien suivant : https://use.berlin/10033145... - Page 91 Gentile cliente, La ringraziamo per aver acquistato il dispositivo. La preghiamo di leggere attentamente le seguenti istruzioni per l’uso e di seguirle per evitare possibili danni tecnici. Non ci assumiamo alcuna responsabilità per danni scaturiti da una mancata osservazione delle avvertenze di sicurezza e da un uso improprio del dispositivo.
-
Page 92: Avvertenze Di Sicurezza
AVVERTENZE DI SICUREZZA • Attenersi a tutte le indicazioni elencate nelle istruzioni per l‘uso. • Il dispositivo non deve essere utilizzato vicino all‘acqua o in un ambiente umido. • Assicurarsi che non vengano versati liquidi sul dispositivo e sulle aperture del dispositivo. •... -
Page 93: Pannello Di Controllo E Connessioni
PANNELLO DI CONTROLLO E CONNESSIONI Pannello di controllo Display 2. Sensore telecomando 3. Volume/Ok 4. Menu 5. Standby 6. Sleep 7. Sinistra 8. Sveglia 9. Modalità 10. Preset 11. Destra Connessioni Antenna 2. AUX 3. Alimentazione... -
Page 94: Telecomando E Tasti Funzione
TELECOMANDO E TASTI FUNZIONE Standby Menu Chiave In alto... - Page 95 Sinistra Muto In basso Info Abbassare volume Play/Pausa Destra Indietro Alzare volume Sveglia Avanti Sleep Numeri/Lettere Preferiti Dimmer STANDBY Premere STANDBY sul telecomando o sul lato frontale del dispositivo per attivare il dispositivo o passare in modalità standby. MUTE Premere MUTE sul telecomando per disattivare l’audio o premerlo nuovamente o VOL+ sul telecomando o ruotare la manopola sul dispositivo per proseguire con la riproduzione.
- Page 96 OK e TASTI FRECCIA Premere i tasti freccia sul telecomando o SINISTRA/DESTRA sul lato frontale per sfogliare tra le opzioni e premere OK per confermare la scelta. VOL+ e VOL- Per impostare il volume, premere VOL+ e VOL- o utilizzare direttamente la manopola.
-
Page 97: Utilizzo Generico
UTILIZZO GENERICO Messa in funzione della web radio • Collegare la spina alla presa elettrica. Sullo schermo compare “Benvenuti”. Assicurarsi di estrarre al massimo l’antenna. In questo modo si riceve il miglior segnale possibile. • Al primo utilizzo della radio, è possibile selezionare la lingua dopo la schermata di benvenuto ruotando la manopola del volume e confermare con OK. -
Page 98: Web Radio
WEB RADIO Utilizzare SINISTRA/DESTRA o ruotare la manopola del volume per selezionare “Web radio” sullo schermo, premere OK per aprire la web radio e vengono mostrate diverse opzioni: Salvare le emittenti radiofoniche preferite Trovata l’emittente desiderata, tenere premuto FAVOR o PRESET per raggiungere l’impostazione “Aggiungere ai preferiti”. -
Page 99: Media Center
MEDIA CENTER Utilizzare SINISTRA/DESTRA o ruotare la manopola del volume per selezionare “Media Center” sullo schermo e premere OK per aprire il Media Center. UPnP: Universal Plug and Play permette di stabilire una connessione a un altro dispositivo per riprodurre musica, come ad es. PC (Windows Media Player), telefoni cellulari (GooglePlay) e altri dispositivi. -
Page 100: Radio Fm
RADIO FM L’intervallo di frequenza FM è compreso tra 87,5 MHz e 108,00 MHz. Aprire completamente l’antenna per trovare il segnale più intenso per ogni emittente. Utilizzare SINISTRA/DESTRA o ruotare la manopola del volume per selezionare “Radio FM” dalla schermata principale e premere OK per aprirla. -
Page 101: Dab/Dab
DAB/DAB+ Utilizzare SINISTRA/DESTRA o ruotare la manopola del volume per selezionare “DAB/DAB+” sullo schermo e premere OK per aprire DAB/ DAB+. Quando si utilizza DAB sulla radio per la prima volta, inizia la ricerca di emittenti DAB e sullo schermo compare “Scanning”. Una volta trovate tutte le emittenti disponibili, ne viene mostrata la selezione. -
Page 102: Centro Informazioni
CENTRO INFORMAZIONI Utilizzare SINISTRA/DESTRA o ruotare la manopola del volume per selezionare “Centro informazioni” sullo schermo e premere OK per aprirlo. Informazioni meteorologiche: per selezionare le informazioni meteo di una certa località, utilizzare IN ALTO/IN BASSO per sfogliare tra i continenti e selezionare con OK. -
Page 103: Modalità Bt
“BT” sullo schermo e premere OK per aprire la funzione BT. Nelle impostazioni del dispositivo è possibile collegare il dispositivo con la radio tramite BT e viene indicata con “Radio Gaga 2.0”. 2. Selezionare il file audio desiderato sul dispositivo esterno e iniziare la riproduzione. - Page 104 Rete Configurazione WLAN Nelle impostazioni di rete è possibile realizzare una connessione WiFi selezionando la configurazione di rete senza filo. La radio cerca le connessioni WiFi disponibili. Cercare la connessione WiFi e confermare con OK. Per inserire lettere/ numeri, utilizzare la funzione della manopola del volume o premere NUMERI/LETTERE fino a quando viene mostrata la cifra esatta e premere DESTRA per passare a quella successiva.
- Page 105 Data e ora Impostazione manuale o rilevamento automatico Ora è data possono essere impostate manualmente invece di utilizzare il rilevamento automatico. Ruotare la manopola del volume o utilizzare i numeri per inserire le cifre desiderate. Non appena è stata inserita la cifra corretta, premere DESTRA per impostare il giorno.
- Page 106 • Quando i minuti sono sul valore corretto, premere DESTRA per modificare “AM” o “PM”, premere OK per confermare e tornare alle impostazioni della sveglia. • Scorrere verso il basso e selezionare “Sound” con OK. Ora è possibile scegliere tra segnale acustico, melodia, web radio, FM o DAB/DAB+. •...
- Page 107 Sveglia per sonnellino • Dopo aver selezionato “Alarm” nelle impostazioni di configurazione o ALARM sul telecomando è possibile scegliere “NAP Alarm (off)”. • Selezionare dopo quanti minuti si desidera accendere la sveglia per sonnellino, tra le opzioni: spegnere, 5 minuti, 10 minuti, 20 minuti, 30 minuti, 60 minuti, 90 minuti, 120 minuti.
- Page 108 Schermo Lo schermo può essere impostato a colori o monocromo. Gestione energetica Selezionare questa opzione per configurare la radio in modo che passi automaticamente in modalità standby dopo un determinato tempo di inattività o se non viene ricevuto segnale WiFi. Si possono selezionare 5/15/30 minuti per il passaggio alla modalità...
- Page 109 Impostazione FM • Modalità: può essere impostata su “Mono” o “Stereo”. • Valore soglia per l’intensità del segnale: selezionare le impostazioni per il valore soglia (soglia di ricerca/soglia stereo). Il valore soglia per l’intensità del segnale viene impostato sul passaggio automatico tra modalità...
-
Page 110: Correzione Degli Errori
Ripresa dopo l’accensione Accendere questa funzione per fare in modo che la radio funzioni dopo l’accensione. Lo schermo rimane sul menu principale. Aggiornamento software Mostra se sono disponibili aggiornamenti per il software della radio. Se è così, cliccare per iniziare l’aggiornamento. Ritornare alle impostazioni di fabbrica Selezionare questa opzione per riportare la radio e tutte le impostazioni realizzate alla versione originale di fabbrica. -
Page 111: Smaltimento
Problema Possibile causa e soluzioni Il telecomando Controllare se la batteria e vuota. Sostituirla se non funziona necessario. correttamente. Assicurarsi che non ci siano ostacoli tra il sensore sul dispositivo e il telecomando. Nessuna connessione Assicurarsi di avere selezionato la modalità WiFi. -
Page 112: Dichiarazione Di Conformità
DICHIARAZIONE DI CONFORMITÀ Produttore: Chal-Tec GmbH, Wallstraße 16, 10179 Berlino, Germania. Questo prodotto è conforme alle seguenti direttive europee: 2011/65/UE (RoHS) 2014/53/UE (RED) La dichiarazione di conformità completa del produttore è disponibile al seguente link: https://use.berlin/10033145...
Need help?
Do you have a question about the Radio Gaga 2.0 and is the answer not in the manual?
Questions and answers