
Related Manuals for Inficon Contura S600


Summary of Contents for Inficon Contura S600
- Page 1 Translation of the original operating instructions ® Contura S600 Leak detector Catalog No. 574-000 From software version 1.52 (Operating unit) jina92en1-04-(2302)
- Page 2 INFICON GmbH Bonner Strasse 498 50968 Cologne, Germany...
-
Page 3: Table Of Contents
INFICON Table of Contents Table of Contents 1 About this manual ............................ 7 1.1 Warnings .............................. 7 1.2 Target groups............................ 7 2 Safety................................ 8 2.1 Intended use ............................ 8 2.2 Duties of the operator.......................... 9 2.3 Owner requirements.......................... 9 2.4 Dangers.............................. 9 3 Shipment, Transport, Storage........................ - Page 4 Table of Contents INFICON 6.2.4 Switch off Automatic Login...................... 28 6.2.5 Switch on Automatic Login...................... 28 6.2.6 Product-specific settings ...................... 28 6.2.6.1 Determine the Measuring mode .................. 28 6.2.6.2 Select, modify or create product (measurement settings) .......... 30 6.2.6.3 Create product variants ..................... 31 6.2.6.4...
- Page 5 INFICON Table of Contents 6.10.4 Inner volume calibration...................... 42 6.10.5 Check calibration of inner volume.................... 43 6.11 Call active errors and warnings...................... 44 6.12 Logging off from the device........................ 44 6.13 Switching off the device......................... 44 7 Warning and error messages........................ 45 7.1 List of warning and error messages .......................
- Page 6 Table of Contents INFICON 10.3.1 Export measurement data...................... 66 10.3.2 Export ZERO measurements...................... 67 10.3.3 Change and control settings ....................... 67 10.4 CE Declaration of Conformity......................... 70 Index ................................ 72 Contura® S600-Operating-instructions-jina92en1-04-(2302)
-
Page 7: About This Manual
INFICON About this manual | 1 1 About this manual This document applies to the software version stated on the title page. Product names may occur in the document, which are added for identification purposes only and belong to the respective owner of the rights. -
Page 8: Safety
2 | Safety INFICON 2 Safety 2.1 Intended use The device is a leak detector, in which test objects are tested for leaks in the foil chamber. • Only operate the device as intended, as described in the operating instructions, in order to avoid hazards due to incorrect use. -
Page 9: Duties Of The Operator
INFICON Safety | 2 2.2 Duties of the operator • Read, observe, and follow the information in this manual and in the work instructions provided by the owner. This concerns in particular the safety and warning instructions. • Always observe the complete operating instructions for all work. - Page 10 2 | Safety INFICON • Never try to find toxic, caustic, microbiological, explosive, radioactive or other harmful substances with the device. Dangers from electric There is a danger to life from the contact of conductive parts inside the device. power •...
-
Page 11: Shipment, Transport, Storage
INFICON Shipment, Transport, Storage | 3 3 Shipment, Transport, Storage Scope of delivery Item Quantity Basic unit Measuring chamber Power supply cable Specimen (CON-Check) Textile mesh Operating manual Unpacking instructions ► Check the scope of delivery after receipt of the product to make sure it is complete. -
Page 12: Description
4 | Description INFICON 4 Description 4.1 Function The device is a leak detector and can be used for non-destructive testing of food packaging containing gas for leaks. The type of gas does not matter for the measurement. Measuring principle You place the test objects between the two elastic membranes of the foil chamber. -
Page 13: Display
INFICON Description | 4 4.2 Display 4.2.1 Assembly of the touchscreen The display is a touchscreen and works primarily with symbols. The touchscreen responds to being touched lightly. To correctly select the chosen function, avoid strong pressure. You can always see symbols for the navigation on the display. -
Page 14: Result Display
4 | Description INFICON Navigation buttons The buttons can appear in five different colors: • Gray: Function is disabled • Dark blue: Function can be activated • Light blue: Function is active • Red: Error is active (navigation button diagnosis) •... - Page 15 INFICON Description | 4 Measurement result: If the leak rate is below the setpoint, the measurement result is shown on a green Leak-proof background. Max. leak rate: Measurement Fig. 1: The measurement display is underlined in green when the test object has passed...
-
Page 16: Technical Data
4 | Description INFICON 4.3 Technical data Mechanical data 574-000 Name Contura S600 Dimensions basic unit (L × W × H) 730mm x 540mm x 250mm Dimensions measuring chamber (L x W x 800mm x 780mm x 420mm H), without plug... -
Page 17: Factory Settings
INFICON Description | 4 Ambient conditions 574-000 Name Contura S600 Max. altitude above sea level 2000 m Max. relative humidity above 40°C 50 % Max. relative humidity from 31°C to 40°C 80% to 50% (decreasing linearly) Max. humidity up to 31 °C... - Page 18 4 | Description INFICON Lighting Optional input field 18 / 76 Contura® S600-Operating-instructions-jina92en1-04-(2302)
-
Page 19: Installation
INFICON Installation | 5 5 Installation 5.1 Setup WARNING Danger from moisture and electricity Moisture entering the device can lead to personal injury due to electric shocks as well as damage to property due to short circuiting. ► Only operate the device in a dry environment. - Page 20 5 | Installation INFICON In order to be able to operate the measuring chamber while standing without great effort, provide for an installation area at a height of approx. 590 mm above the floor. Place the basic unit and the measuring chamber on a firm and level surface with the feet.
-
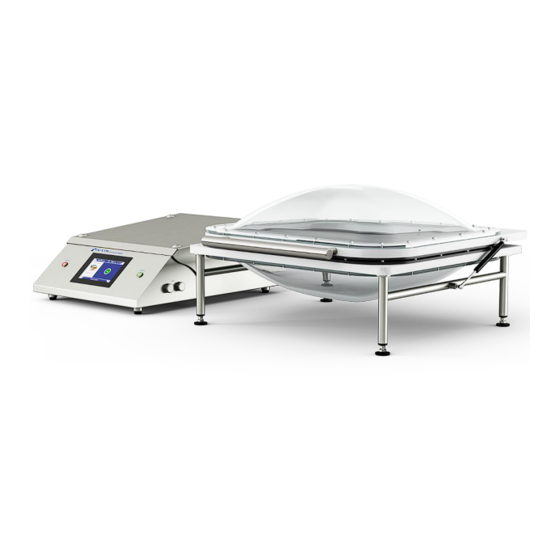
Page 21: Design Of Device
INFICON Installation | 5 5.2 Design of device Fig. 4: Front view Measuring chamber USB 2.0 interface Measuring chamber handle "START" button Button for starting the measurement Green = Ready to measure Gas spring Touchscreen USB 2.0 interface "STOP" button Button for stopping the measurement Red = Error or warning Contura®... - Page 22 5 | Installation INFICON Fig. 5: Rear view with connections Hose outside Ø 16 mm Without function, exhaust air opening is on the underside Hose outside Ø 8 mm RJ45 network interface Hose outside Ø 8 mm RS232 interface Cable to the measuring chamber supply...
-
Page 23: Markings On The Device
INFICON Installation | 5 5.2.1 Markings on the device The markings on the device have the following meanings: Label for the returns to the recycling circuit. Device cannot be scrapped with the normal domestic waste. Hand injuries warning 5.3 Connecting to the power supply system... -
Page 24: Other Interfaces
5 | Installation INFICON ð This configures the character that is sent after the barcode is output. Language selection: “English US“ ð The leak detector requires an English (US) keyboard layout. To test the configuration of the scanner, connect it to a PC and use a text editor to check the output of the scanner. -
Page 25: Operation
INFICON Operation | 6 6 Operation 6.1 Switch on and login ► To switch on the device, press the power button. ð When delivered the device shows the measurement screen. 6.2 Basic settings 6.2.1 Setting the language You can set the language in the user settings, see "Select, modify, create user profile [} 26]". -
Page 26: Select, Modify, Create User Profile
6 | Operation INFICON • create / modify / delete images, • export / delete measurement data, • modify measurement settings. Supervisor Members of the group Supervisor have all the rights of groups User and Operator. Moreover, they can • create / modify / delete operators, •... -
Page 27: Modify Personal Settings
INFICON Operation | 6 Mueller Chips Name Mueller Group User Language German User settings If the "PIN" field is not filled in or you want to change the content, enter a 4-digit PIN. To assign the required rights to the user, select a group. Via select between the groups "User", "Operator"... -
Page 28: Switch Off Automatic Login
6 | Operation INFICON 6.2.4 Switch off Automatic Login Factory setting As per factory settings, after switching on the device the user "Supervisor" automatically logs in and the measurement screen is called. This default user also has the permissions of the group "Supervisor". Without changing this setting, any user can operate all functions without restriction. - Page 29 INFICON Operation | 6 Undesired measurement results in the Measuring mode "Universal" are possible Seriously damaged packaging (gross leaks) could be shown as "Leak-proof" in testing, because when evacuating the measuring chamber, the filling gas is completely sucked out of the packaging.
-
Page 30: Select, Modify Or Create Product (Measurement Settings)
6 | Operation INFICON 6.2.6.2 Select, modify or create product (measurement settings) For setting measurement specifications you need a product that has been created. ü Operator or Supervisor rights > Products ð Existing products are displayed as a list. Press a product name and choose from the displayed tool-bar or from the display: , to load a product. -
Page 31: Create Product Variants
INFICON Operation | 6 Also fill in the "Max. inner volume" field, which is displayed depending on the measuring mode, to specify the gas-filled inner volume. Switch to the tab "Part 2". Select the "measurement time" from the displayed time intervals. -
Page 32: Changing The Volume
6 | Operation INFICON Highlight the desired shortcut key (maximum 6) and press the "Edit" button. ð The "Product favorite" window is displayed. "Name" field: Assign a short name for the shortcut key of the desired product. Depending on the width of the letters, you can save between 3 and 6 letters. -
Page 33: Switch Automatic Cycle On Or Off
INFICON Operation | 6 The option "Autostart" is activated in the factory settings. You can switch the "Autostart" option on or off. ü Operator or Supervisor rights > Device Adjust. Save ð If the automatic measurement start is OFF, press the "START" button on the touchscreen or on the housing to start the measurement. -
Page 34: Change Settings For Zero
6 | Operation INFICON Adjust. Save 6.2.11 Change settings for ZERO To compensate for external influences such as air pressure or temperature on the measurement, carry out ZERO measurements regularly when the measuring chamber is empty. This helps to maintain accuracy of measurements. When certain conditions occur, you will be prompted to perform ZERO measurements, see also “Perform... -
Page 35: Perform Zero Measurement
INFICON Operation | 6 ð Existing products are displayed. If you cannot find the desired product, you can create it, see "Select, modify or create product (measurement settings) [} 30]". Click the desired product name. Load ð You will be asked to perform a ZERO measurement. -
Page 36: Checking The Operation Of The Device
6 | Operation INFICON Activate the "Optional input field". Save 2. Fill or change input field in measurement window ü You have activated the optional input field. Touch the input field in the measurement window. Enter the desired text using the keyboard that appears. -
Page 37: Measuring
INFICON Operation | 6 6.4 Measuring CAUTION Warning about hand injuries Only open and close the measurement chamber when your fingers are outside the measuring chamber halves and outside the pivoting range of the measuring chamber. NOTICE Damage by improper filling of the measuring chamber Leaking liquids entering the tubing, can interfere with the function of the device. -
Page 38: Measurement Data And Device Information
6 | Operation INFICON If you want to cancel the measurement, press the "STOP" button on the front side of the device, see Design of device [} 21]. ð The measured leak rate is highlighted in color and numerically in the "Measurement"... -
Page 39: Deleting Measurement Data
INFICON Operation | 6 > Measurements Save ð All measurement data are transferred. There is an indication when the export is completed. The measurement data remain saved on the device. See also 2 Data request or control via network [} 66] 6.5.4 Deleting measurement data... -
Page 40: Updating The Software Of The Basic Unit
6 | Operation INFICON Connect the USB flash drive to a USB port on the device. > Update > Update operating unit ð At the top in the window the active software version of the user interface is shown. If one or more versions of the software are on the USB flash drive the most recent version is shown on the line below. -
Page 41: Save User And Product Data
INFICON Operation | 6 ð After completion there is an automatic restart of the system. 6.7 Save user and product data You can save all user and product data to a USB flash drive and restore whenever necessary. No backup of measurement data When backing up user and product data no measurement data backup is performed. -
Page 42: Calibrating The Device
6 | Operation INFICON 6.10 Calibrating the device 6.10.1 Reasons for calibration In the following cases, calibration is mandatory: • The installation site of the leak detector is located above 1000 m above sea level. • The measuring chamber was changed. -
Page 43: Check Calibration Of Inner Volume
INFICON Operation | 6 ð The "Calibration" window opens. Select "Inner volume" in the selection field and then follow the instructions on the screen. ð After the ZERO measurement, place the test specimen in the center of the measuring chamber. -
Page 44: Call Active Errors And Warnings
6 | Operation INFICON A deviation of approx. 4 ml is within the range of the tolerance and does not affect the gross leak detection. 6.11 Call active errors and warnings Active errors Errors or warnings are displayed on the active user interface. In addition, the diagnosis symbol changes color >... -
Page 45: Warning And Error Messages
INFICON Warning and error messages | 7 7 Warning and error messages During operation, the display shows information that helps you operate the instrument. Measurement values are displayed along with current unit modes, operating instructions as well as warnings and error messages. The instrument is equipped with extensive self-diagnostic functions. - Page 46 7 | Warning and error messages INFICON Type Notification Possible sources of Remedy error W106 Several EEPROM A software update • Confirm the warning message parameters have been introduced new • Check that the message does not appear initialized parameters when you restart the device •...
- Page 47 INFICON Warning and error messages | 7 Type Notification Possible sources of Remedy error W170 Hood open Measurement started • Measure with closed chamber with chamber open Proximity switch not • Contact customer service connected Proximity switch not • Contact customer service...
- Page 48 7 | Warning and error messages INFICON Type Notification Possible sources of Remedy error E520 Pressure too high Leak in the valve block • Check that the message does not appear when you restart the device • Contact customer service Pump is defective •...
- Page 49 INFICON Warning and error messages | 7 Type Notification Possible sources of Remedy error E564 Valve fault Valve sticking • Repeat the measurement Valve defective • Perform valve cleaning • Contact customer service W600 Calibration factor too low Incorrect value entered •...
-
Page 50: Cleaning And Maintenance
8 | Cleaning and maintenance INFICON 8 Cleaning and maintenance All cleaning and maintenance work described here must be carried out without opening the device hood out of stainless steel! DANGER Risk of death from electric shock There are high voltages inside the device. Touching parts where electrical voltage is present can result in death. -
Page 51: Cleaning Hoses
INFICON Cleaning and maintenance | 8 Membrane Pull the textile mesh carefully from the Velcro tape and wipe the membrane with a soft damp cloth. Use only warm water to moisten. Avoid cleaning agents that contain alcohol, fat or oil. -
Page 52: Replace Inline External Filters
Tighten the blue screw caps of the filter element. 8.6 Replace textile mesh Textile mesh measuring chamber Use the supplied mesh fabric or order a set Contura S600 with 10 pieces: Order number 200010083 Required tools None Gently pull the used textile mesh from the Velcro tape. See also "Cleaning the membrane [} 50]". -
Page 53: Replace Membrane Support With Membranes
INFICON Cleaning and maintenance | 8 Make sure that the textile mesh does not protrude from either side of the Velcro tape and the function of the chamber sealing is not impaired. 8.7 Replace membrane support with membranes Upper membrane support complete,... - Page 54 8 | Cleaning and maintenance INFICON WARNING Risk of injury from the hood falling down When dismantling the gas pressure springs or installing a gas pressure spring in the service position, the hood can fall and lead to injuries. ► Use the connection point for the left gas pressure spring. See the following steps.
- Page 55 INFICON Cleaning and maintenance | 8 If it is necessary to remove the upper membrane support including the damaged membrane, unscrew the 22 screws with a T25 screwdriver. If it is necessary to remove the lower membrane support including the damaged membrane, first pull both hoses from the bottom of the measuring chamber.
-
Page 56: Velcro Tape Replacement
8 | Cleaning and maintenance INFICON Fig. 8: Position of the hoses 1 Lower membrane support 2 Hose connections 3 Hose guides Slide the black hose guides into a right angle arrangement. This provides strain relief. 8.8 Velcro tape replacement Measuring chamber velcro strip Order number 200004918 (2.26 m long) -
Page 57: Replacement Of The Measuring Chamber Hinges
INFICON Cleaning and maintenance | 8 In production rooms with increased dust load, the filter mat on the bottom of the device can become contaminated. Replace the filter mats if there is significant contamination. The filter mats are also changed every 4 years as part of the manufacturer's service, see also "Service by the manufacturer [} 59]”. -
Page 58: Change Gas Springs Of The Measuring Chamber
8 | Cleaning and maintenance INFICON 8.11 Change gas springs of the measuring chamber Set with 2 gas springs and 4 angle Order number 200010084 joints Required tools Open-end wrench size 7 The holding force of gas springs decreases over time due to wear. If the gas springs no longer hold the chamber lid in the open position, replace the gas springs. -
Page 59: Perform Valve Cleaning (Only If Instructed By Service Department)
INFICON Cleaning and maintenance | 8 8.12 Perform valve cleaning (only if instructed by service department) Small particles on the valve seats can trigger warning message 561. If this warning message occurs several times, contact the service department. ü You have contacted the service department. -
Page 60: Sending For Repair Or Maintenance
8 | Cleaning and maintenance INFICON • Replacement inline internal filters • Replacement 2-inline external filters • Replacement of lower side air filter 8.16 Sending for repair or maintenance You can send the device to the manufacturer for repair or maintenance. For further details see "Returning the device for maintenance, repair or disposal [} 61]”. -
Page 61: Decommissioning
INFICON Decommissioning | 9 9 Decommissioning 9.1 Disposing of the device The device can either be disposed of by the operator or be sent to the manufacturer. The device consists of materials that can be recycled. This option should be exercised to prevent waste and also to protect the environment. - Page 62 9 | Decommissioning INFICON 62 / 76 Contura® S600-Operating-instructions-jina92en1-04-(2302)
-
Page 63: Appendix
Appendix | 10 10 Appendix 10.1 Accessories and spare parts Order number Hose package measuring chamber Contura S600 200010085 Lower dome, acrylic glass, for Contura S600 200010091 Top dome, acrylic glass, for Contura S600 200010081 Gas spring 15-120-200N Contura S600 200010084... -
Page 64: Operate Leak Detector Via Web Browser (Lan)
10 | Appendix INFICON 10.2 Operate leak detector via web browser (LAN) NOTICE Operating system can be hacked via USB or Ethernet The Linux operating system used in the leak testing is not updated automatically and can therefore contain security gaps. This vulnerability may be exploited through the Ethernet and USB interfaces of the leak testing to provide unauthorized access to the system. -
Page 65: Setting The Lan Connection In The Pc Or Tablet
INFICON Appendix | 10 10.2.2 Setting the LAN connection in the PC or Tablet LAN connection - quick-start If you have performed the steps described here once, it is sufficient to enter the IP address for many devices in case of repetition. -
Page 66: Data Request Or Control Via Network
10 | Appendix INFICON 10.3 Data request or control via network In addition to access to the graphical user interface, you also have the option of retrieving specific measurement data from your leak detector, making settings and sending control commands. -
Page 67: Export Zero Measurements
INFICON Appendix | 10 Parameter Name Description Options Example pvid product Query measurements of ID's of the product pvid=12 variants one or more product variants. Separated pvid=8,15,2 variants by comma for several See also 2 Graphical display of the measurement data [} 38] 10.3.2 Export ZERO measurements... - Page 68 10 | Appendix INFICON Loads the product with ID 2 and the product variant with ID 1. The response is either {"confirmation":"Product load executed"} – If the product is available {"error":"Product not available"} – If the product is not available Change "Measuring mode"...
- Page 69 INFICON Appendix | 10 {"stateId":3,"errors":[{"number":355,"typeId":2,"type":"Warning","text":"Int vol negative","value":-8.5}]} If errors or warnings are currently present, these are added. Contura® S600-Operating-instructions-jina92en1-04-(2302) 69 / 76...
-
Page 70: Ce Declaration Of Conformity
10 | Appendix INFICON 10.4 CE Declaration of Conformity 70 / 76 Contura® S600-Operating-instructions-jina92en1-04-(2302) - Page 71 INFICON Appendix | 10 Contura® S600-Operating-instructions-jina92en1-04-(2302) 71 / 76...
-
Page 72: Index
Index INFICON Index Access controls 25 Entering a barcode 31 Additional input field 35 Errors and warnings (active) 44 Auto Login 28 Automated login Switch off 28 Factory settings 17 Switch on 28 Function buttons 14 Automatic cycle Function description 12... - Page 73 INFICON Index Large Rigid 29 Large Soft 29 Take a screenshot 59 Small Rigid 29 Touchscreen 13 Universal 28 Transfer the product image to the leak detector 31 Measuring principle 12 Transport 11 Modify Personal Settings 27 Universal 28 Operator 25...
- Page 74 Index INFICON 74 / 76 Contura® S600-Operating-instructions-jina92en1-04-(2302)
Need help?
Do you have a question about the Contura S600 and is the answer not in the manual?
Questions and answers