
Related Manuals for cytiva VIA Thaw L1000


Summary of Contents for cytiva VIA Thaw L1000
- Page 1 VIA Thaw L1000 Operating Instructions Original instructions VIA Thaw L1000 cytiva.com...
-
Page 2: Table Of Contents
Manage thawing profiles ..........................53 5.3.1 Manage thawing profiles on Chronicle ....................54 5.3.2 Manage thawing profiles on VIA Thaw L1000 .................. 55 Operation ......................60 Overview ................................61 Select a thawing profile ..........................63 Load a cryobag ..............................64 Thawing process ............................ - Page 3 Great Britain ..............................99 9.3.5 Regulatory statements ..........................100 9.3.6 Regulations for North America ....................... 101 9.3.7 Declaration of Hazardous Substances (DoHS) ................102 9.3.8 Wireless LAN ..............................104 Health and Safety Declaration Form ...................... 105 VIA Thaw L1000 Operating Instructions 29492479 AE...
-
Page 4: Introduction
This chapter contains important user information, descriptions of safety notices, regu- latory information, intended use of the product, and lists of associated documentation. In this chapter Section See page About this manual Important user information Associated documentation VIA Thaw L1000 Operating Instructions 29492479 AE... -
Page 5: About This Manual
VIA Thaw L1000. Typographical conventions Software items are identified in the text by bold italic text. Hardware items are identified in the text by bold text. In electronic format, references in italics are clickable hyperlinks. VIA Thaw L1000 Operating Instructions 29492479 AE... -
Page 6: Important User Information
VIA Thaw L1000 is intended for research or manufacturing use only. It is not intended for clinical procedures or for diagnostic purposes. VIA Thaw L1000 should only be used by a specifically trained scientist or technician in a Process Development Laboratory or manufacturing environment. - Page 7 Note: A note is used to indicate information that is important for trouble-free and optimal use of the product. Tip: A tip contains useful information that can improve or optimize your proce- dures. VIA Thaw L1000 Operating Instructions 29492479 AE...
-
Page 8: Associated Documentation
Associated documentation Introduction This section describes the user documentation that is delivered with the product, and how to find related literature that can be downloaded or ordered from Cytiva. User documentation for VIA Thaw L1000 The user documentation listed in the table below is available in printed or PDF format. -
Page 9: Safety Instructions
This chapter describes safety precautions, labels and symbols that are attached to the instrument. In addition, the chapter describes emergency procedures. In this chapter Section See page Safety precautions Symbols and abbreviations Emergency procedures VIA Thaw L1000 Operating Instructions 29492479 AE... -
Page 10: Safety Precautions
• Objects can become warm due to warming up of the heater plates during normal operation of the instrument NOTICE VIA Thaw L1000 must remain upright during transport/ handling, operation, and storage. Transporting/handing, oper- ating, or storing the unit in another orientation can cause damage to the instrument. -
Page 11: Symbols And Abbreviations
This symbol indicates the location of a wired networking terminal. This symbol indicates the location of a fuse and the fuse rating. Year (YYYY) and month (MM) of manufacture in YYYY-MM format. Name and address of the manufacturer. VIA Thaw L1000 Operating Instructions 29492479 AE... -
Page 12: Emergency Procedures
Emergency procedures Introduction This section describes how to shut down the VIA Thaw L1000 instrument in an emer- gency situation, and the procedure for restarting the VIA Thaw L1000 instrument. The section also describes the result in the event of power failure. - Page 13 Follow the steps below to restart the instrument after emergency shutdown or power failure: Step Action Make sure that the condition that caused the emergency shutdown is corrected. Connect the power supply cord to the power outlet. Switch on the instrument. VIA Thaw L1000 Operating Instructions 29492479 AE...
-
Page 14: System Description
3 System description System description About this chapter This chapter gives an overview to VIA Thaw L1000, and a brief description of its func- tion. In this chapter Section See page System overview User interface Thawing profiles VIA Thaw L1000 Operating Instructions 29492479 AE... -
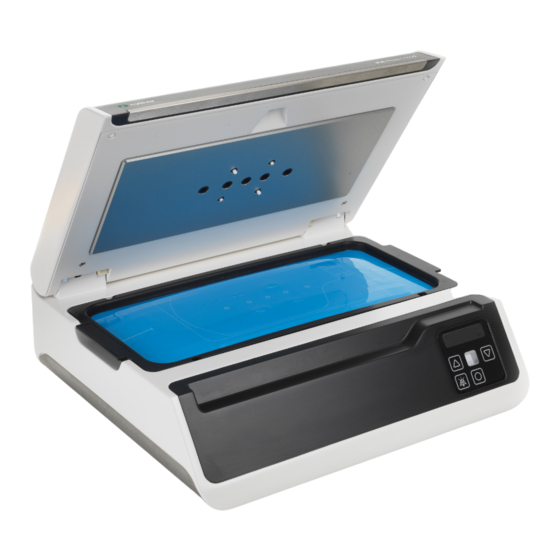
Page 15: System Overview
System overview Introduction to VIA Thaw L1000 VIA Thaw L1000 tightly controls the heating of cryopreserved samples stored in cryo- bags until it detects that the samples are thawed. Multiple sensors constantly monitor the condition of the sample to determine when thawing is complete. - Page 16 Control panel Drain plunger Power and network connections The illustration below shows the power and the network connections present on VIA Thaw L1000. Part Description Appliance inlet Fuse holder Power switch Network port VIA Thaw L1000 Operating Instructions 29492479 AE...
-
Page 17: User Interface
3 System description 3.2 User interface User interface In this section Section See page 3.2.1 Control panel 3.2.2 Start-up menu structure 3.2.3 Admin menu VIA Thaw L1000 Operating Instructions 29492479 AE... -
Page 18: Control Panel
3 System description 3.2 User interface 3.2.1 Control panel 3.2.1 Control panel The illustration below shows the control panel of VIA Thaw L1000. Part Description Scroll up button Display Status indicator light Scroll down button Enter button Acknowledge alarm button... - Page 19 The instrument is ready to start a thawing process when the Thawing profile screen is displayed. The illustration below shows the thawing profile information that appears on the Thawing profile screen. Part Description Profile name Current date and time VIA Thaw L1000 Operating Instructions 29492479 AE...
- Page 20 Connected to Chronicle Wired network link not active Wireless network link not active Time alarm value for the selected profile Load temperature value for the selected profile Fill volume for the selected profile VIA Thaw L1000 Operating Instructions 29492479 AE...
-
Page 21: Start-Up Menu Structure
The illustration below shows the Start-up menu structure after switching on VIA Thaw L1000. Note: On first power up, VIA Thaw L1000 may request the current local date (year, month, day) and time (hours, minutes and time-zone) in order to maintain correct thaw logs for the cryobags. See Section 4.4.2 Set date and time, on... - Page 22 This screen is displayed only if the plates are not heated to the correct temperature. Thawing profile Thawing profile screen, on page Admin menu Section 3.2.3 Admin menu, on page Thaw logs Section 6.6 Viewing thaw logs, on page VIA Thaw L1000 Operating Instructions 29492479 AE...
-
Page 23: Admin Menu
3.2.3 Admin menu 3.2.3 Admin menu The thawing profiles, the settings and network of VIA Thaw L1000 can be managed through the Admin menu. The following illustration shows the Admin menu structure. To access the submenus, Access the Admin menu, on page... - Page 24 The PIN code is a four-digit number required to access the Admin menu. The PIN code changes daily and can only be obtained after the user registers the instrument on Chronicle. See Section 4.5 Chronicle, on page Follow the instructions below to obtain a PIN code. VIA Thaw L1000 Operating Instructions 29492479 AE...
- Page 25 Step Action Log on to Chronicle. Select Instrument tab. Search the instrument list and select the name of the VIA Thaw L1000 instrument currently in use. Result: The current PIN code is listed alongside other information about the instru- ment.
- Page 26 The PIN screen cannot be accessed from the Admin screen if the PIN is entered incorrectly 3 times within a 5-minute period. In this case, the Locked PIN screen appears, as shown below, and the user has to wait for the PIN screen to appear again. VIA Thaw L1000 Operating Instructions 29492479 AE...
-
Page 27: Thawing Profiles
The profiles can be managed via either Chronicle or the instrument. See Section 5.3 Manage thawing profiles, on page VIA Thaw L1000 is able to store up to a total of 16 thawing profiles. The profiles can be accessed on the instrument via the Start-up menu structure. NOTICE Prior to use, check that the selected thawing profile and alarm preset are appropriate. -
Page 28: Installation
In this chapter Section See page Site requirements Unpack the product Install VIA Thaw L1000 Set up the system Chronicle Connect to the system network VIA Thaw L1000 Operating Instructions 29492479 AE... -
Page 29: Site Requirements
±2° Environmental conditions The following precautions must be taken when choosing a location for VIA Thaw L1000: • The instrument must not be located near liquids or areas where liquids can splash, spill, or drip onto the instrument, areas of high humidity or dampness, areas of direct sunshine, or outdoors. -
Page 30: Unpack The Product
• CD box (containing user documentation CD) • EU Declaration of Conformity If any of these items are missing or damaged do not use the instrument and contact your local Cytiva representative or authorized distributor. VIA Thaw L1000 Operating Instructions 29492479 AE... -
Page 31: Install Via Thaw L1000
This can result in a risk of electric shock or fire. WARNING The instrument should only be used with a protectively earthed mains socket outlet. The instrument must be connected to a protectively earthed mains socket outlet to ensure safe operation. VIA Thaw L1000 Operating Instructions 29492479 AE... - Page 32 4 Installation 4.3 Install VIA Thaw L1000 WARNING VIA Thaw L1000 must only be used with the mains power supply cord supplied. Contact your Cytiva representative or authorized distributor if the supplied mains power supply cord is unsuitable for your location.
- Page 33 4 Installation 4.3 Install VIA Thaw L1000 Install the thawing tray The thawing tray must be installed in VIA Thaw L1000 before any cryobags can be thawed. NOTICE Unlock transport clips before operation. If not done this can cause the cryobags to thaw incorrectly.
- Page 34 Verify that the outer edge of the thawing tray is aligned with the edges of the cavity and that the gap between the instrument and tray is even. Connect the mains power supply cord Follow the instructions below to connect VIA Thaw L1000 to mains power. Step Action Connect the mains supply cord to the appliance inlet on the rear of the instrument.
- Page 35 4 Installation 4.3 Install VIA Thaw L1000 Step Action Connect the mains power supply cord to the mains socket outlet. VIA Thaw L1000 Operating Instructions 29492479 AE...
-
Page 36: Set Up The System
4 Installation 4.4 Set up the system Set up the system In this section Section See page 4.4.1 Start the instrument 4.4.2 Set date and time 4.4.3 Factory reset VIA Thaw L1000 Operating Instructions 29492479 AE... -
Page 37: Start The Instrument
4 Installation 4.4 Set up the system 4.4.1 Start the instrument 4.4.1 Start the instrument Follow the instructions below to switch on VIA Thaw L1000. Step Action Make sure that the thawing tray is present. Remove any cryobag from the instrument. -
Page 38: Set Date And Time
Admin menu. Without access to the Admin menu, it is not possible to rectify the time and date. VIA Thaw L1000 may request the date and time on start-up, when the current settings are invalid. to select the desired value and tap... - Page 39 The Admin menu will appear shortly after. Set the time and timezone The following illustration shows how to set the time and time-zone on VIA Thaw L1000. Follow the instructions below to change the time and time-zone on the instrument.
- Page 40 Time-zone +00:00 is the time-zone offset from Universal Coordinated Time (UTC). to select the time-zone and tap to confirm. The time-zone is set concurrently to hours and minutes. Result: The Confirm screen appears. The Admin menu will appear shortly after. VIA Thaw L1000 Operating Instructions 29492479 AE...
-
Page 41: Factory Reset
4.4.3 Factory reset 4.4.3 Factory reset VIA Thaw L1000 can be restored to its factory supplied condition by performing a factory reset. The factory reset eliminates all stored information relating to thawing profiles, network settings, and thaw logs. The preprogrammed thawing profiles are restored. -
Page 42: Chronicle
Contact your local Cytiva representative or an authorized distributor for more informa- tion about access to Chronicle. Note: Chronicle is not a part of VIA Thaw L1000 and it is not required for the func- tioning of the instrument. Register the instrument on Chronicle Follow the instructions below to register VIA Thaw L1000 on Chronicle. - Page 43 4 Installation 4.5 Chronicle Note: The transfer of thawing process data from the instrument to Chronicle does not occur during a thawing process. VIA Thaw L1000 Operating Instructions 29492479 AE...
-
Page 44: Connect To The System Network
4.6 Connect to the system network Connect to the system network Introduction VIA Thaw L1000 requires a network connection to access software updates and the Chronicle functionality. The instrument supports both wired and wireless connections. The following symbols appear on the Thawing profile screen when the instrument is connected to a network: •... - Page 45 Select the DHCP box to automatically assign the information necessary to network configuration. If the DHCP box is not selected, fill the fields: • IP Address • Gateway • DNS Server • Netmask VIA Thaw L1000 Operating Instructions 29492479 AE...
- Page 46 • The SSID is the serial number of the instrument to be configured. Note: The serial number of VIA Thaw L1000 can be found on the rear of the instrument or on the Instrument properties screen after turning on the instrument.
- Page 47 Fill the fields Wireless SSID, and Wireless Password to configure the wire- less network connection. Note: VIA Thaw L1000 supports WEP 128, WPA-PSK (TKIP), and WPA2-PSK (AES) network security protocols. See the Privacy and Security Manual 29492819 for more information on wireless network security.
- Page 48 Switch on and off the instrument in order for the instrument to connect to the network. Result: The wireless hotspot and the network configuration are no longer acces- appears on the Thawing profile screen. sible. VIA Thaw L1000 Operating Instructions 29492479 AE...
-
Page 49: Preparation
5 Preparation Preparation About this chapter This chapter gives the required information to prepare VIA Thaw L1000 for operation, before thawing a cryobag. In this chapter Section See page Prepare the instrument for a thawing Cryobags Manage thawing profiles VIA Thaw L1000 Operating Instructions 29492479 AE... -
Page 50: Prepare The Instrument For A Thawing
Section 4.4 Set up the system, on page for more information on how to start the instrument. Once powered, VIA Thaw L1000 pre-heats the heater plates. During this time, the user will not be allowed to select a thawing profile. -
Page 51: Cryobags
CryoMACS 1000 Overwrapped cryobags Overwrapped cryobags can be used with VIA Thaw L1000. Make sure to exclude air from between the cryobag and the overwrap. The presence of air or other fluids within the overwrap may interfere with the end-of-thaw detection. - Page 52 It is recommended to close the overwrap by heat sealing. Other methods to close the overwrap, for example using a knot , should be avoided as it may lead to difficulties in closing the lid, and the Lid open alarm to be generated. VIA Thaw L1000 Operating Instructions 29492479 AE...
-
Page 53: Manage Thawing Profiles
5 Preparation 5.3 Manage thawing profiles Manage thawing profiles In this section Section See page 5.3.1 Manage thawing profiles on Chronicle 5.3.2 Manage thawing profiles on VIA Thaw L1000 VIA Thaw L1000 Operating Instructions 29492479 AE... -
Page 54: Manage Thawing Profiles On Chronicle
For information on how to download thawing profiles from https://pre- gmp.chronicle.bio onto VIA Thaw L1000, see Download thawing profiles from Chronicle, on page For more information, visit https://pre-gmp.chronicle.bio or the custom URL for your organization. VIA Thaw L1000 Operating Instructions 29492479 AE... -
Page 55: Manage Thawing Profiles On Via Thaw L1000
5 Preparation 5.3 Manage thawing profiles 5.3.2 Manage thawing profiles on VIA Thaw L1000 5.3.2 Manage thawing profiles on VIA Thaw L1000 On VIA Thaw L1000, thawing profiles can be: • created • downloaded from Chronicle • deleted The instrument is able to store a maximum of 8 thawing profiles created locally, and 8 thawing profiles downloaded from Chronicle. - Page 56 5 Preparation 5.3 Manage thawing profiles 5.3.2 Manage thawing profiles on VIA Thaw L1000 Screen Name Description Fill This parameter specifies the fill volume of the cryobag during the thawing process. The instrument adjusts the duration of the thawing process according to this parameter.
- Page 57 Download thawing profiles from Chronicle When VIA Thaw L1000 is connected to Chronicle via a network connection, the user may download up to 8 thawing profiles from Chronicle on to the instrument. Note: All previously downloaded Chronicle thawing profiles will be overwritten on the instrument during the next download.
- Page 58 To confirm the download of thawing profiles from Chronicle on to the instrument. Delete a thawing profile On VIA Thaw L1000, only thawing profiles created locally can be deleted. Thawing profiles downloaded from Chronicle must be adjusted on Chronicle and re-downloaded to the instrument.
- Page 59 5 Preparation 5.3 Manage thawing profiles 5.3.2 Manage thawing profiles on VIA Thaw L1000 Step Action Access the Delete profile screen from the Thawing profiles menu. to select the thawing profile you want to delete and tap confirm. and tap...
-
Page 60: Operation
6 Operation Operation About this chapter This chapter gives instructions on how to operate VIA Thaw L1000 in a safe way. In this chapter Section See page Overview Select a thawing profile Load a cryobag Thawing process End of a thawing process... -
Page 61: Overview
The following illustration shows an overview of a thawing process. Screen Name Description Load cryobag Place the cryobag in the instrument. Monitor thaw Monitor a thawing process, on page End-of-thaw Section 8.1 Alarms, on page VIA Thaw L1000 Operating Instructions 29492479 AE... - Page 62 To confirm the cryobag is completely thawed. Take picture Take picture of the cryobag. Remove Remove the cryobag from the instru- cryobag ment. Summary of End summary of a thawing process, thaw on page VIA Thaw L1000 Operating Instructions 29492479 AE...
-
Page 63: Select A Thawing Profile
Follow the instructions below to select a thawing profile, before loading a cryobag on the instrument. Step Action on the Start-up menu structure to select the profile you want to use. to confirm. Result: The Load cryobag screen appears. VIA Thaw L1000 Operating Instructions 29492479 AE... -
Page 64: Load A Cryobag
• Do not continue to use the product with a punctured or leaking thawing tray. • Replace a punctured or leaking thawing tray. • Contact your local Cytiva representative or authorized distrib- utor to obtain a replacement thawing tray. VIA Thaw L1000 Operating Instructions 29492479 AE... - Page 65 Use cryobags listed in this Operating Instructions. Different cryo- bags can cause end-of-thaw detection to not work correctly. NOTICE Use of different cryoprotectants than the ones listed in this manual can cause the end-of-thaw detection to work incorrectly. VIA Thaw L1000 Operating Instructions 29492479 AE...
- Page 66 If you cannot scan the label at the start of the thawing process, the barcode reader will turn on again at the end of the process, allowing for the cryobag label to be scanned. VIA Thaw L1000 Operating Instructions 29492479 AE...
- Page 67 Information from the barcode is stored in the instrument log and uploaded to Chronicle. Note: To avoid the scanning of identifiable patient data, the barcode module only accepts Code-128 barcodes containing donation identification numbers (DIN) as per the ISBT128 standard. VIA Thaw L1000 Operating Instructions 29492479 AE...
-
Page 68: Thawing Process
After canceling a thaw, a Summary of thaw screen appears. See End summary of a thawing process, on page Note: The date and time of the canceled thaw is recorded in the thaw log. VIA Thaw L1000 Operating Instructions 29492479 AE... -
Page 69: End Of A Thawing Process
Make sure the content of the cryobag is completely thawed. Step Action to select the Complete thaw screen and tap to confirm. VIA Thaw L1000 Operating Instructions 29492479 AE... - Page 70 When alarms have been generated Elapsed thawing time (minutes:seconds) Note: Basic information regarding the thawing process is stored in the instrument system logs. Note: Switch off the instrument if no longer in use. VIA Thaw L1000 Operating Instructions 29492479 AE...
-
Page 71: Viewing Thaw Logs
6.6 Viewing thaw logs Viewing thaw logs Introduction Thaw logs in VIA Thaw L1000 contain records of each performed thawing process. The instrument records information regarding the start and end of the thawing process, as well as the alarms generated during the thaw. - Page 72 Thaw logs screen. The illustration below shows an example of when the Over temperature alarm was generated during a thawing process. Damaged thaw logs If thaw log data cannot be retrieved, the Damaged thaw log screen appears. VIA Thaw L1000 Operating Instructions 29492479 AE...
-
Page 73: Maintenance
About this chapter This chapter provides instructions for cleaning and replacement activities that should be performed by the user of the VIA Thaw L1000 system, and information about annual maintenance that should be performed by Cytiva. In addition, instructions for software maintenance are included. -
Page 74: Maintenance Program
79 Planned maintenance It is recommended that VIA Thaw L1000 undergoes annual maintenance to verify the integrity and performance of the instrument. Contact your local Cytiva representative or authorized distributor to arrange a service. VIA Thaw L1000 Operating Instructions 29492479 AE... -
Page 75: Cleaning Before Planned Service
Health and safety declaration forms Health and safety declaration forms are available for copying or printing in the Refer- ence information chapter of this manual, or on digital media supplied with the user documentation. VIA Thaw L1000 Operating Instructions 29492479 AE... -
Page 76: Cleaning And Disinfection
7.3 Cleaning and disinfection Cleaning and disinfection Introduction This section gives instructions for cleaning and disinfecting VIA Thaw L1000. The illustration below shows the correct way to clean VIA Thaw L1000. Safety precautions WARNING Disconnect the product from the power supply before cleaning. - Page 77 These can cause damage to the instrument and cause it to malfunction. Recommended substances for cleaning and disinfection The following substances have been tested with VIA Thaw L1000 and been found to be compatible with all the components. Function Substance...
- Page 78 Use one of the recom- mended disinfectants. See Recommended substances for cleaning and disinfection, on page Note: Follow the instructions of the manufacture for correct use of the disinfec- tants. VIA Thaw L1000 Operating Instructions 29492479 AE...
- Page 79 Let the disinfected surfaces dry completely before using the instrument. Clean the barcode reader lens Use a damp lint-free cloth or wipe to clean the barcode reader lens. Take care not to scratch the window. VIA Thaw L1000 Operating Instructions 29492479 AE...
-
Page 80: Replacement Procedures
If a fuse requires repeated replacement, do not continue to use the instrument. Contact your Cytiva representative or an authorized distributor. VIA Thaw L1000 has user replaceable fuses located next to the appliance inlet on the rear of the instrument. Follow the instructions below to replace fuses. - Page 81 Cytiva representative or authorized distributor to arrange for a replacement battery to be fitted to the instrument. VIA Thaw L1000 contains a built in lithium-ion coin cell battery to power the real-time clock and store time and date information if disconnected from the power supply.
-
Page 82: Software Maintenance
Once the system has been connected to Chronicle, VIA Thaw L1000 is able to access any software updates made available through Chronicle. -
Page 83: Troubleshooting
If the suggested actions in this guide do not solve the problem, or if the problem is not covered by this guide, contact your Cytiva representative for advice. In this chapter... -
Page 84: Alarms
The following alarms can be generated by VIA Thaw L1000. As a result of an alarm, a warning will be displayed in the thaw logs. See... - Page 85 The table below describes the alarms generated by VIA Thaw L1000 and the actions to be taken by the user to resolve the situation.
- Page 86 The alarm is generated only once during the thawing process. Lid open Inspect the cryobag and decide whether to stop, complete or continue the thawing process. Close the lid or tap to acknowledge the alarm. VIA Thaw L1000 Operating Instructions 29492479 AE...
-
Page 87: Error Codes
NOTICE Do not continue to use the instrument if an error is not solved by the corresponding corrective action. Make a note of the error code and provide it to you local Cytiva representative or authorized distributor. Error code Possible causes... -
Page 88: Instrument Performance
Install does not deflect. the thawing tray, on page 33 for more information. This problem during a thawing process can cause a prolonged thawing time and ultimately an incomplete thawing of the cryobag. VIA Thaw L1000 Operating Instructions 29492479 AE... -
Page 89: Thawing Performance
Rough handling or improper Handle the cryobags carefully, to storage of the cryobag. reduce the risk of shock or impact. Note: Make sure not to puncture or perforate the cryobag during the process. VIA Thaw L1000 Operating Instructions 29492479 AE... -
Page 90: Reference Information
About this chapter This chapter lists the specifications, recycling information and regulatory information of VIA Thaw L1000. In this chapter Section See page Specifications Recycling information Regulatory information Health and Safety Declaration Form VIA Thaw L1000 Operating Instructions 29492479 AE... -
Page 91: Specifications
Parameter Specification Allowed location Indoor use only Ambient temperature, operation 15°C to 30°C Ambient temperature, storage -30°C to +50°C Max. relative humidity, operation 30% to 75% (non-condensing) 10% to 95% Relative humidity, non-operating VIA Thaw L1000 Operating Instructions 29492479 AE... - Page 92 9 Reference information 9.1 Specifications Parameter Specification Altitude, operation Up to 2000 m Pollution degree of the intended envi- Pollution degree 2 ronment VIA Thaw L1000 Operating Instructions 29492479 AE...
-
Page 93: Recycling Information
Disposal of batteries Waste batteries and accumulators must not be disposed of as unsorted municipal waste and must be collected separately. Follow applicable local regulations for recy- cling of batteries and accumulators. VIA Thaw L1000 Operating Instructions 29492479 AE... -
Page 94: Regulatory Information
9 Reference information 9.3 Regulatory information Regulatory information Introduction This section lists the regulations and standards that apply to VIA Thaw L1000. In this section Section See page 9.3.1 Contact information 9.3.2 European Union and European Economic Area 9.3.3 Eurasian Economic Union Евразийский... -
Page 95: Contact Information
The table below summarizes the required manufacturing information. Requirements Information Name and address of the legal manu- Asymptote Ltd., facturer Sovereign House, Cambridge, CB24 9BZ United Kingdom Telephone number of the legal manu- +44(0)330660 0320 facturer VIA Thaw L1000 Operating Instructions 29492479 AE... -
Page 96: European Union And European Economic Area
The CE marking and the corresponding EU Declaration of Conformity is valid for the instrument when it is: • used according to the Operating Instructions/Operator Manual, and • used in the same state as it was delivered, except for alterations described in the Operating Instructions/Operator Manual. VIA Thaw L1000 Operating Instructions 29492479 AE... -
Page 97: Eurasian Economic Union
Telephone: +7 916 043 39 70 E-mail: rucis@cytiva.com Информация о производителе и импортере В следующей таблице приводится сводная информация о производителе и импортере, согласно требованиям Технических регламентов Таможенного союза и (или) Евразийского экономического союза. VIA Thaw L1000 Operating Instructions 29492479 AE... - Page 98 Member States of the Customs Union of the Eurasian Economic Union Данный знак о Евразийском соответствии указывает, что изделие одобрено для использования на рынках государств-членов Таможенного союза Евразийского экономического союза VIA Thaw L1000 Operating Instructions 29492479 AE...
-
Page 99: Great Britain
The UKCA marking and the corresponding UK Declaration of Conformity is valid for the instrument when it is: • Used according to the Operating Instructions/Operator Manual, and • Used in the same state as it was delivered, except for alterations described in the Operating Instructions/Operator Manual. VIA Thaw L1000 Operating Instructions 29492479 AE... -
Page 100: Regulatory Statements
When used in a residential environment, there is a concern of radio interference. 주의사항 A급 기기 (업무용 방송통신 기자재) 이 기기는 업무용환경에서 사용할 목적으로 적합성평가를 받 은 기기 로서 가정용 환경에서 사용하는 경우 전파간섭의 우려가 있습 니다. VIA Thaw L1000 Operating Instructions 29492479 AE... -
Page 101: Regulations For North America
Note: The user is cautioned that any changes or modifications not expressly approved by Cytiva could void the user’s authority to operate the equip- ment. This equipment has been tested and found to comply with the limits for a Class A digital device, pursuant to part 15 of the FCC Rules. -
Page 102: Declaration Of Hazardous Substances (Dohs)
Periodic replacement of those consumables or parts to maintain the declared EFUP shall be done in accordance with the Product Maintenance Procedures. This product must not be disposed of as unsorted municipal waste, and must be collected sepa- rately and handled properly after decommissioning. VIA Thaw L1000 Operating Instructions 29492479 AE... - Page 103 Indicates that this hazardous substance contained in at least one of the homogeneous materials used for this part is above the limit requirement in GB/T 26572 • Data listed in the table represents best information available at the time of publication. VIA Thaw L1000 Operating Instructions 29492479 AE...
-
Page 104: Wireless Lan
9 Reference information 9.3 Regulatory information 9.3.8 Wireless LAN 9.3.8 Wireless LAN The wireless LAN has been verified in accordance with EU regulation, and tested by notified body “PHOENIX TEXTLAB GmbH ” CE0700. VIA Thaw L1000 Operating Instructions 29492479 AE... -
Page 105: Health And Safety Declaration Form
Service Ticket #: To make the mutual protection and safety of Cytiva service personnel and our customers, all equipment and work areas must be clean and free of any hazardous contaminants before a Service Engineer starts a repair. To avoid delays in the servicing of your equipment, complete this checklist and present it to the Service Engineer upon arrival. - Page 106 To make sure the mutual protection and safety of Cytiva personnel, our customers, transportation personnel and our environment, all equipment must be clean and free of any hazardous contaminants before shipping to Cytiva. To avoid delays in the processing of your equipment, complete this checklist and include it with your return.
- Page 107 Page intentionally left blank...
- Page 108 © 2020–2021 Cytiva All goods and services are sold subject to the terms and conditions of sale of the supplying company operating within the Cytiva business. A copy of those terms and conditions is available on request. Contact your local Cytiva representative for the most current information.
Need help?
Do you have a question about the VIA Thaw L1000 and is the answer not in the manual?
Questions and answers