Table of Contents
Advertisement
Quick Links
Advertisement
Table of Contents

Subscribe to Our Youtube Channel
Related Manuals for AmScope IN300 Series


Summary of Contents for AmScope IN300 Series
- Page 1 IN300 Series User’s Manual...
-
Page 2: Table Of Contents
IN300 Series Table of Contents Before Use .................. 3 Introduction ...................... 3 Safety Precautions .................... 4 Parts .................... 5 IN300 ....................... 5 IN300-FL ......................6 Definition of Parts .................... 7 Getting Started ................8 Assembly ......................8 Operation .................. 10 Setting Up ...................... -
Page 3: Before Use
Congratulations on the purchase of your new AmScope microscope! This manual is designed for the IN300 series microscopes. It is designed for the applications involving in large vessels or samples in biology, microbiology, histology immunology and iatrology, etc. Allowing you to observe specimen in culture flasks, Petri dishes or other containers, it comes with long working distance Plan objectives, high quality phase contrast objectives, super widefield eyepieces, 45°... -
Page 4: Safety Precautions
IN300 Series Before Use Safety Precautions 1. As the microscope is a precision instrument, always handle it with care, avoiding impact or abrupt movement during transportation. Do not shake the package. 2. Do not place the microscope in direct sunlight or in high heat. Keep it indoors in a dry and clean place with temperatures between 32-100 °F (0-40 °C), and in maximum... -
Page 5: Parts
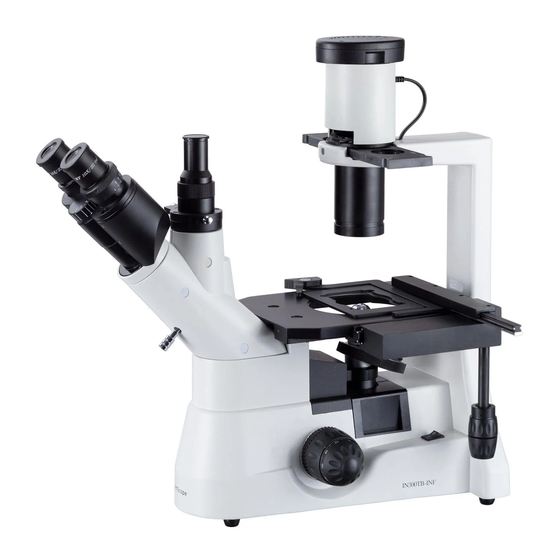
IN300 Series Parts IN300 Light Source Iris Control Diopter Control Trinocular Port Eyepieces Condenser MechanicalStage Trinocular Shutter Control Power Switch Coarse Focusing Knob Objectives Mechanical Stage Controls Fine Focusing Knob... -
Page 6: In300-Fl
IN300 Series Parts IN300-FL Fluorescent Shield Eyepieces Trinocular Port Vertical Condenser Iris Control Adjustment Diopter for Mercury Bulb Illuminator Box Mechanical Stage Trinocular Shutter Control Bulb Housing Lock Horizontal Adjustment for Mercury Bulb Power Box Coarse Focusing Knob Fine Focusing knob... -
Page 7: Definition Of Parts
IN300 Series Parts Definition of Parts Coarse Focusing Knob Used to initially bring the sample into the sight and focus Condenser & Iris Diaphragm Controls the amount of light that hits the sample Dimmer Controls the amount of light that escapes from the base lens... -
Page 8: Getting Started
IN300 Series Getting Started Assembly 1. Objective 2. Mechanical stage 3. Florescent Mercury lamp power box (-FL model) 4. Mercury lamp house 5. Metal stage Lamp holder 7. Halogen bulb 8. Filter 9. Filter holder 10. Protector (-FL model) 11. Eyepiece... - Page 9 IN300 Series Getting Started 1. First, take the styrofoam container out of the cardboard carton and lay it on its side, paying attention to which side is labeled up. Remove the tape and open the container carefully so as to avoid dropping and damaging the optical items.
-
Page 10: Operation
IN300 Series Operation Setting Up 1. With both eyes open, look into the eyepieces. Adjust the interpupillary distance by holding the eyepiece tubes and rotating the eyepiece tubes either towards or away from each other until only one circle of light is seen by both eyes. -
Page 11: Adjusting The Condenser & Diaphragm
20x eyepieces to match your camera, the image may differ in magnification). You do not need an adapter to attach your AmScope camera to the trinocular port. However you may need one if you have a non-AmScope camera. Our photo port is a 23mm size. Attaching a Camera 1. -
Page 12: Centering Fluorescent Bulb (Fl Models Only)
IN300 Series Operation stain the sample, which will glow when a certain type of light excites the cell and stain. We ask that our customers research and learn this type of microscopy prior to purchasing a fluorescent micro- scope, as they are quite expensive to purchase without knowing in advance what stains/dyes are to be used with what filters. -
Page 13: Changing The Halogen Bulb (Top)
IN300 Series Operation Changing the Halogen Bulb (Top) Before changing the light bulb, first pull the plug out of the electrical socket and wait for the lamp to cool down. The light can get hot when a halogen system is in use, so please be careful to avoid being burned. -
Page 14: Maintenance/Precautions
- After use, cover the microscope with the provided dust cover. - Keep your AmScope microscope in a dry, clean location in order to prevent rust or other damages. - The mercury bulb must be primed before each use by allowing 10-15 minutes of time to heat the bulb up completely. -
Page 15: Specifications
IN300 Series Specifications IN300 Series Specifications Parts Specifications IN300TA IN300TB IN300TC Extreme WF Eyepiece WF10X/18mm WF10X/18mm w/ Pointer WF10X/18mm w/ Reticle WF16X/13mm WF20X/10mm WF25X/10mm DIN Plan Objectives Viewing Head Trinocular Head TrinocularPort C-Mount Photo port 23mm Photo Port Focusing Coaxial Focusing System... -
Page 16: Optional Accessories
IN300 Series Specifications Optional Accessories Parts Description Model # Purpose Eyepieces EP20X30 Obtaining 80x, 200x, 800x, and 2000x magnifica- tion powers EP25X30 For obtaining 250x and 2500x magnification pow- 10x w/ Pointer EP10X30P For easier identifying of objects 10x w/ Reticle... -
Page 17: Technical Parameters
IN300 Series Technical Parameters Electrical System There are two options for electrical systems for this series of microscope: 1. 220V~240V power supply: 220V~240V ±10%, 50Hz 2. 100V~120V power supply: 100V~120V ±10%, 60Hz All units come standard as 110V units unless an upgrade to a 220V system is requested. Upgrade fee is dependent on which unit is purchased. -
Page 18: Technical Terms & Concepts
IN300 Series Technical Parameters Technical Terms & Concepts Total Magnification Total magnification of a microscope is calculated by the magnification of the objective multiplied by the mag- nification of the eyepieces. -Ex: (10x Eyepieces) x (4x Objective) = 40x Total Magnification Field of View Linear field of view of the eyepiece divided by the magnification of the objective. -
Page 19: Troubleshooting
IN300 Series Troubleshooting Common Issues Symptom Cause Remedy OPTICAL ISSUES The nosepiece is misaligned Turn the nosepiece until it clicks into place One side of the field of view is darker Stains or dust has accumulated on the condenser, Clean all lenses with lens cleaner or a lint free non-... -
Page 20: Common Issues (Continued)
IN300 Series Troubleshooting Common Issues (Continued) Symptom Cause Remedy OPTICAL ISSUES The color of the image is The brightness adjustment knob is not in the right position Adjust the brightness knob to a higher or lower setting for color clarity...
Need help?
Do you have a question about the IN300 Series and is the answer not in the manual?
Questions and answers