Table of Contents
Advertisement
Quick Links
Advertisement
Table of Contents

Related Manuals for D.T.Systems RedHead RH 300


Summary of Contents for D.T.Systems RedHead RH 300
- Page 1 RedHead RH 300 Electronic Dog Trainer Owner’s Manual Manufactured by:...
- Page 2 NOTICE! According to how you use your transmitter, the transmitting range might be much different. You will have more range if you use your transmitter apart from your body as follows: Maximum Range Typical Range Minimum Range...
-
Page 3: Table Of Contents
TABLE OF CONTENTS Table of Contents ........3 • Introduction..........4 • Package Contents ........5 • Model Features .......... 5 • Parts and Functions........6 • Installing/Changing Batteries ...... 10 • Turning ON and OFF........11 • Battery Saving Mode ........12 •... -
Page 4: Introduction
INTRODUCTION Congratulations and thank you for purchasing our RedHead RH 300 Remote Dog Trainer. RedHead RH 300 Dog Training Collar is durable, safe and very humane when used correctly. This training system offers Maxx-Range™ technology, the industry’s only internally woven antenna in the collar. -
Page 5: Package Contents
IMPORTANT NOTE: Please read this owner’s manual in its entirety before operating this unit. Should you have any questions about our collars or their operation please contact our Customer Service department (see back page for address and phone number information). PACKAGE CONTENTS •... -
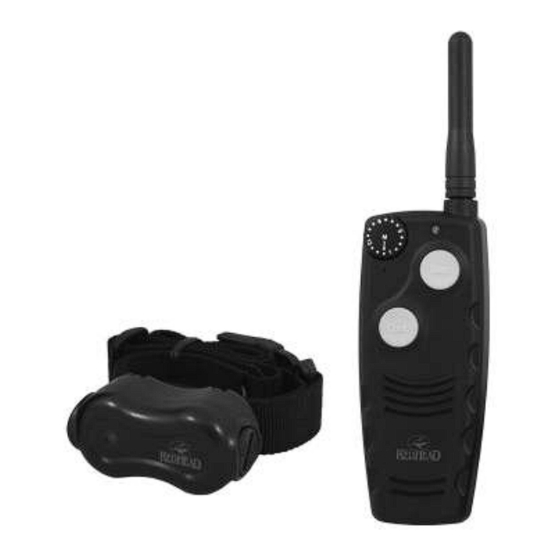
Page 6: Parts And Functions
PARTS & FUNCTIONS Antenna Indicator Intensity Light Selection Dial Beep Continuous Button Stimulation Button Battery Compartment Magnet (in back) Indicator (Red Mark in back) Lanyard Attachment Transmitter... - Page 7 PARTS & FUNCTIONS Intensity Selection Dial The intensity selection dial allows you to choose between 15 different levels of stimulation for very precise control. On the ‘M’ setting, you can choose between regular and Battery Saving Mode* (see page 12). Transmitter Antenna Be sure to check that the antenna is securely fastened to the transmitter before each use.
- Page 8 PARTS & FUNCTIONS Collar Belt with Embedded Receiver Buckle with Antenna Activation Magnet Contacts Magnetic Switch Indicator Indicator Light (Red Mark) Battery Speaker Compartment Collar Receiver Battery Compartment Cap The collar requires one 6 volt battery (included in package). Batteries should be inserted with ‘+’...
- Page 9 PARTS & FUNCTIONS Magnetic Switch Indicator (Red Mark) The Magnetic Switch Indicator is a red dot showing where the Magnetic Activation Switch is located. You can use the Magnetic Indicator on the Transmitter or the Activation Magnet on the Buckle to activate and deactivate your Collar Receiver (see page 11).
-
Page 10: Installing/Changing Batteries
INSTALLING/CHANGING BATTERIES Transmitter Battery 1. Push down on the Battery Compartment cover where it is marked “PUSH” and slide it down in the direction of the marked arrow. 2. Remove the old battery if present. 3. Install new 9V battery with ‘-’ terminal on left and ‘+’... -
Page 11: Turning On And Off
TURNING THE UNIT ON AND OFF NOTE The Transmitter is always in a permanent sleep state. It is only ON when a button is being pressed, and it does not need to be turned OFF by the user. Turning the Collar Receiver ON 1. -
Page 12: Battery Saving Mode
BATTERY SAVING MODE The Battery Saving Mode will reduce battery consumption in the Collar Receiver and increase battery life. In the regular battery mode, the Collar Receiver battery can last up to approximately 72 standby hours. In the Battery Saving Mode, the Collar Receiver battery can last up to approximately 240 standby hours.* *These figures are estimates and vary depending on numerous factors... -
Page 13: Testing
TESTING NOTE: Turn the Collar Receiver ON for Testing To Test the Electronic Stimulation: 1. Place the tester firmly on the contacts of the Collar Receiver. 2. Set the intensity (note - an intensity level setting of 4 or less might not be enough to light the tester). -
Page 14: Reprogramming
REPROGRAMMING If your current Collar Receiver is not responding to the Transmitter, it may need to be reprogrammed to the Transmitter. 1. Hold the Magnet Indicator (Red Mark) on the Transmitter directly against the Magnetic Switch Indicator (Red Mark) on the side of the Collar Receiver. -
Page 15: Properly Fitting The Collar
PROPERLY FITTING THE COLLAR NOTE: Proper collar tightness and position are very important to ensure safe and consistent collar use. All electronic collars need to be very snug around the dog’s neck to work properly. They must be just tight enough to allow the “contacts” or electrodes to make good contact on your dog’s skin. -
Page 16: Setting The Intensity Level
SETTING THE INTENSITY LEVEL It is very important to set the correct intensity level on your RH 300 Training System before beginning your training sessions to provide the proper level of stimulation without over-stimulating your dog. 1. Place the Intensity Selection dial so that the system is set on Level 1. -
Page 17: Maintenance
It is very important to periodically clean your RedHead RH 300 system for maximum performance. Regular cleaning will also lengthen the life of your unit. Clean the RedHead RH 300 collar box with • lukewarm water and a mild anti-bacterial soap. -
Page 18: Important Safety Notes
IMPORTANT SAFETY NOTES Before training, your dog should be examined by a • veterinarian to assure that your dog is in good health. Never leave your dog unattended with the unit • on. Since no electronic device is perfect, there is a very slight possibility that your dog may receive an unintentional electric stimulation. -
Page 19: Warranty
FCC & IC COMPLIANCE Your RedHead RH 300 Trainer has been manufactured under complete compliance with Part 15 of the Federal Communication Commission (FCC) rules and Industry Canada (IC) Standard RSS-310. The complex internal structure of each product has been designed to operate within specific regulations of FCC specifications. -
Page 20: Contact Information
2872 Walnut Hill Lane Dallas, Texas 75229 Tel: (214) 350-9446, (888) 588-8364 Fax: (214) 350-7847 Website: www.dtsystems.com E-mail: customerservice@dtsystems.com RH 300 2016.04.20 Printed in Korea...
Need help?
Do you have a question about the RedHead RH 300 and is the answer not in the manual?
Questions and answers