Table of Contents
Advertisement
Advertisement
Table of Contents

Related Manuals for D.T.Systems RedHead RH Pro 1000


Summary of Contents for D.T.Systems RedHead RH Pro 1000
- Page 1 RedHead RH Pro 1000 With SmartLED Owner’s Manual Manufactured by:...
- Page 2 IMPORTANT NOTE: Please read this owner’s manual in its entirety before operating this unit. Should you have any questions about our collars or their operation please contact our Customer Service department (see back page for address, phone number, and email information). NOTICE! According to how you use your transmitter, the transmitting range...
-
Page 3: Table Of Contents
TABLE OF CONTENTS Table of Contents ........3 • Introduction ..........5 • Package Contents ........6 • Model Features........6 • Transmitter Parts & Functions ....7 • Installing Transmitter 9V Battery ....9 • Collar Unit Parts & Functions....10 •... -
Page 5: Introduction
Our Vibration Assist lends a helping hand in the form of an audible vibration emitted from the collar to aid in training for a no-shock alternative stimulus. The new RedHead RH Pro 1000 is the result of over years experience... -
Page 6: Package Contents
PACKAGE CONTENTS • Transmitter with Compact Antenna and Lanyard (9V bat- tery not included) • Collar Receiver with NiMH Battery (already installed) • Battery Charger • Triple-Jack Splitter/Adaptor Cable for charging • Test Light • Owner’s and Training Manuals MODEL FEATURES •... -
Page 7: Transmitter Parts & Functions
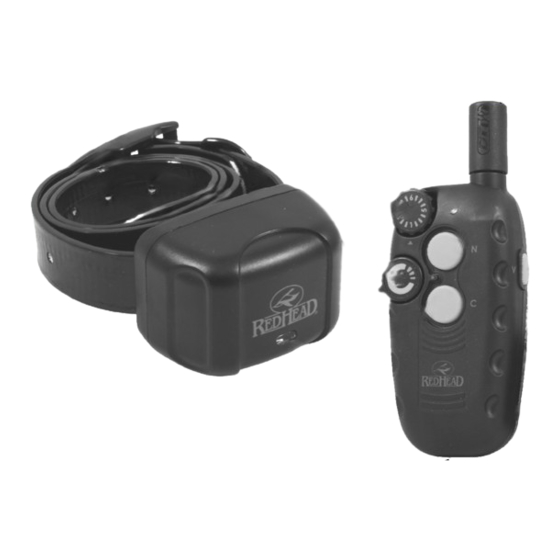
TRANSMITTER PARTS & FUNCTIONS Compact Antenna LED Indicator Light Nick Stimulation Button Intensity Level Dial Collar Selector Vibration Button Dial Continuous Stimulation Camo Battery Button Cover (back) Magnet Indicator (red dot) Lanyard Connection Transmitter Specifications Unit Dimensions Weight Transmitter 4 3/4” x 2” x 1 3/8” 2.5 oz. - Page 8 TRANSMITTER PARTS & FUNCTIONS Compact Transmitter Antenna - Always check that the Antenna is securely fastened to the transmitter before each use. Hand tighten only. Use caution when attaching Antenna as over-tightening may cause damage to the Antenna or antenna mount. LED Indicator Light - The LED lights while pressing any of the Transmitter buttons.
-
Page 9: Installing Transmitter 9V Battery
TRANSMITTER PARTS & FUNCTIONS Lanyard Connection - Attachment point for lanyard. Camo Battery Cover (Back of Transmitter) - Covers battery and battery compartment. Held by 2 small Phillips screws. Make sure the battery is inserted in the proper direction. Do not over-tighten the screws or you may crack the plastic. -
Page 10: Collar Unit Parts & Functions
COLLAR UNIT PARTS & FUNCTIONS Buckle Charging Receptacle Contacts Magnetic ON/OFF Activation Switch Collar Belt with MAXX-Range™ SmartLED 360 Antenna Indicator Light Collar Unit Specifications Unit Dimensions Weight R.A.P.T. 1400 2 1/4” x 1 1/2” x 1 1/4” 4.7 oz. (with belt) Magnetic ON/OFF Activation Switch (small bump) - Turns the Collar Receiver unit ON/OFF by using the Magnet Indicator on the Transmitter (see page 14). - Page 11 COLLAR UNIT PARTS & FUNCTIONS Battery Charging Receptacles - The charger cables plug into the Charging Receptacle for recharging (located on the side of the Collar Receiver facing the dog’s neck). After charging, always close the Charg- ing Receptacle with the rubber plug to prevent foreign particles from getting inside the unit.
-
Page 12: Smartled
SmartLED R.A.P.T. Series collar units are equipped with the SmartLED battery status system. The SmartLED system lets you know when the unit is charging and when the charging is complete. It also gives you a status on how much charge is remaining in the battery during use, when it needs charging, and when the batteries will need to be replaced. -
Page 13: Charging The Batteries
CHARGING THE BATTERIES The RH Pro 1000 collar unit is equipped with rechargeable Nickel Metal Hydride (NiMH) batteries, which are not memory sensitive and do not require depletion before recharging. Although batteries come partially charged from the factory, it is recommended that they are given a full charge (about 12 hours) before initial use. -
Page 14: Turning On And Off
TURNING ON/OFF The Transmitter is always in a permanent sleep state. It is only ON when a button is being pressed and does not need to be turned off by the user. If the Transmitter does not activate, make sure you have a good battery installed. -
Page 15: Testing
TESTING If the collar unit is not responding to any signals NOTE: from the transmitter, the collar may need to be repro- grammed to the transmitter (see page 16). Before testing, make sure that both units are fully charged and the power to the Collar Receiver is “ON”. To Test the Electronic Stimulation: 1. -
Page 16: Programming The Collar
PROGRAMMING THE COLLAR When adding an “Add-On” collar, the collar will need to be programmed to the transmitter. If your current collar unit is not responding to the transmitter, it may also need to be reprogrammed to the transmitter. 1. Select the desired Collar Selector Dial position on the transmitter. -
Page 17: Properly Fitting The Collar
PROPERLY FITTING THE COLLAR NOTE: Proper collar tightness and position are very important to insure safe and consistent collar use. All electronic collars need to be very snug around the dog’s neck to work properly. They must be just tight enough to allow the “contacts”... -
Page 18: Setting The Intensity Level
SETTING THE INTENSITY LEVEL It is very important to set the correct intensity level on your RH Pro 1000. Training System before beginning your training sessions to provide the proper level of stimulation without over-stimulating your dog. 1. Place the Intensity Selection dial so that the system is set on Level 1. -
Page 19: Maintenance
MAINTENANCE It is very important to periodically clean your RH Pro 1000 system for maximum performance. Regular cleaning will also lengthen the life of your unit. Clean the collar box, belt and buckle with lukewarm • water and a mild anti-bacterial soap. Thoroughly clean the space between the electrodes •... -
Page 20: Important Safety Notes
IMPORTANT SAFETY NOTES Before training with this unit, your dog’s health • should be examined by a veterinarian. Do not use with aggressive-tempered dogs. • Your RH Pro 1000 collar is a very valuable tool if • • • • used correctly. -
Page 21: Warranty
WARRANTY • D.T. Systems Premium Lifetime Warranty is the best warranty offered in the industry. This warranty is free to participating U.S. customers (a completed warranty registration card must be returned within 30 days of original purchase). This changes our normal one year parts and labor warranty to a limited lifetime warranty against manufacturing defects on parts and a one year warranty on labor. -
Page 22: Fcc/Ic/Ce Compliance
FCC/IC/CE COMPLIANCE Your RH Pro 1000 Trainer has been manufactured under complete compliance with Part 15 of the Federal Communication Commission (FCC) rules, Industry Canada (IC) Standard RSS-310, and Article 3 of the Directive 1999/5/EC. The complex internal structure of each product has been designed to operate within specific regulations of FCC specifications. -
Page 24: Contact Information
2872 Walnut Hill Lane Dallas, Texas 75229 Tel: (214) 350-9446, (888) 588-8364 Fax: (214) 350-7847 Website: www.dtsystems.com E-mail: customerservice@dtsystems.com RH Pro 1000 2015.11.20 Printed in Korea...
Need help?
Do you have a question about the RedHead RH Pro 1000 and is the answer not in the manual?
Questions and answers