Table of Contents
Advertisement
Advertisement
Table of Contents

Related Manuals for Alpine PXE-C80-88


Summary of Contents for Alpine PXE-C80-88
- Page 1 Owner’s Manual PXE-C80-88 8 CHANNEL AUDIO PROCESSOR AMPLIFIER...
-
Page 3: Table Of Contents
ENGLISH Contents X-Over Settings ........15 EQ ................15 Customize the output channel Instructions type ............15 Channel Mute Setting......16 Warning ..............3 EQ Adjustment .........16 Points for Safe Use ........... 3 Equalizer Settings........16 About the software license of the product..5 Sync Settings..........17 Preparation work...........6 Channel settings ........17 Accessory List ............ - Page 4 Wired Controller ..........27 Startup Screen ..........27 Master Volume ..........27 Subwoofer Volume (SUB W) ...... 27 Sound Effect Presets (PRESET) ....27 Main Source ............. 28 Main Source Attenuation ......28 Mix Source ............28 Channel Settings ..........29 Specifications............
-
Page 5: Instructions
The volume must be maintained at a level where Alpine will not assume any responsibility. the noise outside the car can be heard while • This manual uses various icons to explain how to... - Page 6 Please return this product to an fire or electric shock. authorized Alpine dealer or the nearest Alpine service center for repair. Do not damage the pipe or wiring when drilling...
-
Page 7: About The Software License Of The Product
• Locations subject to severe vibration and -20°C. About the software license of the product The software installed in the product contains open-source software. See the following Alpine website for details on the open source software. [CN] https://www.alpine.com.cn/c/aftermarket_oss/download/CSP_Series [EN] https://www.alpine.com.cn/e/aftermarket_oss/download/CSP_Series * Appropriate recycling channels should be adopted for the disposal of electronic products to reduce electronic waste pollution. -
Page 8: Preparation Work
Preparation work Accessory List Machine Screw × 10 Self-tapping Screw × 4 Mounting Brackets × 2 20P Input Cable 12P Output Cable USB Cable External Bluetooth Module Wired controller Main Unit (KCE-800BT) (RUX-CSP1) Controller cable... -
Page 9: Connections And Functions
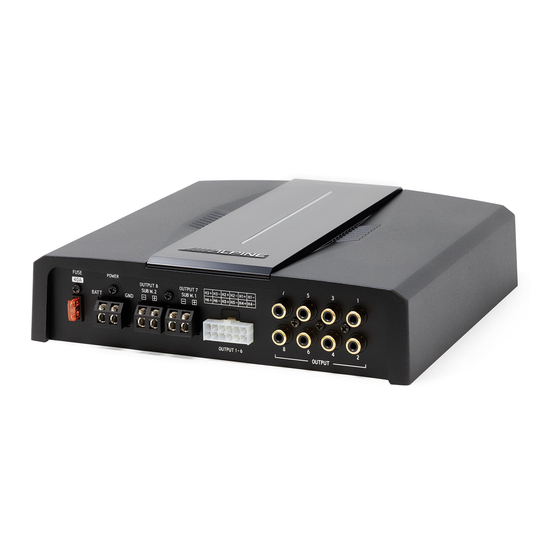
Connections and Functions External Bluetooth Controller USB cable (included) Mobile player Car audio player (Sold separately) ACC (Red) Ignition key Car audio player Battery REMO (Yellow/Red) (Sold separately) To External Power Amplifier etc. High Level IN1+ (White) High Level IN1- (White/Black) High Level IN2+ (Blue) High Level IN2- (Blue/White) High Level IN3+ (Yellow) -
Page 10: Connections And Functions
• If you want to attach an optional noise suppressor, please try to keep it away from the machine when connecting. Your Alpine dealer has various types of noise suppressors, please contact them for details. • Your Alpine dealer is proficient in noise prevention methods, please consult your dealer for details. -
Page 11: Pairing The Device
• Computer screen resolution: 2560 × 1440 or higher Note: • The PC viewer will not operate properly on PC systems running an operating system other than those listed in the system requirements. • You can download the latest PC viewer software from the Alpine website. -
Page 12: Computer Software
• Before connecting the PXE-C80-88 machine to the computer, please install the PXE-C80_C60 computer software correctly. • After installing the PXE-C80_C60 software, you can tune and set the PXE-C80-88 machine on the computer. * This function is mainly for manufacturers and distributors. -
Page 13: Connection
Load All Presets Connection Load the files of the entire machine previously saved on the computer to the machine (including the Setting items: current working scene, machine preset scene, Connection output channel configuration data, etc.), and copy Setting content: all the machine data that has been debugged to the Connection/disconnected currently connected machine. -
Page 14: Restore Factory Settings
Setting item: Firmware update Language Settings Click the “>” button to select the upgrade Setting item: file. Language Click the “Update” button to upgrade the Setting content: firmware. The upgrade progress reaches English 100%, indicating that the firmware upgrade is successful. View About Click the “OK”... -
Page 15: Master Volume Setting
Master volume setting Delay adjustment Delay group selection Delay value display window Setting item: Master volume Combined frequency volume adjustment Setting content: Input mode selection 0~35 (initial value: 12) Input mode selection You can adjust the total volume by pressing Ouput mode selection and holding the left mouse button, dragging the volume fader left or right, or scrolling the... -
Page 16: Home Page
Setting content: 0% to 100% (default 0%) Home Page Note: When the current audio source mode is selected, Home Page the audio source mode can no longer be superimposed, otherwise the Mix source is invalid. Mix Source Selection Setting items: Setting items: Mix source selection Home Page... -
Page 17: X-Over Settings
Sync settings page Frequency setting: The frequency can be adjusted by directly inputting the value, scrolling the mouse wheel, the up and down keys on the keyboard, or clicking “-” or “+”. Adjustable range: 20Hz~20000Hz. Slope setting: -6dB/Oct, -12dB/Oct, -18dB/ Oct, -24dB/Oct, -30dB/Oct, -36dB/Oct, -42dB/ Oct, -48dB/ Oct is optional. -
Page 18: Channel Mute Setting
Click the channel display selection button to display Customize the output channel the curve of the channel. type EQ settings Refer to “Output type custom page” (page 14). Select the output channel to be adjusted. When the mouse moves to the serial number Channel Mute Setting position, hold down, drag up and down to adjust the equalizer gain, drag left and right... -
Page 19: Sync Settings
Click [Reset EQ], the parameters of all Preset sound settings equalizers of the current channel return to the initial state. Click [G.EQ Mode] to pop up a warning box “Confirm P.EQ to G.EQ mode?”, press OK to switch to [G.EQ Mode], click [P.EQ Mode] to pop up a warning box “Confirm G.EQ to P.EQ mode?”, press OK to confirm Switch [P.EQ Mode]. -
Page 20: Mix
Refer to “Input mode selection page” (page 18). Anti EQ AntiEQ page After the PXE-C80-88 machine sets the sound source signal into the audio processor, it is divided into the volume of each output channel, and the purpose of mixing and mixing can be achieved by adjusting the volume of each sound source in the channel. -
Page 21: H.level Input Channel Type
Volume adjustment process H.level input channel type Upon connecting to a new amp, AutoEQ will prompt you to start adjusting the volume level. Refer to “Output type custom page” (page 14). Fixed the RTA data Default is Fixed [ ], There is no RTA data. Click one channel Unfixed [ ], begin to display RTA data. -
Page 22: Measurement
Perform measurement Measurement When you are ready, click the button to begin measurement. This section explains the measurement portion of A countdown will begin on the screen, and then the AutoEQ. measurement process will begin. For the duration of the measurement, move the Microphone movement microphone through the cabin of the car as Correct microphone movement during sound... -
Page 23: Tuning
Distortion & Noise (magenta) - This curve shows Tuning the distortion and noise that were present during your measurement. With measurement complete, you are ready to tune Tuning Process the sound in the vehicle. This section covers the standard procedure using Tuning screen the tuning screen to create your EQ. - Page 24 Adjust the EQ Gain Offset Good offset sample Figure 11. This setting will define the amount of boost and cut AutoEQ will use. When adjusting EQ Gain Offset, it is best to turn on the display of only the Measurement and EQ curves in the graph area.
-
Page 25: Managing Amps
Managing Amps This section covers how to manage saved amps in AutoEQ and how to reconnect to an amp you have already worked on. Reconnect to an amp To reconnect to an amp you have worked on previously, you must have that amp connected to your PC via USB. -
Page 26: Mobile Phone App
A list of required software and hardware. Tap on Bluetooth to enter the Bluetooth settings. Connect In the list of available devices, you will see the Alpine Connect the iPhone app to the Alpine amp. amp. It will have a name that starts with “DSP HD- …”. -
Page 27: Volume Adjustment
Volume Adjustment Tuning Refer to AutoEQ Volume Adjustment in PC side. Refer to AutoEQ Measurement in PC side. (page 21) (page 19) Figure 6 - The tuning screen with its default options Figure 2 - The volume adjustment screen showing shown. -
Page 28: Managing Amps And Reconnecting
Figure 10 - An example of the tuning screen showing a customized EQ curve with the option shown to delete a control point. Managing Amps and Reconnecting Refer to AutoEQ Managing Amps in PC side. (page 23) -
Page 29: Wired Controller
Wired Controller Subwoofer Volume (SUB W) Press and hold the button in the main interface for Connect the wired controller (RUX-CSP1) to the DSP 1~4 seconds to enter the subwoofer volume (SUB correctly, and ensure that it starts normally before W) interface, as shown in Figure 3. -
Page 30: Main Source
When the cursor moves to a number, press the button briefly to load the sound effect presets, as Main Source Attenuation shown in Figure 4-2. After the data is loaded, it will exit from this interface to the main interface (Master Press the button briefly to select the COAX (Digital), Volume Interface). -
Page 31: Channel Settings
Note: When the wire controller is in the channel 8 setting interface, press the button briefly to enter the When a sound source is selected, it cannot then be CAUTION page, as shown in Figure 8-2. Turn the selected again as the mix sound source; doing so button can choose to save or skip, and press it causes the mix sound source to be invalid, as shown briefly to determine the selection. - Page 32 Information on the disposal of waste electrical and electronic equipment and batteries (applicable to countries that adopt a garbage collection system) If you want to dispose of this product, do not mix it with general household waste. In accordance with regulations that require proper disposal, recycling and recycling, there is a separate collection system for waste electronic products.
-
Page 33: Specifications
Specifications Performance Power Output Rated: 4Ω, 14.4V, 10%THD CH1-6: 50W, CH7-8: 150W RCA Output Rated: 10kΩ, 14.4V, 0.1%THD CH1-8: 4Vrms THD+N High level: 2Vrms into 4Ω ≤0.1% RCA: 2Vrms into 10kΩ ≤0.06% High level: 40k-AES17+A-weighted ≥80dB RCA: 40k-AES17+A-weighted ≥95dB Input Voltage High level 26Vpp 11Vpp... -
Page 34: Function Parameter
Function Parameter Inputs 8ch High-level 6ch RCA Coaxial Digital Signal Bluetooth Audio USB Audio (DAC) Outputs 8ch High-level 8ch RCA Output Channel Signal Gain Range: -60dB~+6dB Output Signal Equalizer Type: Parametric / Graphic Equalizer Frequency: 20Hz~20kHz (1Hz steps) Q value: 0.404~28.852 Gain: -12.0dB~+12.0dB (0.1dB steps) Anti EQ Signal Equalizer Type: Parametric / Graphic Equalizer... -
Page 35: Open Source License
Open Source License Apache License Version 2.0, January 2004 http://www.apache.org/licenses/ TERMS AND CONDITIONS FOR USE, REPRODUCTION, AND DISTRIBUTION 1. Definitions. “License” shall mean the terms and conditions for use, reproduction, and distribution as defined by Sections 1 through 9 of this document. “Licensor”... - Page 36 “Contribution” shall mean any work of authorship, including the original version of the Work and any modifications or additions to that Work or Derivative Works thereof, that is intentionally submitted to Licensor for inclusion in the Work by the copyright owner or by an individual or Legal Entity authorized to submit on behalf of the copyright owner.
- Page 37 (d) If the Work includes a “NOTICE” text file as part of its distribution, then any Derivative Works that You distribute must include a readable copy of the attribution notices contained within such NOTICE file, excluding those notices that do not pertain to any part of the Derivative Works, in at least one of the following places: within a NOTICE text file distributed as part of the Derivative Works;...
- Page 38 9. Accepting Warranty or Additional Liability. While redistributing the Work or Derivative Works thereof, You may choose to offer, and charge a fee for, acceptance of support, warranty, indemnity, or other liability obligations and/or rights consistent with this License. However, in accepting such obligations, You may act only on Your own behalf and on Your sole responsibility, not on behalf of any other Contributor, and only if You agree to indemnify, defend, and hold each Contributor harmless for any liability incurred by, or claims asserted against, such Contributor by reason of your accepting any such warranty or additional liability.
- Page 39 The MIT License =============== Copyright (c) 2016-2017 ZeroMQ community Copyright (c) 2016 VOCA AS / Harald Nøkland Copyright (c) 2009-2011 250bpm s.r.o. Copyright (c) 2011 Botond Ballo Copyright (c) 2007-2009 iMatix Corporation Permission is hereby granted, free of charge, to any person obtaining a copy of this software and associated documentation files (the “Software”), to deal in the Software without restriction, including without limitation the rights to use, copy, modify, merge, publish, distribute, sublicense, and/or sell copies of the Software, and to permit persons to whom the Software is furnished to do so, subject to...
- Page 40 About the Rules of Bluetooth Electromagnetic Radiation Regulation Thailand...
- Page 41 USA/ FCC Statement: This device complies with Part 15 of the FCC Rules. Operation is subject to the following two conditions: (1) this device may Canada not cause harmful interference, and (2) this device must accept any interference received, including interference that may cause undesired operation.
- Page 43 ALPS ALPINE EUROPE GmbH Aurora House, Deltic Avenue, Rooksley, Milton Keynes, MK13 8LW, United Kingdom Phone: 0345-313-1640 ALPINE ELECTRONICS OF AUSTRALIA PTY., LTD. 161-165 Princes Highway, Hallam Victoria 3803, Australia Phone 03-8787-1200 010-65660308 ALPS ALPINE ASIA CO., LTD.
Need help?
Do you have a question about the PXE-C80-88 and is the answer not in the manual?
Questions and answers