
Subscribe to Our Youtube Channel
Related Manuals for Future light EYE-36 MK2


Summary of Contents for Future light EYE-36 MK2
- Page 1 BEDIENUNGSANLEITUNG USER MANUAL EYE-36 MK2 LED-Head Wash © Copyright Für weiteren Gebrauch aufbewahren! Nachdruck verboten! Keep this manual for future needs! Reproduction prohibited!
-
Page 2: Table Of Contents
Inhaltsverzeichnis Table of contents EINFÜHRUNG ..............................3 Lieferumfang ..............................3 SICHERHEITSHINWEISE..........................4 BESTIMMUNGSGEMÄßE VERWENDUNG..................... 5 GERÄTEBESCHREIBUNG..........................6 Features ................................. 6 Geräteübersicht.............................. 7 INSTALLATION ..............................8 Projektormontage............................8 Anschluss an den DMX-512 Controller / Verbindung Projektor - Projektor ..........10 Anschluss ans Netz............................11 BEDIENUNG .............................. -
Page 3: Einführung
- sich die letzte Version der Anleitung im Internet herunter laden EINFÜHRUNG Wir freuen uns, dass Sie sich für einen FUTURELIGHT EYE-36 MK2 entschieden haben. Sie haben hiermit ein leistungsstarkes und vielseitiges Gerät erworben. Nehmen Sie den EYE-36 MK2 aus der Verpackung. -
Page 4: Sicherheitshinweise
SICHERHEITSHINWEISE ACHTUNG! Seien Sie besonders vorsichtig beim Umgang mit gefährlicher Netzspannung. Bei die- ser Spannung können Sie einen lebensgefährlichen elektrischen Schlag erhalten! Dieses Gerät hat das Werk in sicherheitstechnisch einwandfreiem Zustand verlassen. Um diesen Zustand zu erhalten und einen gefahrlosen Betrieb sicherzustellen, muss der Anwender die Sicherheitshinweise und die Warnvermerke unbedingt beachten, die in dieser Bedienungsanleitung enthalten sind. -
Page 5: Bestimmungsgemäße Verwendung
Es dürfen unter keinen Umständen Flüssigkeiten aller Art in Steckdosen, Steckverbindungen oder in irgendwelche Geräteöffnungen oder Geräteritzen eindringen. Besteht der Verdacht, dass - auch nur minimale - Flüssigkeit in das Gerät eingedrungen sein könnte, muss das Gerät sofort allpolig vom Netz getrennt werden. -
Page 6: Gerätebeschreibung
- - -m Das Bildzeichen bezeichnet den Mindestabstand zu beleuchteten Gegenständen. Der Abstand zwischen Lichtaustritt und der zu beleuchteten Fläche darf diesen Wert nicht unterschreiten! Das Gerät darf nur auf nicht brennbaren Oberflächen aufgestellt werden. Um eine gute Luftzirkulation zu gewährleisten, muss um das Gerät ein Freiraum von mindestens 50 cm eingehalten werden. -
Page 7: Geräteübersicht
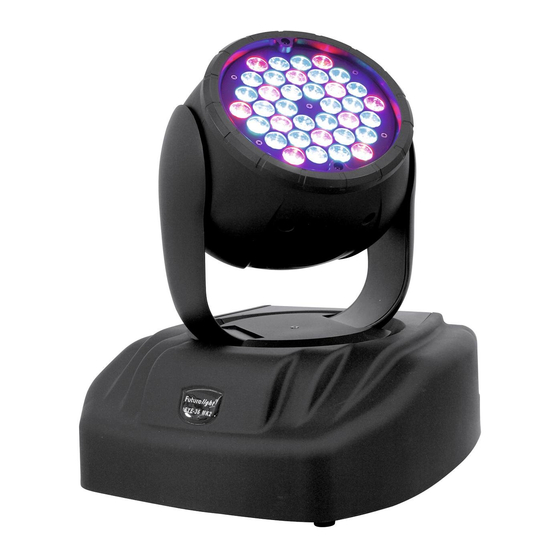
Geräteübersicht (1) Projektorkopf (2) LEDs (3) Projektorarm (4) Base (5) Standfuß (6) DMX-Ausgangsbuchse (12) Kontroll-LED (7) DMX-Eingangsbuchse (13) Up-Taste (8) Tragegriff (14) Down-Taste (9) Display (15) Netzschalter (10) Mode-Taste (16) Sicherungshalter (11) Enter-Taste (17) Netzanschluss 7/28 00039649.DOC, Version 1.2... -
Page 8: Installation
INSTALLATION Projektormontage Die Aufhängevorrichtungen des Projektors muss so gebaut und bemessen sein, dass sie 1 Stunde lang ohne dauernde schädliche Deformierung das 10-fache der Nutzlast aushalten kann. Die Installation muss immer mit einer zweiten, unabhängigen Aufhängung, z. B. einem geeigneten Fangnetz, erfolgen. - Page 9 ACHTUNG! Montieren Sie den Projektor ausschließlich über zwei geeignete Haken. Bitte beachten Sie auch die Installationshinweise auf der Unterseite der Base. Achten Sie darauf, dass das Gerät sicher befestigt wird. Vergewissern Sie sich, dass die Verankerung stabil ist. Die Projektorbase lässt sich auf zwei ver- schiedene Arten montieren.
-
Page 10: Anschluss An Den Dmx-512 Controller / Verbindung Projektor - Projektor
Anschluss an den DMX-512 Controller / Verbindung Projektor - Projektor Achten Sie darauf, dass die Adern der Datenleitung an keiner Stelle miteinander in Kontakt treten. Die Geräte werden ansonsten nicht bzw. nicht korrekt funktionieren. Beachten Sie, dass die Startadresse abhängig vom verwendeten Controller ist. Unbedingt Bedienungsanleitung des verwendeten Controllers beachten. -
Page 11: Anschluss Ans Netz
Drücken Sie die Enter-Taste zur Bestätigung. DEM - Demo-Betrieb Der EYE-36 MK2 lässt sich im Demo-Betrieb ohne Controller einsetzen. Trennen Sie dazu den EYE-36 MK2 vom Controller und rufen Sie das vorprogrammierte Programm auf. • Drücken Sie die Mode-Taste und wählen Sie „DEM“. -
Page 12: Dmx-Gesteuerter Betrieb
Nachdem Sie die Startadresse definiert haben, können Sie den EYE-36 MK2 über Ihren Controller ansteuern. Bitte beachten Sie: Schalten Sie den EYE-36 MK2 ein. Das Gerät prüft, ob DMX-512 Daten empfangen werden oder nicht. Wenn Daten empfangen werden, blinkt die Kontroll-LED. Werden keine Daten empfangen, blinkt die Kontroll-LED nicht. -
Page 13: Dmx-Protokoll
DMX-Protokoll Steuerkanal 1 - Horizontale Bewegung (Pan) Wenn Sie den Regler verschieben, bewegen Sie den Kopf horizontal (PAN). Allmähliches Einstellen des Kopfes bei langsamen Schieben des Reglers (0-255, 128-Mitte). Der Kopf kann an jeder gewünschten Einstellung angehalten werden. Steuerkanal 2 - Vertikale Bewegung (Tilt) Wenn Sie den Regler verschieben, bewegen Sie den Kopf vertikal (TILT). -
Page 14: Reinigung Und Wartung
20 39 14 27 8% 15% S Grün 40 59 28 3B 16% 23% S Blau 60 79 3C 4F 24% 31% S Rot und grün 80 99 50 63 31% 39% S Rot und blau 100 119 64 77 39% 47% S Grün und blau 120 139 78 8B... -
Page 15: Sicherungswechsel
Damit die Lager der rotierenden Teile gut funktionieren, müssen sie ca. alle 6 Monate geschmiert werden. Zum Ölen ist eine Spritze mit einer feinen Nadel zu benutzen. Die Ölmenge darf nicht übermäßig sein, um zu vermeiden, dass das Öl während des Rotierens ausläuft. Im Geräteinneren befinden sich außer der Sicherung keine zu wartenden Teile. -
Page 16: Introduction
- pass this manual on to every further owner or user of the product - download the latest version of the user manual from the Internet INTRODUCTION Thank you for having chosen a FUTURELIGHT EYE-36 MK2. You will see you have acquired a powerful and versatile device. Unpack your EYE-36 MK2. -
Page 17: Safety Instructions
SAFETY INSTRUCTIONS CAUTION! Be careful with your operations. With a dangerous voltage you can suffer a dangerous electric shock when touching the wires! This device has left our premises in absolutely perfect condition. In order to maintain this condition and to ensure a safe operation, it is absolutely necessary for the user to follow the safety instructions and warning notes written in this user manual. -
Page 18: Operating Determinations
running, the device must be checked by a specialist if the liquid has reduced any insulation. Reduced insulation can cause mortal electrical shock. There must never be any objects entering into the device. This is especially valid for metal parts. If any metal parts like staples or coarse metal chips enter into the device, the device must be taken out of operation and disconnected immediately. -
Page 19: Description Of The Device
Make sure that the area below the installation place is blocked when rigging, derigging or servicing the fixture. For overhead use (mounting height >100 cm), always fix the fixture with an appropriate safety-rope. Fix the safety-rope at the correct fixation points only. The safety-rope must never be fixed at the transport handles! Only operate the fixture after having checked that the housing is firmly closed and all screws are tightly fastened. -
Page 20: Overview
Overview (1) Projector head (2) LEDs (3) Yoke (4) Base (5) Foot (6) DMX-Out socket (12) Control LED (7) DMX-In socket (13) Up-button (8) Carrying handle (14) Down-button (9) Display (15) Power switch (10) Mode-button (16) Fuseholder (11) Enter-button (17) Power supply 20/28 00039649.DOC, Version 1.2... -
Page 21: Installation
INSTALLATION Rigging The installation of the projector has to be built and constructed in a way that it can hold 10 times the weight for 1 hour without any harming deformation. The installation must always be secured with a secondary safety attachment, e.g. an appropriate catch net. This secondary safety attachment must be constructed in a way that no part of the installation can fall down if the main attachment fails. - Page 22 The fixture’s base enables to be mounted in two ways. The Moving-Head can be placed directly on the stage floor or rigged in any orientation on a truss without altering its operation characteristics (see the drawing). For overhead use (mounting height >100 cm), always install an appropriate safety bond. You must only use safety bonds complying with DIN 56927, quick links complying with DIN 56926, shackles complying with DIN EN...
-
Page 23: Dmx-512 Connection / Connection Between Fixtures
DMX-512 connection / connection between fixtures The wires must not come into contact with each other, otherwise the fixtures will not work at all, or will not work properly. Please note, the starting address depends upon which controller is being used. Only use a stereo shielded cable and 3-pin XLR-plugs and connectors in order to connect the controller with the fixture or one fixture with another. -
Page 24: Connection With The Mains
OPERATION With the POWER-switch, you can switch the device on and off. After you connected the effect to the mains, the EYE-36 MK2 starts running. During the Reset, the motors are trimmed and the device is ready for use afterwards. -
Page 25: Dmx-Controlled Operation
EYE-36 MK2 will respond to the controller. If you set, for example, the address to channel 13, the EYE-36 MK2 will use the channel 13 to 24 for control. Please, be sure that you don’t have any overlapping channels in order to control each EYE-36 MK2 correctly and independently from any other fixture on the DMX-chain. -
Page 26: Dmx-Protocol
DMX-protocol Control-channel 1 - Horizontal movement (Pan) Push slider up in order to move the head horizontally (PAN). Gradual head adjustment from one end of the slider to the other (0-255, 128-center). The head can be stopped at any position you wish. Control-channel 2 - Vertical movement (Tilt) Push slider up in order to move the head vertically (TILT). -
Page 27: Cleaning And Maintenance
20 39 14 27 8% 15% S Green 40 59 28 3B 16% 23% S Blue 60 79 3C 4F 24% 31% S Red and green 80 99 50 63 31% 39% S Red and blue 100 119 64 77 39% 47% S Green and blue 120 139 78 8B... -
Page 28: Replacing The Fuse
There are no serviceable parts except for the fuse inside the device. Maintenance and service operations are only to be carried out by authorized dealers. Replacing the fuse If the fine-wire fuse of the device fuses, only replace the fuse by a fuse of same type and rating. Before replacing the fuse, unplug mains lead.
Need help?
Do you have a question about the EYE-36 MK2 and is the answer not in the manual?
Questions and answers