Table of Contents
Advertisement
Welcome to the World of Patpet.com
620 Series
Remote Dog Training Collar
Thank you for purchasing the 620 or 620B Remote Dog Training Collar. We
have made every attempt to provide you with the most technologically
advanced product while meeting the most stringent quality and manufac-
turing standards.
We are confident you will be pleased with the results you will attain with
this dog training collar. Please remember you will get better results with
the use of lower stimulation combined with consistent training techniques.
The use of high levels of stimulation should only be used as a last resort
and in life-threatening situations.
Good luck with your training and please feel free to contact us should you
have any questions.
Advertisement
Table of Contents

Related Manuals for Patpet 620 Series


Summary of Contents for Patpet 620 Series
- Page 1 Welcome to the World of Patpet.com 620 Series Remote Dog Training Collar Thank you for purchasing the 620 or 620B Remote Dog Training Collar. We have made every attempt to provide you with the most technologically advanced product while meeting the most stringent quality and manufac- turing standards.
- Page 2 IMPORTANT SAFETY INFORMATION Explanation of Attention Words and Symbols used in this manual This is the safety alert symbol. It is used to alert you to potential personal injury hazards. Obey all safety messages that follow this symbol to avoid possible injury or death. WARNING indicates a hazardous situation which, if WARNING not avoided, could result in death or serious injury.
- Page 3 CAUTION Please read and follow the instructions in this manual. A proper fit of the collar is important. A collar worn for too long, or made too tight on the dog’s neck may cause skin damage. These are called bed sores, or decubitus ulcers and pressure necrosis.
-
Page 4: Table Of Contents
TABLE OF CONTENTS COMPONENTS ..................1 HOW THE SYSTEM WORKS ..............2 MAIN FEATURES ...................3 TRANSIMITTER ..................4 RECEIVER Collar..................5 OPERATING GUIDE HOW TO TURN THE P-COLLAR 620 ON/OFF ........6 TO MAXIMIZE THE DISTANCE ..............8 FIT THE RECEIVER COLLAR ..............9 FIND THE BEST INTENSITY LEVEL FOR YOUR DOG ......11 THE LCD&LED INDICATOR ..............12 CHARGING THE BATTERY..............14 HOW TO PAIR THE REMOTE TRANSMITTER&RECEIVER COLLAR...16... -
Page 5: Components
COMPONENTS OTHER ITEMS YOU MAY NEED • Small Phillips head screwdriver • Pliers • Scissors • Lighter • Non-metallic collar and 10-foot leash... -
Page 6: How The System Works
Now you can experience the difference a Remote Trainer can make. Spend less time training and more time enjoying your dog. The PatPet® Remote Trainer is easy to use, with an advanced digital display that tells you exactly what level of stimulation you are using. -
Page 7: Main Features
MAIN FEATURES 600M Remote Training Range User Expandable to a Two-dog System Tone, Vibration, and Shock Commands 16 Adjustable Progressive Intensity Levels for Vibration and Shock Blue Backlit LCD Indicating Intensity Level and Battery 2-hour Rapid Charging Lithium Polymer Battery 100% Waterproof Innovative Blind Operation with Touch Distinguishing Mode Buttons... -
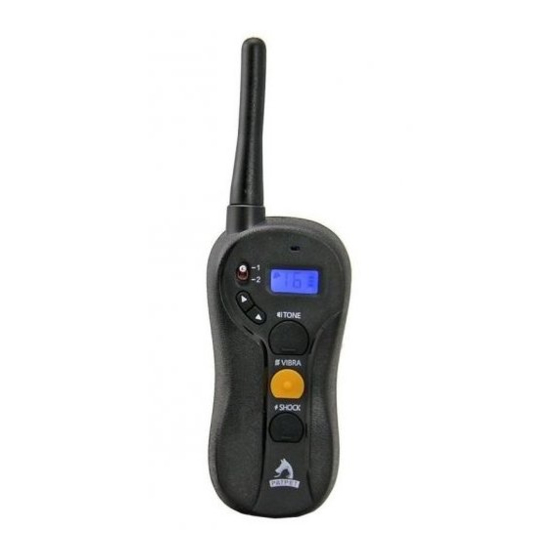
Page 8: Transimitter
TRANSMITTER Selecting Channels Quick selection for LED Indicator Light the certain dog we Blue Backlit LED Display want to train. Indicating Intensity Level Intensity Level under Any Circumstances Adjustment of Visibility. Blind Operation Buttons Touch Easily distinguish and Distinguishing send the correct training Edge command without eyes on Effectively preventing... -
Page 9: Receiver Collar
RECEIVER COLLAR Contact Points On/Off Button Charging Jack ( with cover ) Collar... -
Page 10: Operating Guide
OPERATING GUIDE HOW TO TURN THE P-COLLAR 620 ON/OFF To turn the Transmitter on: 1. Mount the antenna in the corresponding position of the transmitter,tightly. 2. Press any button on the Transmitter. The blue backlight on the display stays on for approximately 30 seconds after a button is pressed. - Page 11 HOW TO TURN THE P-COLLAR 620 ON/OFF To turn the Receiver Collar on: 1. Press and hold the On/Off Button until the Green LED light comes on. (This takes approximately one second). 2. Release the On/Off Button. To turn the Receiver Collar off: 1.
-
Page 12: To Maximize The Distance
HOW THE TRANSMITTER BUTTONS WORK Dog 1/2 Toggle Up/Down TONE Button Button(Black with Bar) VIBRA Button(Orange with Dot) SHOCK (Black with Bar)Button Tone Only Button (Black with Bar): Sends an audible tone to the collar. No stimulation is delivered. Vibration Only Button (Orange with Dot) /Shock Only Button (Black with Bar): Delivers vibration/shock through the Contact Points on the Receiver Collar at the level shown on the Digital Display. -
Page 13: Fit The Receiver Collar
FIT OF THE RECEIVER COLLAR Important: The proper fit and placement of your Receiver Collar is important for effective training. The Contact Points must have direct contact with your pet’s skin on the underside of his neck. To assure a proper fit, please follow these steps: 1. - Page 14 6. Trim the collar as follows (3D): a. Mark the desired length of the collar with a pen. Allow for growth if your pet is young or grows a thick winter coat. b. Remove the Receiver Collar from your pet and cut off the excess.
-
Page 15: Find The Best Intensity Level For Your Dog
FIND THE INTENSITY LEVEL THAT IS BEST FOR YOUR DOG The patpet® 620 and 620b have multiple intensity levels. This allows you to choose the stimulation that is best for your dog. NOTE: always start at the lowest level and work your way up. -
Page 16: The Lcd&Led Indicator
THE LCD & LED INDICATOR Indicates Vibration/Shock levels ranging from 1-16, and appears in the center. Indicates the active dog receiver and appear on the left. Indicates battery’s power level. Note: The battery indicator will flash every second to indicate low battery. - Page 17 TONE and Transmits Pairing command Red LED on for length VIBRA Buttons to Receiver Collar of button press held simultaneously Receiver Indicator Light – Function and Response Receiver Collar Function Green LED Response Power on Flashes once Normal operation - Good battery 1 flash every 5 seconds Training tone On length of a TONE button press Flashes once every second within...
-
Page 18: Charging The Battery
CHARGING THE BATTERY The unit uses Lithium-Polymer batteries. 1. Charge the unit before using it for the first time. 2. Do not charge the batteries near any flammable substances. 3. Fully charge the batteries if the unit is to be stored without use for a period of 3 months or more. - Page 19 NOTE: The Battery Indicator on the Transmitter will scroll and the indicator light will be a steady red while charging. The Battery Indicator will become steady and the LED Indicator Light will flash when fully charged. The indicator light on the Receiver Collar will be a steady red while charging and a green light will turned on when fully charged.
-
Page 20: How To Pair The Remote Transmitter&Receiver Collar
HOW TO PAIR THE REMOTE TRANSMITTER & RECEIVER COLLAR If your Receiver Collar does not beep when the TONE Button on the Remote Transmitter is pushed, or if you feel the Receiver Collar is not responding to the Remote Transmitter, follow these steps to pair them: 1. -
Page 21: How To Use The Test Light
HOW TO USE THE TEST LIGHT 1. Turn the Receiver Collar on. 2. Hold the Test Light Contacts to the Contact Points. 3. Press the SHOCK Button on the Remote Transmitter. 4. The Test Light will flash. Note: At higher Shock Levels, the Test Light will flash brighter. -
Page 22: How The Transmitter Buttons Work
TO MAXIMIZE THE DISTANCE The unit has a 600 yard range. The range may vary depending on the way the Transmitter is held. Hold the Transmitter away from your body to receive the greatest range. For maximum signal strength, keep the device properly charged. -
Page 23: Frequently Asked Questions
Receiver is used in or around salt water, it should be rinsed with fresh water following each use. Can I use the PatPet 620 or Yes. The PatPet 620 and 620B 620B with more than one are expandable to a maximum of dog? two dogs. - Page 24 Will I get exactly 600 yards of The range you get with your range with the PatPet 620 or PatPet 620 or 620B will vary 620B? according to terrain, weather, and vegetation, as well as transmission from other radio devices. To get the maximum range, please refer to the “How...
-
Page 25: Troubleshooting
Remote Transmitter or Collar Receiver. •Many factors can impact the range you have with the PatPet 620 or 620B. For a list of these factors, please refer to “How the System Works.” • You can verify the Collar Receiver is... - Page 26 The Collar Receiver will not •Make sure that the Receiver turn on. Collar has been charged. For the initial charge, be sure to charge it for at least 4 hours. Subse- quent charges only take 2-3 hours. The Collar Receiver is not •Verify that the Receiver Collar responding to the Remote and the Remote Transmitter are...
-
Page 27: Compliance
(2) this device must accept any interference received, including interference that may cause undesired operation. Modification or changes to this equipment not expressly approved by Patpet Technology Co., Ltd CAUTION may void the user’s authority to operate the equipment. -
Page 28: Product Parameters
Launcher Net weight: 76.2g Distance: ~ 600 meters (open area) Power supply: 3.7V polymer lithium battery ~ 500mAH Battery life: 6 to 8 weeks Frequency (output): 433.92 MHz (300mW) Antenna: external Dustproof and waterproof grade IPX5 Communication and codec MCU control Strength Level: Operating temperature: 0 °... -
Page 29: Reference Size For Different Dogs
REFERENCE SIZE FOR DIFFERENT DOGS Chest Back Neck Size Measurement Length Type (in) (in) (in) 9.8-11.8 7.8-8.6 11.4-14.2 7.8-9.5 13.7-16.5 9-11 16.2-18.5 10.6-12.2 12.2 11.8-13.4 18.1-20.8 13.8 13-14.5 20.5-23.2 15.7 17-18.9 30-33 23.6 18.5-20.5 34.6-38.2 25.6 21.6-24.4 36.2-39.3 27.5 REFERENCE WEIGHT FOR DOGS Large Dog ( Body height above 24 inch, Weight above 88 Ibs ) Medium Dog ( Height 16-24 inch, Weight 24.2-66 Ibs ) Small Dog ( Height 10-16 inch, Weight 8.8-22 Ibs )
Need help?
Do you have a question about the 620 Series and is the answer not in the manual?
Questions and answers