Table of Contents
Advertisement
Available languages
Available languages
Quick Links
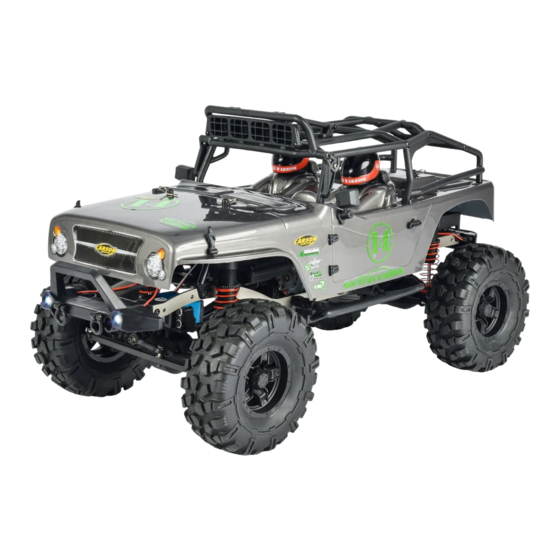
MC-10 Mountain Warrior
AssEmBlED READy-To-Run moDEl
500404094 / 500404098 // Stand: August 2016
Achtung - Attention - Attenzione
DE // Betriebsanleitung
GB // Instruction Manual
FR // Avertissement de sécurité
IT // Avvertenze di sicurezza
Montageanleitung - Instructions
Ersatzteile - Spare Parts
02
03 - 09
10 - 16
17 - 18
19 - 20
21
40
Advertisement
Chapters
Table of Contents

Related Manuals for Carson Mountain Warrior MC-10


Summary of Contents for Carson Mountain Warrior MC-10
- Page 1 MC-10 Mountain Warrior AssEmBlED READy-To-Run moDEl Achtung - Attention - Attenzione DE // Betriebsanleitung 03 - 09 GB // Instruction Manual 10 - 16 FR // Avertissement de sécurité 17 - 18 IT // Avvertenze di sicurezza 19 - 20 Montageanleitung - Instructions Ersatzteile - Spare Parts 500404094 / 500404098 // Stand: August 2016...
- Page 2 Handbuch auf dem aktuellsten Stand befindet. werden. Dieses Handbuch enthält die technischen Anlagen, wichtige Den aktuellsten Stand ihres Handbuches finden sie unter: www.carson-modelsport.com Anleitungen zur korrekten Inbetriebnahme und Nutzung sowie Produktinformation entsprechend dem aktuellen Stand vor der Drucklegung. GB // Important information...
-
Page 3: Vorwort
Produktes gegenüber Daten und Abbildungen dieser Anleitung können daher keinerlei Ansprüche abgeleitet werden. Garantiebedingungen Von der Garantie ausgeschlossen sind: Für dieses Produkt leistet CARSON eine Garantie von 24 Monaten • Beschädigung oder Ausfall durch Nichtbeachten der Sicher- betreffend Fehler bei der Herstellung in Bezug auf Material und heitsanweisungen oder der Bedienungsanleitung, höhere Fertigung bei normalem Gebrauch ab dem Kauf beim autorisier- Gewalt, Unfall, fehlerhafte oder außergewöhnliche Beanspru-... -
Page 4: Table Of Contents
InHaLt Vorwort ........................3 Einlegen des Fahrakkus ..................7 Lieferumfang Zubehör ..................4 Einschalten der RC-Anlage................8 Sicherheitsanweisungen .................5 Steuern des Modells ...................8 Chassis ........................6 Steuerung der LED-Beleuchtung ..............9 Abnehmen der Karosserie ................6 Fehlersuche ......................9 Beschreibung Fahrregler ..................7 Montageanleitung ..................21 Aufladen des Fahrakkus..................7 Ersatzteile ...................... -
Page 5: Sicherheitsanweisungen
SIcHerHeItSanweISungen Sicherheitsanweisung und bestimmungsgemäße Verwendung Dieses Produkt ist ausschließlich für Hobbyzwecke ausgelegt und Bitte beachten sie, dass es bei verschiedenen Modellen zu erhöh- darf nur auf dafür vorgesehenen Plätzen benutzt werden. ten Geräuschpegeln kommen kann, daher dürfen diese nicht dauerhaft in ihrer unmittelbarer Umgebung betrieben werden. Mit diesen Modell dürfen keine Personen oder Tiere transportiert werden. -
Page 6: Chassis
cHaSSIS Hintere Stoßdämpfer Motor Frontrammer Fahrregler Vorderreifen Hinterreifen Vorderer Stoßdämpfer Servo abneHmen Der KaroSSerIe • Ziehen Sie die Karosseriesplinte heraus und • Nehmen Sie die Karosserie ab. DE // 6... -
Page 7: Beschreibung Fahrregler
beScHreIbung FaHrregLer Wir empfehlen für den Betrieb des im Modell verbauten Fahr- reglers den im Lieferumfang enthaltenen LiFe-Fahrakku. Jedoch können auch 7.4V LiPo-und 7.2V NiMH- Fahrakkus genutzt werden. Stellen Sie über die beiden am Regler befindlichen Jumper ein ob ein LiFe/LiPo- oder NiMH-Akku verwendet wird. Dies ist unbedingt erforderlich, da der Fahrakku ansonsten beschädigt wird: BATT-Jumper nach links: LiXX-Akku BATT-Jumper nach Rechts: NiMH-Akku... -
Page 8: Einschalten Der Rc-Anlage
eInScHaLten Der rc-anLage AcHTuNG! Immer zuerst den Sender und anschließend erst das Modell anschalten! 1 Schließen Sie den Fahrakku an. 2 Schalten Sie den Empfänger ein. Steuern DeS moDeLLS • Stellen Sie das Modell so ab, dass die Räder frei in der Luft hängen. • Drehen Sie das Steuerrad bis zum Anschlag nach rechts und links. Die Räder sollen dem Lenkausschlag folgen. • Zum Regeln der Fahrgeschwindigkeit betätigen Sie den Gas/ Bremshebel - nach hinten (Vorwärtsfahrt, Gas geben) bzw. -
Page 9: Steuerung Der Led-Beleuchtung
Steuerung Der LeD-beLeucHtung AcHTuNG! 1 Ihr RC-Modell ist an der Front- und Rückseite mit LED Leuchten ausgestattet. Diese können während der Fahrt über den dritten 3 Die installierte Modell-Beleuchtung ersetzt kein Tageslicht. Kanal Ihrer Fernbedienung an und ausgeschalten werden. Fahren Sie daher Ihr Modell bitte nicht Nachts oder bei Dunkel- 2 Im Bild ist der Schalter zur Bedienung des dritten Kanals heit. -
Page 10: Preface
• Cosmetic damage; All replacement parts and products, and products on which a • Transportation, shipping or insurance costs; or refund is made, become the property of CARSON. New or recon- • Costs of product removal, installation, set-up service adjust- ditioned parts and products may be used in the performance of ment or reinstallation;... -
Page 11: Included Items Accessories
contentS Preface ......................... 10 Inserting the drive battery ................14 Included Items Accessories ................11 Turn on the RC System ..................15 Safety Precautions ....................12 How to Control Your Model................15 Chassis ........................13 Control of the LED lighting ................16 Removing the Body ..................13 Troubleshooting .................... -
Page 12: Safety Precautions
SaFety PrecautIonS Safety Instructions and Intended use This product is designed exclusively for hobby use and may only Please note that various models can generate very high noise be used on tracks and areas intended for this purpose. levels and should, therefore, not be operated in your immediate proximity. -
Page 13: Chassis
cHaSSIS Rear shock unit Motor Speed Front bumper Controller Front tyre Rear tyre Front shock unit Saver remoVIng tHe boDy • Remove hook pin and • Take body off. 13 // GB... -
Page 14: Description Speedcontroller
DeScrIPtIon SPeeDcontroLLer We recommend for the operation of the built-in model speed controller the LiFe drive battery which is included in delivery. But you can use also 7.4V LiPo and 7.2V NiMH drive battery. You must change the located Jumper on the controller. One is for LiFe/LiPo- and other is for NiMH battery used. This is absolutely necessary, since the drive battery is otherwise damaged: BATT jumper to left: LiPo battery... -
Page 15: Turn On The Rc System
turn on tHe rc SyStem cAuTIoN! Always turn the transmitter´s power switch oN first! 1 Connect the rechargeable battery for the driving. 2 Switch on the receiver. How to controL your moDeL • Raise the tyres off the ground • Turn the steering wheel to the right and left as far as it will go. The wheels are to follow the steering direction. • If the wheels operate in the opposite direction, operate the servo Reverse switch (ST in position REV). -
Page 16: Control Of The Led Lighting
controL oF tHe LeD LIgHtIng cAuTIoN! 1 Your RC-Car is equipped with LED-lights in the front and back- side. You can switch on and off the lights by the transmitter in 3 The installed lighting does not replace the daylight. Therefore, use of the third channel. - Page 17 Toutes les pièces et produits faisant l‘objet de remplacement • Des dommages esthétiques; deviennent la propriété de CARSON. Dans le cadre des prestations • Le transport, l’expédition et les frais d’assurance; et de garantie, seules des pièces neuves ou retraitées peuvent être • Les frais d‘élimination, de retour, d’installation, de mise au point...
- Page 18 conSIgneS De SécurIté consignes de sécurité et utilisation conforme Ce produit a été exclusivement conçu à des fins de loisir et ne doit niveau de bruit peut être élevé. Pour cette raison, veuillez ne pas être utilisé qu’à des endroits prévus à cet effet. les faire fonctionner de façon permanente auprès de vous.
- Page 19 Pertanto, se il prodotto acquistato presenta lievi differenze condizioni di Garanzia Dalla garanzia sono esclusi: CARSON offre una garanzia di 24 mesi, dalla data di acquisto • Danni o guasti derivanti dalla mancata osservanza delle presso qualsiasi rivenditore autorizzato, contro eventuali difetti di istruzioni d‘uso e di sicurezza, da cause di forza maggiore,...
- Page 20 IStruZIonI DI SIcureZZa Istruzioni di sicurezza e uso conforme Questo prodotto, progettato esclusivamente a scopo di svago, Dato che alcuni modelli possono raggiungere livelli di può essere impiegato unicamente in spazi appositamente rumore particolarmente elevati, si raccomanda di non tenerli previsti.
-
Page 21: Montageanleitung
Montageanleitung • asseMbly instructions DiFFerenZial Vorne/Hinten • DiFFerential Front/rear 500405788 500405775 500405775 M2 x 10 500405788 M2 x 8 500405776 500405788 M3 x 6 M2 x 4 500405789 500405789 M2 x 6 M3 x 8 500405790... - Page 22 Montage VorDer/HinteracHse • asseMbling Front/rear unit 500405791 500405791 500405777 500405792 500405777 500405792 500405792 500405792 M3 x 8 500405792...
- Page 23 Montage cHassis • asseMbling cHassis M3 x 6 500405778 M3 x 6 500405790 500405793 M3 x 8 M3 x 10 500405793 M3 x 8 500405793 500405794 M3 x 10 500405795 M3 x 10 M3 x 8 500405793 500405794 500405779 M3 x 10 500405796 500405793 500405779...
- Page 24 500405797 500405797 500405797 500405789 M3 x 16 500405789 500405789 500405789...
- Page 25 stossDÄMPFer • sHocK absorberrs 500405780 500405780...
- Page 26 Montage stossDÄMPFer Vorne • asseMbling sHocK abSorberS Front 500405780 M3 x 30 M3 x 20 500405780 M3 x 23...
- Page 27 Montage stossDÄMPFer Hinten • asseMbling sHocK abSorberS rear 500405780 M3 x 30 M3 x 20 M3 x 23...
- Page 28 Montage getriebe • asseMbling gear 500405684 500405685 500405686 500405684 M3 x 16...
- Page 29 500405783 M2.5 x 10 500405783 500405686 500405684 500405686 500405686 M3 x 35 M3 x 45 500405783 M3 x 18 500405686...
- Page 30 500405784 500405785 M4 x 4 500405686 M3 x 6 M3 x 10...
- Page 31 Montage getriebeblocK • asseMbling transMission blocK M3 x 8 500405796 500405798 M3 x 10 500405795 M3 x 18...
- Page 32 Montage antribsWellen • asseMbling ProPeller sHaFt 500405800 M2.5 x 6 500405795 500405795 M2.5 x 6 M2.5 x 10 500405795 M2.5 x 14 M2.5 x 10 M2.5 x 14 500405795...
- Page 33 aKKuHalterung • battery Mount 500405782 500405796 500405796 M3 x 8 M3 x 8 M3 x 8 M3 x 10 500405786 500405782...
- Page 34 cHassis scHutZ • cHassis Protection 500405802 500405796 500405802 M2.4 x 14 500405796 500405797...
- Page 35 serVo • saVer 500405798 M3 x 10 M3 x 16 M3 x 10 M3 x 12 500405799 500405799 500405804 500405804...
- Page 36 Montage ÜberrollKÄFig • asseMbling cage 500405801 M2.5 x 6 M2.5 x 12 500405801 M3 x 10 M3 x 12 M2.5 x 14 M2.5 x 12 M2.5 x 10 M3 x 12 M2.5 x 14 M2.5 x 10 M3 x 12...
- Page 37 Montage Karosserie • asseMbling boDy 500405801 500405787 500405787 M3 x 10...
- Page 38 500405787 500405796 500405796 M2.5 x 14...
- Page 39 500405804...
-
Page 40: Ersatzteile
ersatZteile • sPare Parts 500405775 Differezial gesperrt vo/hi 500405779 Chassis Rahmen Li/Re 500405783 Mitteldifferenzial gesperrt Differencial complete Chassis frame Main Differencial 500405776 Kegelrad klein 500405780 Dämpfer Set (4) 500405784 Rutschkupplungs-Set Driving diff gear set Damper set Slipperclutsch 500405777 Antriebswellen CVD vorne 500405781 Schrauben-Set 500405785 Motorritzel Drive shaft front... - Page 41 beZeicHnung FeHlt Deu • engliscH 500405787 Karosserie-Satz 500405791 C-Halter Achsschenkel (2) 500405795 Chassis Verbinder B Mitte (1) Body set Pivot holder chassis holder B 500405788 Getriebegehäuse vo/hi(1) 500405792 Achsschenkel-Set (2) 500405796 Karosserie Stützen Set (4) Gear cover Rear hub set (2) Body holder 500405789 Achsgehäuse vo/hi li/re (2+2) 500405793 Karosserie-Halter Set...
- Page 42 ersatZteile • sPare Parts 500405799 Felgenmitnehmer 12mm 6 500405801 Überrollkäfig mit LED 500405803 Kugellager-Satz Kant (4) / Rim hub 12 mm Halterung / Cage Ball bering set 500405800 Kardanwellen-Set (2) vo/hi 500405802 Chassis Schutz 500405804 Räder (2) Center main shaft Chassis cover Wheels (2) 500405685 Motorhalter...
- Page 43 notIZen / noteS...
- Page 44 Werkstraße 1 // D-90765 Fürth // www.carson-modelsport.de 01805-73 33 00 (14 ct/min aus dem deutschen Festnetz) Service-Hotline for Germany: Mo - Do 8.00 - 17.00 Uhr // Fr 8.00 - 14.30 Uhr CARSON-Model Sport // Abt. Service // Mittlere Motsch 9 // 96515 Sonneberg...
Need help?
Do you have a question about the Mountain Warrior MC-10 and is the answer not in the manual?
Questions and answers