Table of Contents
Advertisement
Available languages
Available languages
Quick Links
Advertisement
Chapters
Table of Contents

Related Manuals for Carson X-18 Sport RTR


Summary of Contents for Carson X-18 Sport RTR
- Page 1 +Brushless RTR Betriebsanleitung Seite 2 - 16 Instruction Manual Page 18 - 32 Mode d’emploi Page 34 - 48 Instrucciones Página 50 - 64 Istruzioni d’uso Pagina 66 - 80 CARSON X-18 50 040 40 25 + 50 040 40 26...
-
Page 2: Vorwort
Ihr Fachhändler. Germany Wir wünschen Ihnen viel Spaß mit Ihrem CARSON Modellauto und jederzeit gute Fahrt! Vor dem Gebrauch Ihres neuen Modells lesen Sie bitte dieses Handbuch sorgfältig durch! CARSON X-18 50 040 40 25 + 50 040 40 26... -
Page 3: Table Of Contents
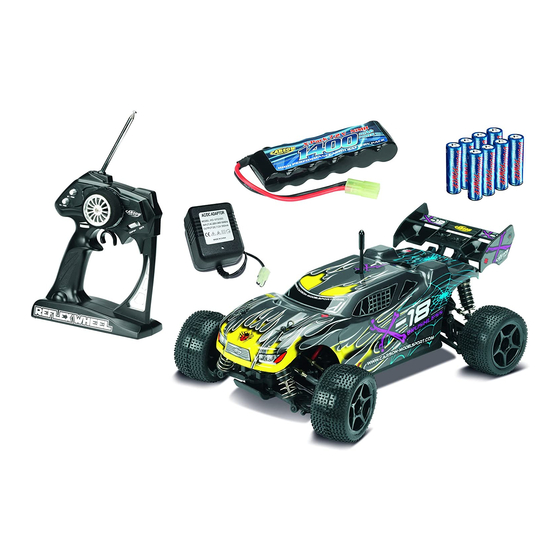
Lieferumfang X-18 Sport X- - 18 Sport 50 040 4025 50 040 4025 Sender X-18 Brushless 50 040 4026 CARSON X-18 50 040 40 25 + 50 040 40 26 CARSON X-18 50 040 40 25 + 50 040 4... -
Page 4: Sicherheitsanweisungen
Bei längerem Nichtgebrauch ist der Fahr-Akku Reaktionsfähigkeit beeinträchtigt sind. unbedingt zu entfernen. • Halten Sie immer direkten Sichtkontakt zum Modell. • Fahren sie das Modell nur mit ordnungsgemäß angebrachter Karosserie. CARSON X-18 50 040 40 25 + 50 040 40 26... -
Page 5: Für Den Zusammenbau Erforderliches Werkzeug
30 001 3305 Kreuzschlitz-Schraubendreher Kreuzschlüssel 30 001 3118 Pinzette 30 007 4003 Seitenschneider 30 007 4035 (klein und groß) und Inbusschlüssel 1,5 / 2 / 2,5 mm 30 007 4023 CARSON X-18 50 040 40 25 + 50 040 40 26... -
Page 6: Chassis
Stoßdämpfer Lenkservo Vorderreifen Hinterreifen Fahrakku Chassis Vorderer Stoßdämpfer b. Abnehmen der Karosserie b. Abnehmen der Karosse • Ziehen Sie die Karosseriesplinte heraus und • Nehmen Sie die Karosserie ab. CARSON X-18 50 040 40 25 + 50 040 40 26... -
Page 7: Technische Daten Motor Und Regler
Gaskanal des Empfängers verbunden Sollte der Motor eine gewisse Zeit nach dem Einstellen des Neutral- punkts immer noch laufen, schalten Sie bitte den Regler aus und wieder ein, um den Neutralpunkt einzustellen. CARSON X-18 50 040 40 25 + 50 040 40 26... -
Page 8: Anleitung Für Den Brushless Speed Controller 50 040 4026
1) Verwenden Sie einen neuen Fahrregler Empfänger 2) Verwenden Sie einen neuen Sender Servo in Steuerkanal 3) Ändern Sie die Einstellungen der Neutralposition des Hebels, die gesteckt (CH1) ATV- oder EPA-Parameter usw. CARSON X-18 50 040 40 25 + 50 040 40 26... - Page 9 „✼, ✼, ✼“ (Einzelblinken). (Endpunkt) des Vorwärts-Bereichs oder des Rückwärts-Bereichs 3. Schutz vor Verlust des Steuersignals: Der Regler schaltet die bewegt wird. Ausgangsleistung ab, wenn das Signal für 0,2 Sekunden verloren geht. CARSON X-18 50 040 40 25 + 50 040 40 26...
- Page 10 “✼ ✼, ✼ ✼, ✼ ✼” (Doppelblinken). 2.2. Beschleunigungs-Modus (auch „Punch“) Wählen Sie aus „Level 1“ bis „Level 4“. Eine höhere Zahl steht für einen aggressivere Beschleunigung. CARSON X-18 50 040 40 25 + 50 040 40 26...
-
Page 11: Fahrregler Mit Der Set-Taste Programmieren
Die rote LED blinkt 4 Mal, wählen Sie „100%“ Taste los Taste Hinweis: Hinweis: Während des Programmiervorgangs gibt der Motor neben der blinkenden LED auch gleichzeitig einen „Piep“-Ton aus. CARSON X-18 50 040 40 25 + 50 040 40 26... -
Page 12: Laden Des Fahrakkus
Verwenden Sie zum Laden des Nickel Metall Hydrid Akkus nur das im Lieferumfang enthaltene Ladegerät!!! Ansonsten kann Ihr Fahrakku beschädigt werden. Die Ladezeit ist je nach Ladegerät und Akkutyp unterschiedlich. CARSON X-18 50 040 40 25 + 50 040 40 26... -
Page 13: Einbau Des Fahrakkus
Schäden. i. Einschalten der RC-Anlage • Ziehen Sie die Senderantenne ganz heraus Bei nicht vollständig herausgezogener Antenne verringert sich die Reichweite der Fernsteuerung. ACHTUNG! Immer zuerst den Sender einschalten! CARSON X-18 50 040 40 25 + 50 040 40 26... - Page 14 1 Schließen Sie den Fahrakku an. 2 Schalten Sie den Empfänger ein. 3 Setzen Sie die Karosserie auf und sichern Sie mit den Karosseriesplinten. CARSON X-18 50 040 40 25 + 50 040 40 26...
-
Page 15: Steuern Des Modells
- Nach hinten ziehen (Vorwärtsfahrt, Gas geben) bzw. - Nach vorne drücken (Bremsen, Rückwärtsfahrt). Neutral Rechts Links Vorwärtsfahrt/ Bremsen/ Gas geben Rückwärtsfahrt CARSON X-18 50 040 40 25 + 50 040 40 26 CARSON 40 25 + 50 040 40 26... -
Page 16: Wechseln Der Sendefrequenz
Akkus oder laden sie die Akkus neu Motor hat an Leistung verloren Tauschen Sie den Motor aus Staub/Fremdkörper ist in das Getriebe gelangt Schalten Sie das Modell aus und reinigen Sie das Getriebe CARSON X-18 50 040 40 25 + 50 040 40 26... - Page 17 CARSON X-18 50 040 40 25 + 50 040 40 26...
-
Page 18: Preface
Dear Customer We congratulate you for buying this CARSON RC model car, which is The manual forms part of this product. Should you ignore the designed using state of the art technology. operating and safety instructions, the warranty will be void. -
Page 19: Included Items
Included Items X-18 Sport X- - 18 Sport 50 040 4025 50 040 4025 Transmitter X-18 Brushless 50 040 4026 CARSON X-18 50 040 40 25 + 50 040 40 26 CARSON X-18 50 040 40 25 + 50 040 4... -
Page 20: Safety Precautions
• Watch your model constantly and do not become distracted. removed absolutely. • The body shell should be correctly attached to the vehicle before driving. CARSON X-18 50 040 40 25 + 50 040 40 26... -
Page 21: Tools Needed For The Assembly
Philips screwdriver Hexagonal wrench 30 001 3118 Tweezers 30 007 4003 Side cutter 30 007 4035 (small and big) and hex-wrench 1.5 / 2 / 2.5 mm 30 007 4023 CARSON X-18 50 040 40 25 + 50 040 40 26... -
Page 22: Chassis
Front tyre Rear tyre Driving battery Chassis Front shock unit b. Removing the Body b. Removing the Body • Remove the hook pins and • Take the body off. CARSON X-18 50 040 40 25 + 50 040 40 26... -
Page 23: Tecnical Data Motor And Esc
ESC and then switch it on again to get the neutral point. CARSON X-18 50 040 40 25 + 50 040 40 26... -
Page 24: Instructions For The Brushless Speed Controller (Esc) 50 040 4026
2) Begin to use a new transmitter 3) Change the settings of neutral position of the throttle lever, the Receiver ATV or EPA parameters, etc. Servo plugged into steering channel (CH1) CARSON X-18 50 040 40 25 + 50 040 40 26... - Page 25 0.2 second. • The green LED lights when the throttle stick is moved to the top point (end point) of the forward zone or backward zone. CARSON X-18 50 040 40 25 + 50 040 40 26...
- Page 26 LED flashes in such a style: “✼ ✼, ✼ ✼, ✼ ✼” (double flashes). 2.2. Acceleration mode (also called “Punch”) Select from “Level 1” to “Level 4”. A higher number means more aggressive acceleration. CARSON X-18 50 040 40 25 + 50 040 40 26...
-
Page 27: Program The Esc With The Set Button
Red LED flashes for 4 times, choose “100%“ Note: Note: In the program process, when the LED is flashing, the motor will emit “Beep” tone at the same time. CARSON X-18 50 040 40 25 + 50 040 40 26... -
Page 28: Loading Battery
Only use the specially provided charger units to charge the nickel metal hydride batteries!!! Otherwise your drive battery could be damaged. The charging time will vary according to the charger unit and battery type. CARSON X-18 50 040 40 25 + 50 040 40 26... -
Page 29: Insert Driving Battery
• Pull the transmitter antenna out completely. The range of the remote control is reduced if the antenna is not pulled out completely. CAUTION! Always turn the transmitter´s power switch ON first! CARSON X-18 50 040 40 25 + 50 040 40 26... - Page 30 1 Connect the rechargeable battery for the driving. 2 Switch on the receiver. 3 Put the body on and fix it with the body split pins. CARSON X-18 50 040 40 25 + 50 040 40 26...
-
Page 31: How To Control Your Model
- Pull to the rear (driving forward, to give speed) - Push forward (braking, reverse movement). Neutral Right Left Driving forward, Braking, reverse to give speed movement CARSON X-18 50 040 40 25 + 50 040 40 26 CARSON 40 25 + 50 040 40 26... -
Page 32: How To Change Frequencies
Change batteries or charge them Motor has lost power Change to spare motor Dust or foreign objects are inside gears Turn the power switch ”OFF“ and clean out gears CARSON X-18 50 040 40 25 + 50 040 40 26... - Page 33 CARSON X-18 50 040 40 25 + 50 040 40 26...
-
Page 34: Préface
Conditions de garantie La garantie ne couvre pas : CARSON vous garantit pour 24 mois à partir de la date d’achat (pièces • Tout dommage ou défaillance causé par force majeure, abus, justificatives à l’appui) que la voiture est exempte de tout défaut. -
Page 35: Périmètre De Livraison
Périmètre de livraiso X-18 Sport X- - 18 Sport 50 040 4025 50 040 4025 Emetteur X-18 Brushless 50 040 4026 CARSON X-18 50 040 40 25 + 50 040 40 26 CARSON X-18 50 040 40 25 + 50 040 4... -
Page 36: Consignes De Sécurité
• Gardez toujours le contact visuel avec la maquette. • N’utilisez la maquette que si la carrosserie est correctement montée. CARSON X-18 50 040 40 25 + 50 040 40 26... -
Page 37: Outils Nécessaires Au Montage De La Voiture
Clé hexagonale Pincette 30 007 4003 Pinces coupantes 30 007 4035 et clé à six pas (Allen) 30 001 3118 1,5 / 2 / 2,5 mm 30 007 4023 CARSON X-18 50 040 40 25 + 50 040 40 26... -
Page 38: Châssis
Pneu arrière Accu moteur Châssis Pare-chocs avant b. Retrait de la carrosserie b. Retrait de la carrosser • Retirez les goupilles de la carrosserie et • Défaites la carrosserie. CARSON X-18 50 040 40 25 + 50 040 40 26... -
Page 39: Caractéristiques Techniques Du Moteur Et Du Variateur
Si le moteur devait continuer de tourner un certain temps après le réglage du point neutre, éteindre le variateur et le rallumer pour régler le point neutre. CARSON X-18 50 040 40 25 + 50 040 40 26... -
Page 40: Mode D'emploi Du Brushless Speed Controller 50 040 4026
2) Utiliser un nouvel émetteur 3) Modifier le réglage de la position neutre du levier, les paramètres Récepteur ATV ou EPA, etc. Servo enfiché dans le canal de commande (CH1) CARSON X-18 50 040 40 25 + 50 040 40 26... - Page 41 (point final) de la plage de la marche avant 0,2 seconde. ou de la plage de la marche arrière. CARSON X-18 50 040 40 25 + 50 040 40 26...
- Page 42 (clignotement double). 2.2. Mode accélération (aussi punch) Sélectionner un niveau du « Niveau 1 » au « Niveau 4 ». Plus le niveau est élevé, plus l’accélération est agressive. CARSON X-18 50 040 40 25 + 50 040 40 26...
-
Page 43: Programmation D'esc Au Moyen De La Touche « Set
La DEL rouge clignote 4 fois, sélectionner « 100% » « SET ». « SET ». Remarque : Remarque : Pendant la programmation, le moteur émet un « bip » parallèlement au clignotement de la DEL. CARSON X-18 50 040 40 25 + 50 040 40 26... -
Page 44: Charger L'accu Moteur
Pour charger les accus nickel métal hydrure, utiliser exclusivement le chargeur contenu en périmètre de livraison !!! Cela risquerait sinon d’abîmer votre accu moteur. La durée de recharge varie selon le chargeur et le type d’accu. CARSON X-18 50 040 40 25 + 50 040 40 26... -
Page 45: Montage De L'accu Moteur
• Sortir complètement l’antenne de l ’émetteur. La portée de la radiocommande est diminuée lorsque l’antenne n’est pas sortie complètement. ATTENTION ! Toujours allumer l’émetteur en premier ! Marche CARSON X-18 50 040 40 25 + 50 040 40 26... - Page 46 1 Raccordez l’accu moteur. 2 Allumez le récepteur. 3 Montez la carrosserie et fixez-la avec les goupilles. CARSON X-18 50 040 40 25 + 50 040 40 26...
-
Page 47: Conduite De La Voiture
- Pousser vers l’avant (frein, marche arrière). marche arrière). Au centre Droite Gauche Marche avant, Frein, marche accélération arrière CARSON X-18 50 040 40 25 + 50 040 40 26 CARSON 40 25 + 50 040 40 26... -
Page 48: Changer Les Fréquences
Remplacez les piles, remplacez les accus ou lentement rechargez-les Le moteur est moins puissant qu’avant Remplacez le moteur De la poussière/des corps étrangers ont pénétré dans Éteignez la maquette et nettoyez l’engrenage l’engrenage CARSON X-18 50 040 40 25 + 50 040 40 26... - Page 49 CARSON X-18 50 040 40 25 + 50 040 40 26...
-
Page 50: Prólogo
CARSON. • Todos los danos causados por la pérdida del control del modelo; CARSON podrá a su elección y salvo que las leyes dispongan otra cosa: • Cualquier reparación no efectuada por un servicio de reparaciones (a) Corregir el defecto mediante la reparación del producto sin cargo... -
Page 51: Contenido Del Kit
Contenido del kit X-18 Sport X- - 18 Sport 50 040 4025 50 040 4025 Emisora X-18 Brushless 50 040 4026 CARSON X-18 50 040 40 25 + 50 040 40 26 CARSON X-18 50 040 40 25 + 50 040 4... -
Page 52: Precauciones De Seguridad
Si no utiliza el modelo por algún tiempo, la • Mantenga siempre contacto visual con el modelo. batería recargable debe ser retirada. • La carrocería debería estar correctamente fijada al chasis antes de conducirlo. CARSON X-18 50 040 40 25 + 50 040 40 26... -
Page 53: Herramientas Necesarias Para El Montaje
Llave de cruceta 30 001 3118 Pinzas 30 007 4003 Tenacillas 30 007 4035 (pequeño y grande) y Llaves allen 1,5 / 2 / 2,5 mm 30 007 4023 CARSON X-18 50 040 40 25 + 50 040 40 26... -
Page 54: Chasis
Servo de dirección Neumático delantero Neumático trasero Acumuladores de marcha Chasis Amortiguador delantero b. Cuitar la carrocería b. Cuitar la carrocería • Quite los clips de carrocería y • Levántela. CARSON X-18 50 040 40 25 + 50 040 40 26... -
Page 55: Datos Técnicos Del Motor Y El Regulador
Si, transcurrido un tiempo determinado después de ajustar el punto neutro, siguiera funcionando el motor, apague el regulador y vuelva a encenderlo para ajustar el punto neutro. CARSON X-18 50 040 40 25 + 50 040 40 26... -
Page 56: Instrucciones Del Brushless Speed Controller 50 040 4026
2) Emplee un emisor nuevo Servo insertado en 3) Modifique los ajustes de la posición neutra de la palanca, los el canal de control (CH1) parámetros ATV o EPA, etc. CARSON X-18 50 040 40 25 + 50 040 40 26... - Page 57 3. Protección ante la pérdida de la señal del control: El regulador punto máximo (punto final) del campo de avance o del de retro- desconecta la potencia de salida si la señal se pierde durante ceso. 0,2 segundos. CARSON X-18 50 040 40 25 + 50 040 40 26...
- Page 58 El LED rojo se ilumina como sigue: “✼ ✼, ✼ ✼, ✼ ✼” (parpadeo doble). 2.2. Modo de aceleración (también “punch”) Elija del “nivel 1” al “nivel 4”. Una cifra mayor significa una aceleración más agresiva. CARSON X-18 50 040 40 25 + 50 040 40 26...
-
Page 59: Programación Del Regulador De Conducción Con La Tecla Set
SET tecla SET El LED rojo parpadea 4 veces, seleccione “100%“ Indicación: Indicación: Durante el proceso de programación, además del parpadeo del LED, el motor emite simultáneamente un “pip”. CARSON X-18 50 040 40 25 + 50 040 40 26... -
Page 60: Cargar Acumuladores De Marcha
Para cargar acumuladores NiMH utilice únicamente el cargador previsto en contenido. De lo contrario se puede dañar el acumulador. El tiempo de carga puede variar según el cargador y el tipo de acumulador. CARSON X-18 50 040 40 25 + 50 040 40 26... -
Page 61: Colocación De La Batería
• Extienda completamente la antena de la emisora. El radio de acción de la emisora se reducirá si la antena no está completamente desplegada. ¡PRECAUCION! ¡Conecte siempre primero la emisora! CARSON X-18 50 040 40 25 + 50 040 40 26... - Page 62 1 Conecte la batería recargable para conducir. 2 Conecte el receptor. 3 Coloque la carrocería y fíjela con los clips de carrocería. CARSON X-18 50 040 40 25 + 50 040 40 26...
-
Page 63: Volante De Dirección
- Tirar hacia delante, para ganar velocidad o - Empujar algo al frente (frenos, marcha atrás). Neutra Derecha Izquierda Marcha adelante, Frenos, ganar velocidad marcha atrás CARSON X-18 50 040 40 25 + 50 040 40 26 CARSON 40 25 + 50 040 40 26... -
Page 64: Cómo Cambiar Frecuencias
Cambie o recargue las baterías El motor ha perdido potencia Sustituya por un motor de recambio Han entrado en los engranajes polvo u otros objetos Desconecte el interruptor y limpie los engranajes CARSON X-18 50 040 40 25 + 50 040 40 26... - Page 65 CARSON X-18 50 040 40 25 + 50 040 40 26...
-
Page 66: Prefazione
Vi auguriamo buona fortuna e buon divertimento alla guida del vostro modello CARSON! Prima di utilizzare il vostro nuovo modello leggete attentamente queste istruzioni! CARSON X-18 50 040 40 25 + 50 040 40 26... -
Page 67: Contenuti Del Kit
Contenuti del kit X-18 Sport X- - 18 Sport 50 040 4025 50 040 4025 Trasmettitore X-18 Brushless 50 040 4026 CARSON X-18 50 040 40 25 + 50 040 40 26 CARSON X-18 50 040 40 25 + 50 040 4... -
Page 68: Misure Di Sicurezza
Dopo l’utilizzo rimuovere le batterie dal • Guardare continuamente il modello e non distrasi. modello. • La carrozzeria deve essere fissata correttamente al modello prima dell’utilizzo. CARSON X-18 50 040 40 25 + 50 040 40 26... -
Page 69: Utensili Necessari Al Montaggio Del Modello
30 001 3305 Cacciaviti esagonali e Chiave candela 30 001 3118 Pinzetta 30 007 4003 Tronchesina 30 007 4035 brugola 1,5 / 2 / 2,5 mm 30 007 4023 CARSON X-18 50 040 40 25 + 50 040 40 26... -
Page 70: Telaio
Servo sterzo Gomme anteriori Gomme posteriore Batterie motore Telaio Ammortizzatori anteriori b. Rimuovere la carrozzeria b. Rimuovere la carrozzer • Sfilare le clips di fissaggio e • Rimuovere la carrozzeria. CARSON X-18 50 040 40 25 + 50 040 40 26... -
Page 71: Dati Tecnici Del Motore E Del Regolatore
Se il motore continua a rimanere in funzione anche dopo l’impostazione del neutro, spegnere e riaccendere il regolatore per configurare il neutro. CARSON X-18 50 040 40 25 + 50 040 40 26... -
Page 72: Istruzioni Per Il Brushless Speed Controller 50 040 4026
1) Utilizzare un regolatore elettronico nuovo Empfänger 2) Utilizzare un trasmettitore nuovo Servocomando inserito 3) Modificare le impostazioni del neutro della leva, i parametri ATV o nel canale di comando (CH1) EPA, ecc. CARSON X-18 50 040 40 25 + 50 040 40 26... - Page 73 • Il LED verde si accende se la leva del gas si porta sul punto massimo per 0,2 secondi. (punto finale) del campo di marcia in avanti o del campo di marcia indietro. CARSON X-18 50 040 40 25 + 50 040 40 26...
- Page 74 „✼ ✼, ✼ ✼, ✼ ✼“ (lampeggio doppio). 2.2. Modalità di accelerazione (anche „Punch“) Scegliere un livello tra „Level 1“ e „Level 4“. Un numero più alto indica un’accelerazione più aggressiva. CARSON X-18 50 040 40 25 + 50 040 40 26...
-
Page 75: Programmazione Del Regolatore Con Il Tasto Set
Il LED rosso lampeggia 3 volte, selezionare „75%“ il tasto SET. tasto SET. Il LED rosso lampeggia 4 volte, selezionare „100%“ Nota: Nota: Durante la programmazione, oltre al LED lampeggiante il motore emette anche un „bip“. CARSON X-18 50 040 40 25 + 50 040 40 26... -
Page 76: Come Caricare La Batteria Ricaricabile
Per caricare le batterie Nickel Metal Hydride utilizzare solo lo apposito caricabatterie compreso nel contenuto del kit. Altrimenti la batteria motore potrebbe subire dei danni. Il tempo di carica varia in base all’apparecchio e al tipo di batterie. CARSON X-18 50 040 40 25 + 50 040 40 26... -
Page 77: Montare La Batteria
Accendere trasmettitore • Estrarre l’antenna del trasmettitore completamente. La gittata del radiocomando si riduce notevolmente se non estraete completamente l’antenna. ATTENZIONE! Accendere sempre prima il trasmettitore! CARSON X-18 50 040 40 25 + 50 040 40 26... - Page 78 1 Collegare le batterie ricaricabili per iniziare a guidare. 2 Accendere la ricevente. 3 Montate la carrozzeria e fissatela con le clips in dotazione. CARSON X-18 50 040 40 25 + 50 040 40 26...
-
Page 79: Come Controllare Il Vostro Modello
- Premere avanti (per frenare o andare in retromarcia) Neutra Destra Sinistra Per frenare Per andare avanti o andare in ed accelerare retromarcia CARSON X-18 50 040 40 25 + 50 040 40 26 CARSON 40 25 + 50 040 40 26... -
Page 80: Come Cambiare La Frequenza
Sostituire le batterie o caricarle Il motore ha perso potenza Sostituire il motore C’è sporco o corpi estranei negli ingranaggi Spegnere il modello (posizione OFF) e rimuovere lo sporco nel pignone CARSON X-18 50 040 40 25 + 50 040 40 26... - Page 81 CARSON X-18 50 040 40 25 + 50 040 40 26...
-
Page 82: Montageanleitung
50 040 5165 Vérifier le bon positionnement Comprobar el asiento exacto 50 040 5175 Verificare il corretto posizionamento Differenzial komplett 50 040 5165 Complete differential Différentiel complet Diferencial completo Differenziale completo CARSON X-18 50 040 40 25 + 50 040 40 26... - Page 83 Schraubensicherungslack • Liquid screw lock • Frein filet • Líquido fijatornillos • Frenafiletti Grease • Fett • Graisse Grasa • Grease Silicon Oil • Silikonöl • Huile silcone • Aceite de silicona • Silicon Oil CARSON X-18 50 040 40 25 + 50 040 40 26...
- Page 84 Vista completa 50 040 5166 Abschalten Cut off Coupure Desconectar Disinserzione 50 040 5166 50 040 5184 50 040 5166 Komplett Ansicht Assembled view Vue complète Vista completa Vista completa CARSON X-18 50 040 40 25 + 50 040 40 26...
- Page 85 50 040 5172 50 040 5184 50 040 5178 50 040 5181 50 040 5167 50 040 5184 50 040 5178 50 040 5185 50 040 5185 50 040 5181 CARSON X-18 50 040 40 25 + 50 040 40 26...
- Page 86 50 040 5181 50 040 5181 50 040 5181 50 040 5181 50 040 5185 Links Rechts Left Right À gauche À droite Izquierda Derecha A sinistra A destra CARSON X-18 50 040 40 25 + 50 040 40 26...
- Page 87 50 040 5172 50 040 5181 50 040 5167 Komplett Ansicht Assembled view Vue complète Vista completa Vista completa CARSON X-18 50 040 40 25 + 50 040 40 26...
- Page 88 50 040 5185 À gauche Observe la dirección en todos los Izquierda puntos de giro. A sinistra Prestare attenzione alla direzione per tutti i punti di rotazione. 15 mm CARSON X-18 50 040 40 25 + 50 040 40 26...
- Page 89 50 040 5173 À droite À gauche Derecha Izquierda A destra A sinistra 50 040 5184 50 040 5168 50 040 5167 50 040 5167 50 040 5174 50 040 5167 CARSON X-18 50 040 40 25 + 50 040 40 26...
- Page 90 50 040 5167 50 040 5185 50 040 5167 50 040 5185 50 040 5186 50 040 5186 30.5 mm 50 040 5185 50 040 5186 2 mm 50 040 5185 CARSON X-18 50 040 40 25 + 50 040 40 26...
- Page 91 50 040 5170 50 040 5170 50 040 5183 Dämpfer komplett 50 040 5170 Shocks complete Amortisseur complet 50 040 5170 Amortiguador completo Ammortizzatore completo 50 040 5170 50 040 5170 CARSON X-18 50 040 40 25 + 50 040 40 26...
- Page 92 Glisser un chiffon entre la tige du piston et la pince. Colocar un paño entre la biela y la pinza. Posizionare il panno tra l’asta di comando e la pinza. 50 040 5170 CARSON X-18 50 040 40 25 + 50 040 40 26...
- Page 93 Montage Stabilisator vorne/hinten • Assembly of stabiliser front/rear • Montage du stabilisateur à l’avant/à l’arrière • Montaje del estabilizador delantero/trasero • Montaggio dello stabilizzatore anteriore/posteriore 50 040 5167 50 040 5186 CARSON X-18 50 040 40 25 + 50 040 40 26...
- Page 94 50 040 5167 50 040 5182 50 040 5182 50 040 5183 50 040 5183 50 040 5186 CARSON X-18 50 040 40 25 + 50 040 40 26...
- Page 95 50 040 5178 50 040 5167 Montage Motor • Motor assembly • Assemblage moteur • Montaje motor • Montaggio motore 50 040 5167 50 040 5166 50 040 5178 CARSON X-18 50 040 40 25 + 50 040 40 26...
- Page 96 Montage Akku + Empfänger • Battery + receiver assembly • Montage de l’accu et du récepteur • Montaje del acumulador y el receptor • Montaggio accumulatore + ricevitore 50 040 5178 CARSON X-18 50 040 40 25 + 50 040 40 26...
- Page 97 Montage Räder • Wheels assemly • Assemblage roues • Montaje rueda • Montaggio ruote 50 040 5171 Querschnitt Cross-section Coupe transversale Sección transversal Sezione trasversale CARSON X-18 50 040 40 25 + 50 040 40 26...
- Page 98 RC-System • RC system • Système RC • Sistema de radiocontrol • Sistema RC Karosserie • Body • Carrosserie • Carroceria • Carrozzeria 50 040 5179 50 040 5180 CARSON X-18 50 040 40 25 + 50 040 40 26...
- Page 99 CARSON X-18 50 040 40 25 + 50 040 40 26...
-
Page 100: Ersatzteile
Front steering + suspension arm set Differential completely X-18 50 040 5169 Stoßdämpfer Reparatur Set X-18 50 040 5176 Lenkservo 9 g X-18 Shock repair kit X-18 Servo 9 g X-18 100 CARSON X-18 50 040 40 25 + 50 040 40 26... - Page 101 Body green + wing X-18 Ball bearing set X-18 50 040 5180 Karosserie schwarz + Heckflügel 50 040 5185 Kugelgelenk-Set X-18 Body black + wing X-18 Ball set X-18 CARSON X-18 50 040 40 25 + 50 040 40 26...
-
Page 102: Tuningteile
Alu front + rear steering block left 50 040 5190 2x Stoßdämpfer hinten mit Gewinde 500405195 2x Kugel-Kardanwellen vorne + hi 2x Threaded shock set rear X-18 2x CVD front + rear 102 CARSON X-18 50 040 40 25 + 50 040 40 26... - Page 103 CARSON X-18 50 040 40 25 + 50 040 40 26...
- Page 104 For Germany: CARSON-MODEL SPORT Service-Hotline: 018 05 - 73 33 00 Abt. Service Mittlere Motsch 9 14 ct/min 96515 Sonneberg Mo - Do 8.00 – 17.00 Uhr 8.00 – 14.30 Uhr 8.00 – 14.30 Uhr CARSON-MODEL SPORT Werkstraße 1 • D-90765 Fürth • Germany...
Need help?
Do you have a question about the X-18 Sport RTR and is the answer not in the manual?
Questions and answers