Advertisement
Quick Links
Advertisement

Related Manuals for Futech PROCROSS 8.0 DS


Summary of Contents for Futech PROCROSS 8.0 DS
- Page 1 USER MANUAL EN ENGLISH 044.80G PROCROSS 8.0 DS Manual in your language? Check the back cover...
- Page 2 OVERVIEW VIII ON/OFF ON/OFF XY ENTER...
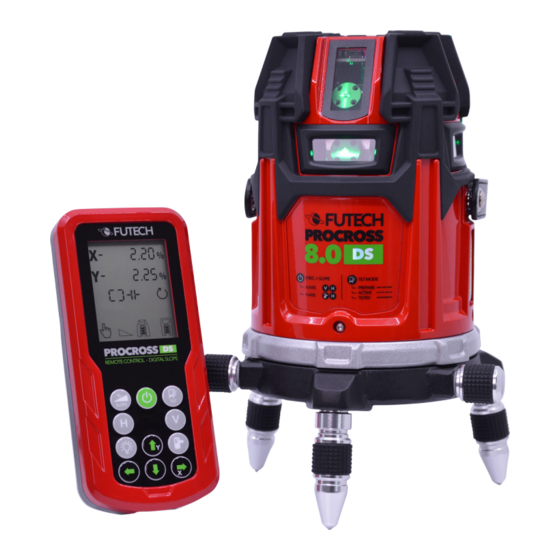
- Page 3 HOUSING KEYPAD REMOTE CONTROL 01 Laser head Power button Power button 02 Laser base Tilt security button Tilt / backlight button 03 Horizontal laser line H-button for horizontal lines H-button for horizontal lines 04 Vertical laser line D V-button for vertical lines V-button for vertical lines 05 Keypad Receiver buttons...
- Page 4 QUICK START GUIDE Power button Press Switch the device ON/OFF Power button Press - Switch the remote control ON/OFF - (de)activate SLEEP mode of device when connected Tilt security button Press (De-)activate tilt security H-button Press (AUTO LEVELLING MODE) (De)activate extra horizontal laser lines (MANUAL SLOPE MODE, DEVICE ONLY) Change to X-axis Hold...
- Page 5 Tilt security indicator Tilt security mode OFF Red, flashing, slow Prepare tilt security (duration: 50 sec. after last manipulation) Red, flashing, fast Tilt security active Red, continuous Tilt alarm Horizontal indicator (AUTO LEVELLING MODE) All horizontal laser lines OFF (MANUAL SLOPE MODE, DEVICE ONLY) X-axis is not selected to set slope Green, continuous (AUTO LEVELLING MODE)
- Page 6 Receiver indicator Green, continuous (IN AUTO LEVELLING MODE) Reveiver mode ON, 35% power save (IN MANUAL SLOPE MODE, DEVICE ONLY) Y-axis is selected to set slope Green, flashing Receiver mode ON, 65% power save Remote control Remote control mode OFF. indicator Blue Remote control mode ON.
-
Page 7: First Time Usage
SAFETY · 4 LEDS lights: > 75% power · 3 LEDS lights: > 50% power Please read the safety instructions is provided in · 2 LEDS lights: > 25% power the separate booklet provided with the device. · 1 LED lights: <... - Page 8 After turning on the laser or after IP66 activating the tilt-security, the tilt-security is being The Procross 8.0 DS has an IP value of 66, which prepared during 50 seconds. During this time means the laser has a complete protection you can install the laser in the correct position.
- Page 9 · Press the power button [a] of the remote con- Shut down the laser and the remote trol to turn on the remote control. control NOTE Hold the H-button [c] and V-button [d] of The screen of the remote control has backlight- the remote control simultaneously.
- Page 10 AUTO-LEVELLING After turning on the device or when you turn off the slope mode, self levelling will automatically place the laserlines 100% levelled. While levelling, the status indicator [M] flashes green and the levelling indicator [VII] on the > 3,5° remote control’s display will flash as well.
- Page 11 within its levelling range. · Press the H-button [C, C] a second time to switch on an additional horizontal laser line NOTE (right). When a tripod is used, the adjustable feet will · Press the H-button [C, c] a third time to switch have no effect.
- Page 12 When switched on, you can locate the laser lines with a receiver. The Procross 8.0 DS offers 3 ways to use slope, manual, electronic or digital. · Depending on which slope you would like to...
- Page 13 button [n] or the digital slope button [o], both can be found exclusively on the remote control. · Change back to automatic levelling (turn off slope mode) by pressing the slope button [e] again. > 3,5° MANUAL SLOPE When using manual slope mode you can use the adjustable feet [11] of the laser base [02] to ON/OFF ON/OFF...
- Page 14 Slope mode is now no longer active and your · Activate the manual slope mode by pressing device will start levelling (status indicator [M] the manual slope button [n] on the remote fl ashes green). control. You can also activate the slope mode by holding down the power button [A] of the ELECTRONIC SLOPE device for approx.
- Page 15 The horizontal indicator [I] will no longer light up. the X-axis. The receiver indicator [K] and the vertical indica- · Press or hold the arrow up button [p] to make tor [J] will now both light up green. This shows the laser line rise on the side pointed by the the device is ready to be set the slope in parallel arrow of the X-axis.
- Page 16 Digital slope is the most advanced way to set · Use the arrow down button [q] to decrease the slopes with the Procross 8.0 DS. This will be done percentage of the slope on the X-axis. by setting a percentage on the remote control NOTE and send this percentage to the device.
- Page 17 the arrow of the Y-axis. The slope percentage X-axis [I] or slope per- centage Y-axis [II] (depends on the last changed value) starts flashing on the screen. Now the percentages are set for X- and Y-axes · Change the percentages of slope for the X- on the remote control.
- Page 18 On the remote control: When tilt mode is active In some cases, you do not want tilt security to be (including preparation time) the tilt security indi- active. In this case, you can simply turn off the tilt cator [VI] is visible on the screen of the remote security by pressing the tilt security button [B, b].
-
Page 19: Specifications
SPECIFICATIONS 044.80G PROCROSS 8.0 DS DECLARATION OF CONFORMITY Visibility Futech (Belgium) declares under its own responsibility that Precision 1mm / 10m this device: Range (with receiver) up to 2x 200m (with receiver) - 044.80G - PROCROSS 8.0 DS GREEN Dust- and water proofness... - Page 20 USER MANUAL other languages: DANSK ITALIANO DEUTSCH NEDERLANDS ESPAÑOL NORSK EESTI KEEL PORTUGUÊS SUOMEN KIELI SL SLOVENŠČINA FRANÇAIS SVENSKA ÍSLENSKA Facebook @futechtools LinkedIn futechtools World Wide Web futech-tools.com YouTube @futechtools...
Need help?
Do you have a question about the PROCROSS 8.0 DS and is the answer not in the manual?
Questions and answers