Advertisement
Quick Links
Thank you for purchasing this product. Please read the instructions carefully before use to ensure safe and
satisfactory operation of this product.
Pre-assembly preparation
Please ensure instructions are read in full before attempting to assemble this product.
Necessary Tools :
Please check the pack contents before attempting to assemble this product. A full checklist of components is given
in this leaflet. If any components are missing, please contact the retailer from whom you bought this product.
This product takes approximately 60 MINUTES to assemble with 2 PEOPLE.
All assembly should be performed on a flat, stable, clean and soft surface.
This product is HEAVY , it should be assembled as near as possible to the point of use. TAKE CARE
WHEN LIFTING to avoid personal injury and (or) damage to the product
The fitting pack contains SMALL ITEMS which should be KEPT AWAY FROM YOUNG CHILDREN.
IMPORTANT: Retain these instructions for future reference.
1 35CM & 1 50CM BEDSTEAD
Pozi screwdriver and Phillips screwdriver
Pz 2 or Pz 3
(Included)
Ph 2
Stock number: 403X-43/44
Page : 1
IW- 1 7-403X-53-4/5-R 3
Advertisement

Related Manuals for Bentley Designs 403X-43


Summary of Contents for Bentley Designs 403X-43
- Page 1 1 35CM & 1 50CM BEDSTEAD Stock number: 403X-43/44 Thank you for purchasing this product. Please read the instructions carefully before use to ensure safe and satisfactory operation of this product. Pre-assembly preparation Please ensure instructions are read in full before attempting to assemble this product.
- Page 2 3 x 2 5 x 28 7 x 28 8 x 14 Page : 2 IW- 1 7-403X-53-4/5-R 3...
- Page 3 Fittings and parts checklist Item Description Qty. Item Description Qty. Sprung slat x 28 Headend Adjustable metal centre leg Footend End plastic sleeve x 28 Side rail Metal centre rail Centre plastic sleeve x 1 4 Grub screw Bracket M8 x 8mm Allen key Flat head screw M4 x 30 x 110 mm...
- Page 4 Step By Step Assembly Instructions Step 1 1 . 1 : Lay all parts on a flat, stable, clean and soft surface. 1 .2 : Attach 8x steel dowels (C) onto headend ( 1 ) and footend (2) by screwing fittings (C) into Fitting the inset fittings that are located on parts ( 1 ) and (2) as shown.
- Page 5 Step By Step Assembly Instructions Step 2 2. 1 : With help of assistant, stand headend ( 1 ) and footend (2) upright. Carefully attach headend ( 1 ) and footend (2) onto both ends of both side rails (3) as shown. Ensure steel dowels (C) are aligned correctly with the holes of mating parts before attaching.
- Page 6 Step By Step Assembly Instructions Step 3 3. 1 : Remove the bracket from adjustable metal center leg (6) by using allen key (E) to turn 2x hex head bolts counterclockwise as shown. Fitting 3.2 : Place metal center rail (4) onto adjustable metal center leg (6) then secure the bracket back onto metal center leg (6) using the previously removed 2x hex head bolts as shown .Use allen key (E) to turn bolts clockwise to fix.
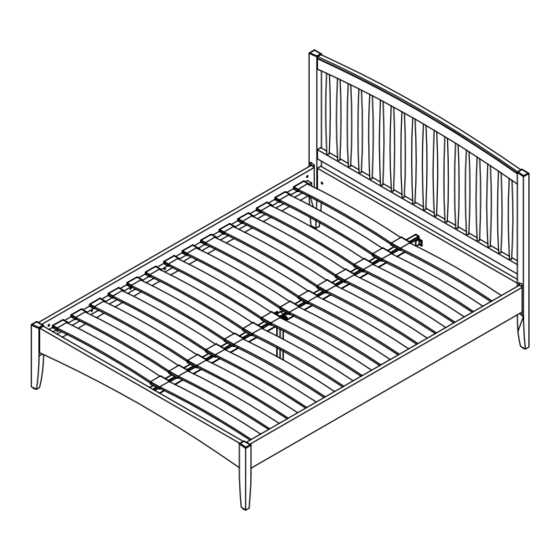
- Page 7 Step By Step Assembly Instructions 4. 1 : Insert 28x end plastic sleeves (7) onto one end of 28x sprung slats (5) and thereafter insert Step 4 the other ends of all parts (5) into both sides of 1 4x center plastic sleeves (8) as shown. 4.2 : Attach the previously assembled 1 4x sprung slat sets into the pre-drilled holes on wood supports of both side rails (3) and pre-drilled holes on metal center rail (4) as shown.
- Page 8 CAUTION: To Relocate Bed Page : 8 IW- 1 7-403X-53-4/5-R 3...
-
Page 9: Care And Maintenance
Care and Maintenance Wood Furniture Wood displays different grain patterns depending on which way they are cut - for example, the 'medullary ray' which can appear on oak furniture is a mark of good quality timber - these are just characteristics of the natural beauty of the wood.