Table of Contents
Advertisement
Quick Links
Installation Instructions
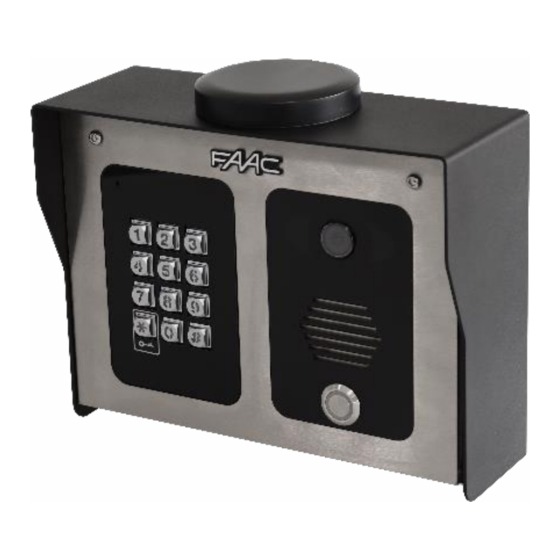
4G Cellular Intercom with Video
Part No. 4401
PROFESSIONAL INSTALL ONLY
Tip: Site Survey BEFORE you begin.
See Page 4!
v1.0
FAAC International Inc.
FAAC International Inc.
West Coast Operations
Headquarter & East Coast Operations
357 South Acacia Avenue
3160 Murrell Rd
Rockledge, FL 32955
Fullerton, CA 92831
Tel. 800 221 8278
www.faacusa.com
1 |
P a g e
Advertisement
Table of Contents

Related Manuals for FAAC 4401


Summary of Contents for FAAC 4401
- Page 1 Installation Instructions 4G Cellular Intercom with Video Part No. 4401 PROFESSIONAL INSTALL ONLY Tip: Site Survey BEFORE you begin. See Page 4! v1.0 FAAC International Inc. FAAC International Inc. West Coast Operations Headquarter & East Coast Operations 357 South Acacia Avenue...
-
Page 2: Table Of Contents
Index Section Pages PHASE 1 – SITE SURVEY Site Survey (4G Router) PHASE 2 – PRODUCT OVERVIEW 5-13 More Detail…. PCB Module Overview Technical Specifications 10-13 PHASE 3 – SETUP 4G 14-16 PHASE 3 – SETUP 4G (Continued) 17-26 4G Setup Intercom on App 18-22 Time Sync &... -
Page 3: Phase 1 - Site Survey
PHASE Site Survey P a g e... -
Page 4: Site Survey (4G Router)
Site Survey (4G Router) YES! I have 4G signal at the gate with my phone! If not, STOP. You will need some! Try a different network provider. Upload Speed I have at least 1.5 Mb UPLOAD speed. If not STOP! This system may operate intermittently remotely or have delayed PUSH notifications. -
Page 5: Phase 2 - Product Overview
PHASE Product Overview P a g e... -
Page 6: More Detail
More Detail…. 4G Antenna Security Screws Camera Microphone Night vision LEDS (short range, up to 5 feet) Keypad Speaker Module Call Button Pedestal mounting holes 4G Router Surge board Call button Main IP PCB Camera keypad module module P a g e... -
Page 7: Pcb Module Overview
Main IP Module in Detail… Intercom ID Antenna SMA Connector RJ45 Socket LED Indicators RED = Network Connection Hard Reset BLUE = Power Button Direct LAN cable Micro SD Connection Card Slot Voltage Outputs Keypad Data Cable Connections Push Button, Mic & Speaker Connections Volume ‘POT’... - Page 8 Overview of 4G Router PCB PCB boot status LEDs 24v DC INPUT GSM Signal GSM 4G LAN port Level LEDs Antenna activity LEDs LAN 2B Pre-connected LAN cable to WIFI PCB LAN Socket. LAN1 – Only required if APN needs changed to match the SIM being used.
- Page 9 Overview of Surge PCB Earth Rod MUST be connected for warranty. 250v 1 Amp 5x20mm Quick Blow Input Fuse (REPLACEABLE) 24v Output via flex cable to main PCB NOT USED 24v INPUT – Use provided power supply or hook up to 24v solar system. (DO NOT USE 12v HERE) 12v DC –...
-
Page 10: Technical Specifications
Technical Specifications GENERAL Front Panel Portrait Orientation AB/ABK = 3mm Acrylic on Architectural Design Marine Grade Stainless Steel BS316 Front Plate AS/ASK = 3mm Marine Grade Stainless Steel BS316 on Architectural Design Marine Grade Stainless Steel BS316 Front Plate FS/FSK = Flush Design Marine Grade Stainless Steel BS316 Front Plate IMP/IMPK = 3mm Acrylic on Imperial Design Marine Grade Stainless Steel BS316 Front Plate Modular = Powder Coated Marine Grade Stainless Steel BS316 Front... - Page 11 System Requirements Mobile device: Newest iOS on iPhone/iPad, newest Android on Smartphone/Tablet Internet: High-Speed Landline Broadband Internet connection, DSL, cable or fibre optic, no socks or proxy server. Min. suggested upload speed of 1.5mbps, Network: Ethernet Network, with DHCP / WIFI 2.4GHz/5.8GHz (with applicable antenna) Recommended Installation Camera lens should be at a min.
- Page 12 Storage On-Board Micro SD Card Max read capacity 32GB Estimated capacity based on 16GB: 5,592 Video Clips (3MB) {AVI.} 33,500 images (0.5MB) {JPG} Supports Hot Swapping. Auto overwrites oldest data at 70% capacity FAT32 Formatting MOTION SENSOR Type Active Detection Type Digital (Pixel-based) Changes of pixilation.
- Page 13 Antenna Type SIM Tray NANO LAN Ports 2 x 10/100 Mbps - LAN/WAN Direct Cable Connection 8 Pin Spring Connector Terminal Block (Linked to 1 x LAN ports) GSM Modem Models 4G Europe - SIM7600E 4G USA - SIM7600A 4G AUS/NZ - SIM7600SA Frequency Range LTE-TDD = B38/B40/B41 LTE-FDD = B1/B3/B5/B7/B8/B20...
-
Page 14: Phase 3 - Setup 4G
PHASE Setup (To be done before installing the intercom) 14 | P a g e... - Page 15 Serial Number Configure 4G Router Before Install Ethernet Socket Step 1 - Open the intercom. (RJ45) RESET Loosen the security screws at the top with the security screwdriver provided. Step 2 – Connect 24v DC power with the power supply provided. Relay Relay Serial...
- Page 16 Configure Intercom Before Install Step 1 Once the 4G Router has been fully configured and you have an internet connection you can proceed to attach the intercom to the app and perform initial testing. Note: If you skip this step and proceed directly to installation, technical support may request you go back and perform this step before diagnosing further.
- Page 17 PHASE Setup (Continued…) 17 | P a g e...
-
Page 18: 4G Setup Intercom On App
4G Setup Intercom on App Once you have the router setup correctly and have internet access then follow the steps below. Option A - Add Intercom Manually Step 1 – Record the Intercom ID Serial AES012345ABCDE The intercom ID number can be Number found on a sticker beside the LAN port connection. - Page 19 Step 3 - The intercom is now added to your device and should show Online. If you can see live video and hear audio, the intercom has successfully connected to the network. If for some reason this does not work, check the LED indicators on the RJ45 socket on the PCB to ensure it is connected correctly to the network.
- Page 20 Serial Number Option B - Add Intercom via local hotspot Step 1 Disconnect the LAN cable that is connected Ethernet Socket Reset Step 2 - Press and HOLD the code button for approx. 3-5secs and release. A tone will be heard. Relay Relay The intercom will now begin to transmit its own...
- Page 21 Step 2b – Enter password to connect via WiFi and the users’ phone Enter the default pass code 123456789 should now be connected directly to the intercom. Android: Press CONNECT Apple: Press DONE Note: Your device may state there is no internet connection. This is normal.
- Page 22 Step 4 Should be showing ONLINE status. Press the Video icon to view live video. Note: at close proximity, you will experience acoustic feedback. This is normal. If you can view live video, and hear acoustics, then this proves that the intercom hardware is working as it should.
-
Page 23: Time Sync & Testing
Time Sync & Testing Step 1 - Ensure the intercom is now added to your device and should show Online. Press the camera icon to view the camera feed Check the date/time stamp. The default date when the intercom has been reset is 1/1/1970. If the date has not updated automatically follow the steps below to correct this. - Page 24 Step 4 – Close the app PUSH notifications may not show while inside the app so to test that the PUSH notifications are working correctly you need to close the app. Select the ‘back’ button and then the Android: ‘EXIT’ door icon will appear on the bottom left, tap this to completely close the application.
-
Page 25: Answering On Android
Answering on Android This will launch the app Swipe down to reveal Press the appropriate and reveal the answer the android lock icon (depending screen. Press the icon notifications and press on which relay your shown to answer the the Praetorian installer has connected call if you wish to notification... -
Page 26: Answering On Ios (Apple)
Answering on iOS (Apple) Swipe the Phone will now launch app. Press icon to Press “VIEW” notification left answer Note: Various versions of IOS and Android OS will have different notification acceptance techniques. Please refer to online support for your device if needed. TIP: Make sure ringer switch is ON and volume is turned up. -
Page 27: Phase 4 Installation
PHASE Installation (Only to be done after the unit is successfully proven to be operating on the network during setup on phase 3.) 27 | P a g e... -
Page 28: How To Achieve & Maintain Ip55 Rating
How to Achieve & Maintain IP55 Rating The IP55 rating attached to this unit is only achieved if the below steps have been followed. This is to prevent any unwanted water and/or bug ingress that can cause various issues with functionality and will void warranty if not followed. Step 1 –... -
Page 29: Power & Antenna
Power & Antenna This intercom comes with a 24v dc power supply. The intercom requires up to 2 amps peak demand at times, therefore power cable is of extreme importance. Please adhere to the cable thickness guide below or the device may be damaged and rendered out of warranty by the manufacturer. -
Page 30: Solar Power
Solar Power You can use solar power if required. You will require a DC voltage regulator applied at the gate board end as the voltage output can vary and cause too high a voltage, which will damage the intercom if over the 26v DC. Our systems would require as a minimum a 30W of solar panel capacity and 10ah battery capacity for our intercoms. -
Page 31: Wiring Example
Wiring Example Serial Number Ethernet Socket Reset SD card Relay Relay Speaker Volume 24V 0V N/O C1 N/O C2 Exit button 24v DC From PSU Magnetic lock Gate controller N/C button 12v DC (not supplied) Note: When the exit button is pressed it will trigger relay 1 for the pre-programmed time in the app. -
Page 32: Adding Additional App Users
Adding Additional APP Users Additional users MUST be added with individual usernames. Do NOT use the same username. Step 1 On the Admin user phone, create a new username and password for any additional phones which you wish to add, as follows. Admin Device! Create a NEW Press the PLUS... - Page 33 Sound, Volumes and Speech Serial Number This intercom is capable of full duplex speech, which means two people can have a conversation and appear to speak at the same time. Since various manufacturers of android phones, iPhones and tablets all differ in acoustic performance, and different users may require varying levels of volume on their own handset, it may be possible to setup some devices in full duplex mode, but Ethernet others may need to be set in half duplex mode (phone user will press to talk).
-
Page 34: Using Keypad Codes
Using Keypad Codes Ensure you program a keypad code in the app first then follow the steps below to use them on the keypad to gain entry. Enter pre-programmed 4-6 digit code. followed by the key to confirm Tip: Press to confirm keypad code 34 | P a g e... -
Page 35: Phase 5 Advanced Setup
PHASE Advanced Setup (Only to be done after the unit is successfully proven to be operating on the network after installation) 35 | P a g e... -
Page 36: Feature Shortcuts & Settings Overview
Feature Shortcuts Add / delete Activity Log proximity cards / tags Add / delete Turn on / off keypad codes. notifications on events. Settings Overview Standard Features Advanced Features 36 | P a g e... -
Page 37: Standard Features
Standard Features Edit Intercom details Ring tones of in-app call (unable Add a new device ID Check APP version to change notification tone) Check current system firmware Adjust intercom time Add, edit or Adjust relay (daylight saving) delete users trigger times Wi-Fi settings Adjust maximum Adjust maximum... -
Page 38: Edit Intercom Details / Add A New Device Id
Edit Intercom Details Change the name of the intercom Intercom ID cannot be changed. Follow the add as a new device steps if ID is incorrect. Change the username Change the password Add a New Device ID Name the intercom Intercom ID can be added manually or auto filled by using the ‘SEARCH INTERCOM ID IN LAN’... - Page 39 Ringtones of In-app Call Choose your preferred ringtone for calls while inside the app. Note: The default call notification tone heard while not in the app cannot be changed. Check APP version App Version Note: Check the Google Play or the Apple app store to ensure you are using the most recent version. 39 | P a g e...
- Page 40 Check Intercom Firmware Intercom Firmware Version See ‘Firmware Updates’ for more info. Note: Add, Edit or Delete Users & Logins Add New User Edit User Delete User Username Password Cancel Save Note: Administrator account cannot be deleted but the password can be edited by selecting the pencil icon to the user.
- Page 41 Adjust Relay Trigger Times Save Settings Relay 1 Trigger times Relay 2 Trigger times Adjust Intercom Time Save Settings NTP Server Enable/Disable Daylight Saving Sync to device timezone 41 | P a g e...
- Page 42 Wi-Fi Settings *Only applicable if attempting to connect to WIFI directly. Please follow our IP install manual for more details. SSID currently connected to Search for WiFi Networks. See WiFi Setup for more details Note: If showing POOR signal level, STOP! You must reposition the antenna or look at alternative options to connect the intercom to the network.
- Page 43 Adjust Maximum Talking Time Save Settings Change the length of time you can talk when a call is answered before the call disconnects. Adjust Maximum Calling Time Save Settings Change the length of time your intercom calls for. Note: If you do not have a good data signal (i.e.
- Page 44 Reboot Intercom Soft Reboot the intercom Simplex / Duplex Audio Selection Save Settings Soft Reboot the intercom Soft Reboot the intercom Soft Reboot the intercom Note: If the volume on the device is too high or is in a noisy environment, it may cause echo or clipping in audio.
-
Page 45: Advanced Feature Overview / Notifications
Advanced Feature Overview Auto opening of gates on Notifications on View activity weekly Select resolution gate/door opening of camera stream schedule & motion sensor Motion Voicemail option Keypad codes Prox cards detection option for missed callers Notifications Enable/Disable app push notifications. (Default = OFF) Relay Trigger –... - Page 46 Auto opening of gates on weekly schedule Save Settings Relay Action Time of Action Day(s) for relay action to happen Note: If a latched command is used then an unlatch will be required to return the relay to its normal state. Date &...
-
Page 47: Activity Log / Auto Reboot
Activity Log The log shows the most recent events which have occurred on the intercom. Some examples are shown. Some of the events capture images, or video from calls and can be played back by pressing the icons to the right. Call received. -
Page 48: Keypad Codes
Keypad Codes *Keypad models only There are 3 types of keypad code options which can be entered as shown. 24/7 codes which work all of the time. (max 100) Time restricted codes which only work on pre-set times and days. (max 100) Auto Expire codes which are temporary. -
Page 49: Prox Cards/Tag Ids
PROX Cards/Tag IDs *PROX models only There are 3 types of PROX ID options which can be entered as shown. 24/7 ID’s which work all of the time. (max 100) Time restricted ID’s which only work on pre-set times and days. (max 100) Auto Expire ID’s which are temporary. - Page 50 Voicemail option for missed callers When voicemail is activated if a call is not answered then an audio message will play to ask the visitor to leave a message. A 20 second video recording can be viewed in the events log. Enable/Disable Voicemail feature Note: SD card must be inserted into the slot on the...
-
Page 51: Troubleshooting
Troubleshooting It is worth remembering that when you install this intercom, you are only supplying one piece of the overall system. The customer’s chosen device will be connected to WIFI or a different cellular network which means there are now three pieces to this system. Anything can go wrong with any part of that entire system. - Page 52 App shows online status locally Insufficient upload speed Reboot the router and then try and when phone is remote, but / Poor GSM Signal again. Connect to the 4G router push notifications may be via LAN cable and check the delayed, or video lag, or showing signal level.
- Page 53 App Updates We will continually monitor the app’s performance and will release updates to enhance the users experience and/or fix any issues that arise overtime. These updates will be available via the iOS app store or the Android Play store. Firmware Updates Firmware updates will be released to fix any bugs or to add additional features where possible throughout the products lifetime.
- Page 54 4G Router Maintenance If using a pre-pay casual SIM card it will need topped up occasionally. It is recommended to register the SIM card on the provider’s web site if available. Most major networks allow registration of card payment details for an auto top up feature, which means they will automatically top up your intercom when the balance runs low or in some cases, they offer a low balance reminder to be sent if they do not wish the auto top up feature.
-
Page 55: How To Change Router Apn / Check Signal
How to Change Router APN / Check Signal Step 1: Connect to the router: a) PC/Laptop = Connect direct using LAN cable (Computer LAN port to LAN 2 on router PCB) << DIRECT CONNECTION >> b) Mobile = Connect the AES 4G Router to an available LAN port on another router that has Wi-Fi. - Page 56 NOTE: If it is the first time connecting to the control panel you might be met by a security certificate check screen on your device. Please see below example for Apple and Android devices on how to proceed past this screen and gain access to the control panel Private Connection Security Screen for Apple, Android &...
- Page 57 Login. Default username and password are both set as ‘root’ then click Login. Once the details have been entered press ‘Login’. Step 4: Select the correct APN from the list. If your required APN is not listed you can select the ‘- - custom - -’...
-
Page 58: Warranty
LIMITED WARRANTY FAAC International, Inc. (“Seller”) warrants the first Purchaser of the product to be free from for a specific period as defined below (“Warranty Period”). defects in material and workmanship The Warranty Period commences from the date of invoice. - Page 59 make such repair, or otherwise. All products sold by the Seller are subject to design and/or appearance modifications, which are production standards at the time of shipment. The Seller may, but shall not be required to, modify or update products shipped prior to a current production standard. THIS WARRANTY IS EXPRESSLY IN LIEU OF ALL OTHER WARRANTIES EXPRESSED OR IMPLIED INCLUDING THE WARRANTIES OF MERCHANTABILITY AND FITNESS FOR USE.
- Page 60 Regulatory Compliance FCC Id: 2ALPX-WIFI-IBK Grantee: Advanced Electronic Solutions Global Ltd This device complies with Part 15 of FCC rules. Operation is subject to the following two conditions: (1) this device may not cause harmful interference, and (2) this device must accept any interference received, including interference that may cause undesired operation.
Need help?
Do you have a question about the 4401 and is the answer not in the manual?
Questions and answers