Table of Contents
Advertisement
Quick Links
Advertisement
Table of Contents

Related Manuals for Philco PHD 64 TB


Summary of Contents for Philco PHD 64 TB
- Page 1 INDUCTION HOB OWNER’S MANUAL PHD 64 TB...
- Page 2 Dear customer, Thank you for buying a PHILCO brand product. So that your appliance serves you well, please read all the instructions in this user’s manual. Copyright © 2019, Fast ČR, a. s. Revision 05/2020...
-
Page 3: Table Of Contents
CONTENTS 1. SAFETY ................................2 2. PRODUCT INTRODUCTION .........................5 2.2 Control Panel ....................................5 2.3 Working Theory .................................... 6 2.4 Before using your New Induction Hob ..........................6 2.5 Technical Specification ................................6 3. OPERATION OF PRODUCT ...........................7 3.1 Touch Controls ..................................... 7 3.2 Choosing the right Cookware .............................. -
Page 4: Safety
1. SAFETY THIS APPLIANCE CAN BE USED BY CHILDREN AGED FROM 8 YEARS AND ABOVE AND BY PERSONS WITH REDUCED PHYSICAL, SENSORY OR MENTAL CAPABILITIES OR LACK OF EXPERIENCE AND KNOWLEDGE IF THEY HAVE BEEN GIVEN SUPERVISION OR INSTRUCTIONS CONCERNING USE OF THE APPLIANCE IN A SAFE WAY AND IF THEY UNDERSTAND THE HAZARDS INVOLVED. - Page 5 PLEASE MAKE SURE TO REFRAIN FROM TOUCHING THE HEATING ELEMENTS. KEEP CHILDREN BELOW 8 YEARS OF AGE AWAY FROM THE APPLIANCE IF THEY ARE NOT UNDER CONSTANT SUPERVISION. WHEN CLEANING THE OVEN DOOR GLASS / COOKING HOB GLASS HINGED COVERS, DO NOT USE HARSH ABRASIVE CLEANING AGENTS OR SHARP METAL SCRAPERS AS THE SURFACE MIGHT BECOME SCRATCHED WHICH COULD RESULT IN THE GLASS BREAKING.
- Page 6 CAUTION: FIRE HAZARD: DO NOT PLACE ANY OBJECTS ON THE COOKING SURFACE. CAUTION: USE ONLY COOKING HOB PROTECTIVE COVERS MADE BY THE MANUFACTURER OF THE COOKING APPLIANCE OR STATED BY THE MANUFACTURER OF THE APPLIANCE AS SUITABLE IN THE RESPECTIVE USER’S MANUAL OR COOKING HOB PROTECTIVE COVERS BUILT-IN IN THE APPLIANCE.
-
Page 7: Product Introduction
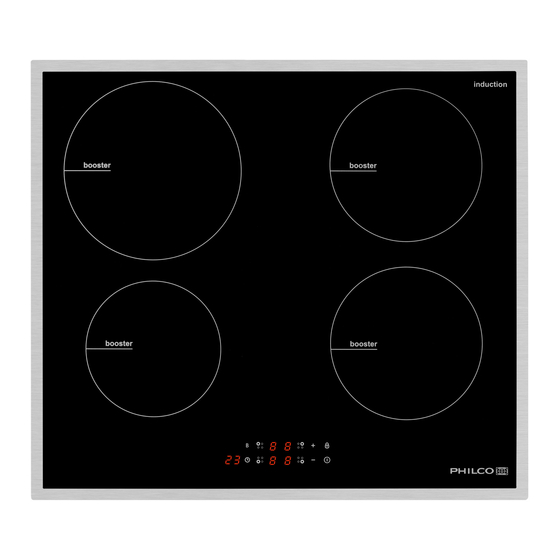
2. PRODUCT INTRODUCTION 2.1 Top View Max. 1300/1500W zone Max. 2300/2600W zone Max. 1800/2000W zone Max. 1800/2000W zone Glass plate Control panel 2.2 Control Panel On/Off control Timer control Boost Heating zone selection controls Power / Timer regulating key Keylock control EN - 5 Copyright ©... -
Page 8: Working Theory
2.4 Before using your New Induction Hob • Read this guide, taking special note of the ‘Safety Warnings’ section. • Remove any protective film that may still be on your Induction hob. 2.5 Technical Specification Cooking Hob PHD 64 TB Cooking Zones 4 Zones Supply Voltage 220-240V~ 50Hz or 60Hz Installed Electric Power 7200W Product Size L×W×H(mm) 590X520X62 Building-in Dimensions A×B (mm) -
Page 9: Operation Of Product
3. OPERATION OF PRODUCT 3.1 Touch Controls • The controls respond to touch, so you don’t need to apply any pressure. • Use the ball of your finger, not its tip. • You will hear a beep each time a touch is registered. • Make sure the controls are always clean, dry, and that there is no object (e.g. a utensil or a cloth) covering them. Even a thin film of water may make the controls difficult to operate. 3.2 Choosing the right Cookware • Only use cookware with a base suitable for induction cooking. Look for the induction symbol on the packaging or on the bottom of the • You can check whether your cookware is suitable by carrying out a magnet test. - Page 10 Do not use cookware with jagged edges or a curved base. Make sure that the base of your pan is smooth, sits flat against the glass, and is the same size as the cooking zone. Use pans whose diameter is as large as the graphic of the zone selected. Using a pot a slightly wider energy will be used at its maximum efficiency.
-
Page 11: How To Use
3.3 How to use 3.3.1 Start cooking Touch the ON/OFF control for three seconds. After power on, the buzzer beeps once, all displays show “–” or “– –”, indicating that the induction hob has entered the state of standby mode. Place a suitable pan on the cooking zone that you wish to use. - Page 12 3.3.2 Finish cooking Touching the heating zone selection control that you wish to switch off Turn the cooking zone off by scrolling down to “0” or touching “-” and “+” control together. Make sure the display shows “0”. Turn the whole cooktop off by touching the ON/OFF control.
- Page 13 Cancel the Boost function Touching the “Boost” control or the “-” button to cancel the Boost function, then the cooking zone will revert to its original setting. Touching “-” and “+” control together. The cooking zone switch off and the boost function cancel automatically • The function can work in any cooking zone.
- Page 14 3.3.5 Timer control You can use the timer in two different ways: • You can use it as a minute minder. In this case, the timer will not turn any cooking zone off when the set time is up. • You can set it to turn one or more cooking zones off after the set time is up. The timer of maximum is 99 min. a) Using the Timer as a Minute Minder If you are not selecting any cooking zone Make sure the cooktop is turned on.
- Page 15 b) Setting the timer to turn one cooking zone off Set one zone Touching the heating zone selection control that you want to set the timer for. (e.g. zone 3#) Touch timer control, the minder indicator will start flashing and “10” will show in the timer display. Set the time by touching the “-”...
-
Page 16: Cooking Guidelines
3.3.6 Default working times Auto shut down is a safety protection function for your induction hob. It shut down automatically if ever you forget to turn off your cooking. The default working times for various power levels are shown in the below table: Power level Default working timer (hour) -
Page 17: Detection Of Small Articles
4.1.3 For stir-frying Choose an induction compatible flat-based wok or a large frying pan. Have all the ingredients and equipment ready. Stir-frying should be quick. If cooking large quantities, cook the food in several smaller batches. Preheat the pan briefly and add two tablespoons of oil. Cook any meat first, put it aside and keep warm. -
Page 18: Care And Cleaning
6. CARE AND CLEANING What? How? Important! Everyday soiling on Switch the power to the cooktop • When the power to the cooktop is glass (fingerprints, off. switched off, there will be no ‘hot marks, stains left by Apply a cooktop cleaner while the surface’ indication but the cooking food or non-sugary glass is still warm (but not hot!) zone may still be hot! Take extreme spillovers on the... -
Page 19: Hints And Tips
7. HINTS AND TIPS Problem Possible causes What to do The induction hob No power. Make sure the induction hob is cannot be turned on. connected to the power supply and that it is switched on. Check whether there is a power outage in your home or area. -
Page 20: Failure Display And Inspection
Problem Possible causes What to do The induction hob Technical fault. Please note down the error letters or a cooking zone and numbers, switch the power to has turned itself off the induction hob off at the wall, and unexpectedly, a tone contact a qualified technician. - Page 21 Wait for the temperature of IGBT return to normal. High temperature of IGBT. Touch “ON/OFF” button to restart unit. Check whether the fan runs smoothly; if not , replace the fan. Supply voltage is below the rated voltage. Please inspect whether power supply is normal.
-
Page 22: Installation
Failure Problem Solution A Solution B Heating stops suddenly Pan Type is wrong. Use the proper pot Pan detection during operation and the (refer to the instruction circuit is damaged, Pot diameter is too display flashes “U”. manual.) replace the power small. - Page 23 SEAL L (mm) W (mm) H (mm) D (mm) A (mm) B (mm) X (mm) F (mm) 560 +4 490 +4 50 min. 3 min. Under any circumstances, make sure the Induction cooker hob is well ventilated and the air inlet and outlet are not blocked.
-
Page 24: Before Installing The Hob, Make Sure That
Follow the requirements below. There are ventilation holes around outside of the hob. YOU MUST ensure these holes are not blocked by the worktop when you put the hob into position. • Be aware that the glue that join the plastic or wooden material to the furniture, has to resist to temperature not below 150 °C, to avoid the unstuck of the paneling. • The rear wall, adjacent and surrounding surfaces must therefore be able to withstand an temperature of 90 °C. 9.2 Before installing the hob, make sure that • The work surface is square and level, and no structural members interfere with space requirements. -
Page 25: Before Locating The Fixing Brackets
9.4 Before locating the fixing brackets The unit should be placed on a stable, smooth surface (use the packaging). Do not apply force onto the controls protruding from the hob. 9.5 Adjusting the bracket position Fix the hob on the work surface by screw 2 brackets on the bottom of hob(see picture) after installation. Adjust the bracket position to suit for different table top thickness. -
Page 26: Cautions
9.6 Cautions The induction hotplate must be installed by qualified personnel or technicians. We have professionals at your service. Please never conduct the operation by yourself. The hob will not be installed directly above a dishwasher, fridge, freezer, washing machine or clothes dryer, as the humidity may damage the hob electronics The induction hotplate shall be installed such that better heat radiation can be ensured to enhance its reliability. - Page 27 Model Mains Connection Cable diameter Cable Protection calibre PHD 64 TB 220-240V ~ 50/60Hz 2Phase+1N 4*2.5mm2 H07RN-F 2 x 16A • If the cable is damaged or to be replaced, the operation must be carried out the by after-sale agent with dedicated tools to avoid any accidents. • If the appliance is being connected directly to the mains an omnipolar circuit-breaker must be installed with a minimum opening of 3mm between contacts. • The installer must ensure that the correct electrical connection has been made and that it is compliant with safety regulations.
- Page 28 INSTRUCTIONS AND INFORMATION REGARDING THE DISPOSAL OF USED PACKAGING MATERIALS Dispose of packaging material at a public waste disposal site. DISPOSAL OF USED ELECTRICAL AND ELECTRONIC APPLIANCES The meaning of the symbol on the product, its accessory or packaging indicates that this product shall not be treated as household waste.
- Page 29 Manufacturer/Importer: Fast ČR, a.s. Praha 10, Černokostelecká 2111 CZ-10000; CZECH REPUBLIC is a registered trademark used under license from SK - 27 Electrolux Home Products., Inc. Copyright © 2019, Fast ČR, a. s. Revízia 05/2020...
Need help?
Do you have a question about the PHD 64 TB and is the answer not in the manual?
Questions and answers