Table of Contents
Advertisement
Quick Links
Advertisement
Table of Contents

Subscribe to Our Youtube Channel
Related Manuals for Ezviz RC3P


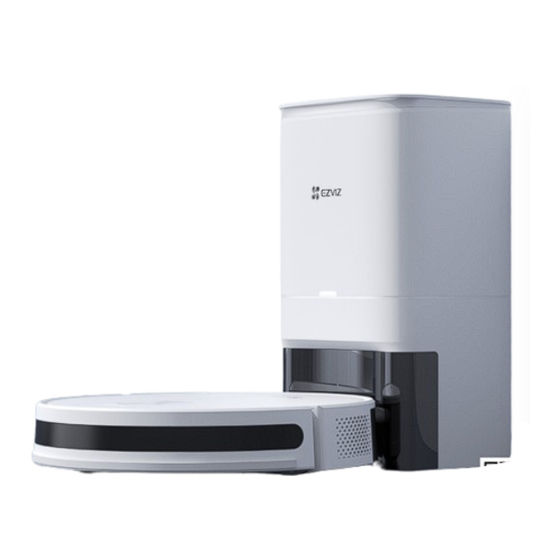
Summary of Contents for Ezviz RC3P
- Page 1 Robot Vacuum Cleaner...
- Page 2 • If the supply cord is damaged, it must be replaced by the manufacturer, its service agent or similarly qualified persons in order to avoid a hazard. • When charging, please use the Auto-empty Base ZD21 offered by EZVIZ. • WARNING: To Reduce The Risk Of Electric Shock - Do not use outdoors or on wet surfaces, commercial or industrial environments.
- Page 3 BeforeServicing. • The auto-empty base can only charge lithium-ion batteries containing no more than 8 cells with a rated capacity of no more than 2600mAh. • The auto-empty base can not be charged to non-rechargeable batteries. PROPER USE OF THE DEVICE • The device is only used for cleaning the floor of the home environment, and should not be used in outdoor environment (such as open balconies), non-ground environment (such as stairs), and industrial environment.
- Page 4 cause explosion. • After the RGB camera is contaminated with dust during use, it is recommended to use the air blower to clean the camera, or use a paper towel and soft dry cloth to wipe and clean, don’t use rough or hard materials, so as to avoid scratches on the glass surface of the vision module.
- Page 5 For more information see: www.recyclethis.info Technical Parameters Class II Direct current Alternating current For indoor use. Before charging, read the instructions. Robot Model CS-RC3P-TWT2, CS-RC3P-TWT5 Overall Dimension 345×345×78.5 mm Weight Approx. 2.83kg Battery Capacity 2,600 mAh Battery Rated Voltage 14.4 V Rated Input 1.5A...
- Page 6 INDIRECT DAMAGES, INCLUDING, AMONG OTHERS, DAMAGES FOR LOSS OF BUSINESS PROFITS, BUSINESS INTERRUPTION, OR LOSS OF DATA OR DOCUMENTATION, IN CONNECTION WITH THE USE OF THIS PRODUCT, EVEN IF EZVIZ HAS BEEN ADVISED OF THE POSSIBILITY OF SUCH DAMAGES. TO THE MAXIMUM EXTENT PERMITTED BY APPLICABLE LAW, IN NO EVENT SHALL EZVIZ’S TOTAL LIABILITY FOR ALL DAMAGES EXCEED THE ORIGINAL PURCHASE PRICE OF THE PRODUCT.
-
Page 7: Table Of Contents
Table of Contents Overview ��������������������������������������������������������������������������������������������������7 Package Contents��������������������������������������������������������������������������������������������������������������������������� 7 Basis ���������������������������������������������������������������������������������������������������������������������������������������������� 8 Robot ��������������������������������������������������������������������������������������������������������������������������������������������� 8 Auto-empty Base ���������������������������������������������������������������������������������������������������������������������������� 9 Quick Start Guide �����������������������������������������������������������������������������������12 Preparation ����������������������������������������������������������������������������������������������������������������������������������� 12 Connect the Power Supply to the Auto-empty Base����������������������������������������������������������������������� 12 Remove Shields ���������������������������������������������������������������������������������������������������������������������������� 13 Place the Robot ���������������������������������������������������������������������������������������������������������������������������� 13 Charging ���������������������������������������������������������������������������������������������������������������������������������������... -
Page 8: Overview
Overview Package Contents Robot Vacuum Cleaner *1 (hereinafter referred as to “Robot”) Side Brush *2 High-performance Filter *2 Auto-empty Base *1 (One has pre-installed in the Robot) (One has pre-installed in the Robot) Remote Control *1 Cleaning Tool *1 (AAA battery *2 included) Quick Start Guide *2 Regulatory Information *1 • A high-performance filter have been installed in the robot. -
Page 9: Basis
Basis Robot * Recharge Button *Recharge Button Microphone * Cleaning/On-off Button Microphone *Cleaning/On-off Button Side Brush Side Brush Recharge Sensor Recharge Sensor Front Bumper Front Bumper Button Recharge Button Press once: back to charging • Press once: start cleaning Cleaning/On-off Button •... -
Page 10: Auto-Empty Base
Infrared Receiving Terminal Infrared Receiving Terminal Filter Box Filter Box Cleaning Tool Cleaning Tool Dust Box Dust Box Taking-out Button Taking-out Button Dust Collection Port Dust Collection Port Filter Opening Button Filter Opening Button Filter Cover Filter Cover High-performance Filter High-performance Filter Suction Inlet Suction Inlet... - Page 11 Name Description Auto-empty Base Solid White: Robot does not connect to the Auto-empty Base LED Indicator Off: both of Robot and Auto-empty Base are correctly connected/the Auto-empty Base is sleeping Solid Red: the Dust Bag is not in place Fast-flashing Red: abnormal state Dust Bag Dust Bag Dust Bag Handle...
- Page 12 Please ensure that the Robot will response with a beep after you operate the remote control. Name Description Press once when the Robot is standby, it will sleep. Under the Sleep Mode, the Robot will enter a low energy-comsumption state, you can still use the remote control to operate it.
-
Page 13: Quick Start Guide
Quick Start Guide Preparation Try to avoid using in the environment with stairs (if must, please set up a guardrail), and try to remove the obstacles on the ground before use. Connect the Power Supply to the Auto-empty Base Install the Auto-empty Base in a location that the Robot can easily access. It is recommended to place the Auto-empty Base against a wall, and on a hard-level surface rather than on rugs or carpets. -
Page 14: Remove Shields
Remove Shields Before use, remove the shields on both sides of the Front Bumper and all protective films on both of the Robot and the Auto-empty Base. Place the Robot Place the Robot on the Auto-empty Base and align it with the Charging Electrodes. When the Auto-empty Base Indicator light goes out and the power indicator slow-flashes white, charging will begin. -
Page 15: Charging
Charging You have two ways to charge the Robot. Automatic recharging: the Robot will automatically return for recharging after the cleaning task is completed. Manual recharging: Short press Short press when pausing to when pausing Short press when pausing to begin automatic recharging. to begin automatic recharging. -
Page 16: Start Cleaning
Start Cleaning Short press the button to start the Full-house Cleaning Mode. Recommended start the Full-house Cleaning Mode when the Robot is on the Auto-empty Base. The Robot will leave the Auto-empty Base and clean in Zigzagging way, and then clean the area along the wall. -
Page 17: Routine Maintenance
Before performing cleaning and maintenance tasks on the Robot, turn the Robot OFF and unplug the Auto-empty Base. • A multi-function Cleaning Tool is provided for easy maintenance. Handle with care, this Cleaning Tool has sharp edges. • EZVIZ manufactures various replacement parts and fittings. Please visit www.ezviz.com for more information on replacement parts. -
Page 18: Dump The Dust Box
Dump the Dust Box Press the Dust Box Taking-out Button to pull out the Dust Box, and then pour the dirt into dust bin. Remove the Filter out of the Filter Box. Clean the Filter with Cleaning Tool and flush the Filter and Dust Box throughly with water as necessary, and then all cleaned elements shall be thoroughly dried. -
Page 19: Clean The Main Brush
Clean the Main Brush Press the buckles to take out the Main Brush Cover and the Main Brush. Use the blade of the Cleaning Tool to cut off the hair entangled on the Main Brush and remove the roller at one end of the Main Brush to clean it, and then re-install the Main Brush into place. -
Page 20: Clean/Replace The Side Brush
Clean/Replace the Side Brush Pull the side brush out and then clean the foreign matters like hairs. Pull out the old side brush and then press the new one into the position. -
Page 21: Clean Universal Wheel
Clean Universal Wheel Pull up the Universal Wheel directly by hand then clean it with the hidden Cleaning Tool and then re-install it into place. Clean the Driven Wheels with the hidden Cleaning Tool. Clean Sensor Wipe dust off with a soft dry cloth or cleaning brush. -
Page 22: Clean The Charging Electrode
Clean the Charging Electrode Wipe off the dust on the Charging Electrodes with a soft dry cloth or cleaning brush. Replace the Dust Bag When the Dust Bag is full, the Auto-empty Base LED Indicator flashes in red. Open the top cover and pull up the handle of the Dust Bag to take it out; Discard the old Dust Bag;... -
Page 23: Clean The Dust Channel
Clean the Dust Channel If the Auto-empty Base LED Indicator flashes in red after replacing the Dust Bag, it is recommended to unplug the power plug, reverse the Auto-empty Base to check whether the Dust Channel is blocked by foreign objects. Use a screwdriver to remove the transparent cover of the Dust Channel, and clean out foreign objects. -
Page 24: Environmental Precautions
Environmental Precautions The chemical substances contained in the built-in lithium-ion battery of this product may cause environmental pollution. Please remove it before scrapping and send it to a professional battery recycling station for centralized disposal. Steps for removing the battery (the following information is only applicable when discarding the device, not the daily operation instructions): 1. -
Page 25: Faq
Problem Solution The battery level is low. Please place the Robot on the Auto-empty Base and align with the Charging Electrodes (When it is completely out of power, it needs to be charged for a while before automatic startup). Startup failure The ambient temperature is too low (below 0°C) or higher than (above 50°C). - Page 26 Problem Solution Whether the Robot needs to be No lithium battery has no memory effect when in use, and there is no need to wait when charged for 16 hours for the first three it is fully charged. times Please check whether the Auto-empty Base is normally powered on. When the Robot automatically returns for recharging after more than 5 minutes of cleaning, automatic dust collection will be started.
- Page 27 The Remote Control works with infrared rays and the infrared receiving terminal of the Robot is located on the front of it. Please aimed at the front of the Robot for remote control operations. For additional information about the device, please refer to www.ezviz.com/eu.
-
Page 28: List Of Faults
• I f the error persists, please contact our Service Department. If the corresponding faults cannot be eliminated by referring to the above methods, please press and hold for 15s, and the Robot will restore to factory settings automatically. If still not eliminated, please refer to www.ezviz.com/eu. -
Page 29: Appendix
Appendix Rechargeable Lithium ion Battery 1. The battery type of the device: Portable battery. 2. The battery of this device is non-removable, which is risky to remove. Chemical Composition Chemical Formula CAS No� Weight (%) Lithium transition metal oxide 182442-95-1 37.3% Carbon(graphite) 7782-42-5...
Need help?
Do you have a question about the RC3P and is the answer not in the manual?
Questions and answers