Advertisement
Available languages
Available languages
Quick Links
Document No: 8P1092
Rev.05
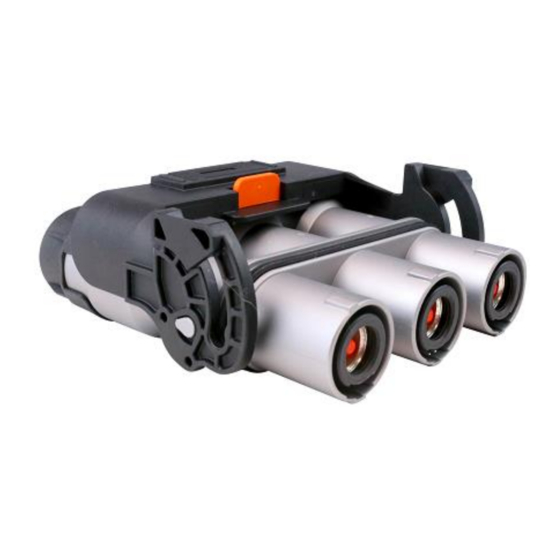
For 3POS PowerLok G2 180D Plug Connector
键位
Key
X 键
Y 键
三芯2代直头组装式连接器安装说明
The Assembly Manual
PL183(X)-30(X)-XX-2-5
高压互锁
0:无
1:有
HVIL
0:NO
X
1:WITH
Y
线缆大小
G2 Connector
Cable Size
mm2
50
70
线缆类型
5:HS cable
www.amphenol-gec.com
Advertisement

Related Manuals for Amphenol PL183 30 Series


Summary of Contents for Amphenol PL183 30 Series
- Page 1 Document No: 8P1092 Rev.05 三芯2代直头组装式连接器安装说明 The Assembly Manual For 3POS PowerLok G2 180D Plug Connector PL183(X)-30(X)-XX-2-5 线缆大小 高压互锁 0:无 G2 Connector Cable Size 1:有 HVIL 线缆类型 键位 0:NO X 键 5:HS cable 1:WITH Y 键 www.amphenol-gec.com...
-
Page 2: Part 1: Package Contents
三芯2代直头组装式连接器安装说明The Assembly Manual for 3POS PowerLok G2 180D Plug Connector 第一部分:包装清单 Part 1: Package contents ③ ④ ① ② ⑥ ⑤ ⑦ ⑧ ⑨ ⑩ ⑪ ⑫ 备注 Note: 安装过程请保留HVIL防护盖在此位置,等线束组装完毕再取出。 HVIL cap should be left in place during assembly, removed after final assembly is complete before use. ①... -
Page 3: Part 2: Plug Assembly
三芯2代直头组装式连接器安装说明The Assembly Manual for 3POS PowerLok G2 180D Plug Connector 第二部分:插头组装 Part 2: Plug Assembly 步骤1:穿配件 Step1:Assemble the accessories 1-1 线缆准备:按生产需求从表1选择合适尺寸的线缆,并裁剪 1-1 Cable preparation : take right-sized cable and cut the cable according to production plan from the table 1 表1:线材规格... - Page 4 三芯2代直头组装式连接器安装说明The Assembly Manual for 3POS PowerLok G2 180D Plug Connector 步骤3:压接铜环 Step 3: Crimping Copper ring 3-1 将 ⑨内铜环从右端移动到屏蔽线下方,屏蔽线覆盖在铜环表面 3-1 Move the ⑨ inside copper ring from the right side to the side below the shield. The shield line is covered on the surface of the copper ring ⑨...
- Page 5 三芯2代直头组装式连接器安装说明The Assembly Manual for 3POS PowerLok G2 180D Plug Connector 步骤4:取1pcs的 ④ R4 端子组件 自左端穿上线缆,并压接在其上(规格参照表4) Step 4: Take a ④ R4 terminal Assy, load it to the cable end on the left, then crimp(refer to table 4) ④ R4 terminal Assy Be sure the gap here is 2±0.5mm 确保这里的间隙是1.5mm到2.5mm之间...
- Page 6 三芯2代直头组装式连接器安装说明The Assembly Manual for 3POS PowerLok G2 180D Plug Connector 步骤7:取出② ③绝缘筒,插入 ④ R4 组件中, 并使其触底 Step 7: Take a ② ③ Insulation sleeve ,plug it to ④ R4 Assy , and make it contact the bottom . ② ③ Insulation sleeve 绝缘筒...
- Page 7 三芯2代直头组装式连接器安装说明The Assembly Manual for 3POS PowerLok G2 180D Plug Connector 步骤10: ② ③绝缘筒插入到①屏蔽壳组件, 并使其触底,带高压互锁绝缘筒②装入位置B,不带高压互锁的绝缘 筒③装入位置A 与C,注意确认HVIL位置以及卡簧是否到位。 Step 10: Plug the ② ③ Insulation sleeve into ①Shield shell assembly , and make it reach the bottom. Insulation sleeve with HVIL ② is in the position B,and Insulation sleeve without HVIL ③ is in the position A and C.
- Page 8 三芯2代直头组装式连接器安装说明The Assembly Manual for 3POS PowerLok G2 180D Plug Connector 12-2 Dielectric Withstand Voltage 12-2 耐压测试 Positions Test voltage(DC) 测试时间(推荐) Leakage Current 位置 测试电压(直流) Test Time(recommended) 漏电流 Cable(power) to shell 5000 V < 5mA 电缆芯线到壳体 Cable(power) to HVIL 5000 V <...
- Page 9 Specifications are subject to change without notice. Contact your nearest Amphenol Corporation Sales Office for the latest specifications. All statements, information and data given herein are believed to be accurate and reliable but are presented without guarantee, warranty, or responsibility of any kind, expressed or implied.
Need help?
Do you have a question about the PL183 30 Series and is the answer not in the manual?
Questions and answers