
Related Manuals for Chiko CBA-1000AT3-HC-DSA-V1


Summary of Contents for Chiko CBA-1000AT3-HC-DSA-V1
- Page 1 集塵機 取扱説明書 設置・メンテナンス編 CBA-1000AT3-HC-DSA-V1 [文書番号] CIM-40002-06 チコーエアーテック株式会社 CHIKO AIRTEC CO., LTD...
-
Page 2: 転載・複写について
集塵機取扱説明書 設置・メンテナンス編 [文書番号] CIM-40002-06 はじめに このたびは、レーザーマーカー用集塵機をお買い上げいただき、誠にありがとうございます。 レーザーマーカー用集塵機は、「風の技術」に消臭機能を付加し、コンパクトにまとめた省エネ形のクリーン BOXです。 本書は設置・メンテナンス向けに装置の取扱方法を記載しています。 ご使用前に本書をよくお読みいただき、内容を十分に理解してから、正しく使用してください。 • 本書は、必要なときにいつでもご覧になれるよう、お手元で大切に保管してください。 • 本書の内容については万全を期していますが、万一ご不明な点や誤り、お気付きの点がございまし たら、当社までご連絡ください。 • 本書を紛失または汚損した場合、警告ラベルを損傷した場合は、速やかに当社までご連絡ください。 • 記載内容は、改良のため細部において実機と異なることがあります。ご質問などはお気軽に当社ま でお問い合わせください。 製品改良のため、本書に記載している仕様の一部を予告なく変更することがあります。 転載・複写について • 本書の著作権は、チコーエアーテック株式会社が所有しています。 • 本書の内容の一部あるいは全部を無断で転載や複写することは固くお断りします。 Copyright © 2023 CHIKO AIRTEC All Rights Reserved はじめに... -
Page 3: 安全に関する表示
集塵機取扱説明書 設置・メンテナンス編 [文書番号] CIM-40002-06 安全に関する表示 本取扱説明書の中で、作業者の事故防止と装置の損傷防止などのため、下記に示す絵表示とシグナルワード による注意事項などを記載しています。 危険、警告、注意は装置を正しく使用し、所定の性能を得るために必要な情報です。 常に遵守してください。 本文中の表示 表示内容を無視して誤った使い方をしたときに生じる危害や損害の程度を、下記の表示で区分し、説明して います。 取扱いを誤った場合、死亡または重傷を負う危険な状態が生じることが想定され、かつ危険 発生時の警告の緊急性(切迫の度合)が高い限定的の場合 取扱いを誤った場合、死亡または重傷を負う危険な状態が生じることが想定される場合 取扱いを誤った場合、傷害を負う危険な状態が生じることが想定される場合 取扱いを誤った場合、物的損害のみ生じることが想定される場合 図記号の説明 お守りいただく内容の種類を次の表示で区分し、説明しています。 禁止 装置の取扱いにおいて、その行為を する内容 強制 装置の取扱いにおいて、必ず実行していただく する内容 その他、知っていると役立つ事項などを、次の表示で区別し、説明しています。 重 要 本機の機能を十分に発揮するための情報 メ モ 装置を取扱う上で知っていると役に立つ事項 凡例 参照先 本書内に参照先がある場合は「章番号/節番号」または(章番号/節番号)、(Pページ番号)で表記します。 例) 装置の起動方法については「4.1」を参照してください。 装置を起動します。(4.1) 交換部品を点検します。(P10) 安全に関する表示... -
Page 4: 保証とアフターサービスについて
(3) 取扱説明書に記載している環境条件以外での使用による故障 (4) 当社製品以外の装置による故障 (5) 当社以外の分解、改造、修理による故障 (6) 自然災害や想定外の外的要因による故障 (7) 出荷時の科学、技術水準では予見できない事由による故障 (8) その他、当社の責任に起因しない故障 3. 保証の対象 保証は、当社と最初にご契約したお客様に適用されます。 転売後のお客様は保証の対象外となります。 4. 責任の制限 当社は、故障によって生じるいかなる損害に関して、一切の責任を負いかねます。 5. 仕様の変更 改良のため、本書に記載している仕様を予告なく変更することがあります。 6. サービス範囲 技術者派遣の費用は、製品販売価格に含まれていません。 ご希望に応じて、別途相談させていただきます。 アフターサービス 装置に関するお問い合わせは、「型番」「製造番号」「弊社受注番号」をお控えのうえ、当社までご連絡ください。 チコーエアーテック株式会社 〒562-0012 大阪府箕面市白島2丁目27-24 <お問い合わせ先> TEL: 072-720-5151 [受付時間] 9:00~18:00(土日祝休み) FAX: 072-720-5133 URL: https://chiko-airtec.jp/ 保証とアフターサービスについて... -
Page 5: Table Of Contents
8 付録 ........50 3.3.3 配管 ..............24 8.1 消耗品リスト ........... 50 8.2 電気回路図 ..........50 4 運転 ......... 25 8.2.1 CBA-1000AT3-HC-DSA-V1(-T/-CE) ..50 4.1 始業前点検 ..........25 8.2.2 CBA-1000AT3-HC-DSA-V1(-UL1/-UL2) .. 51 4.2 装置の起動 ..........26 8.3 海外規格対応 .......... 52 4.3 装置の設定... - Page 6 集塵機取扱説明書 設置・メンテナンス編 [文書番号] CIM-40002-06 8.3.2 UL/CSA規格(MET認定証) ....... 53 もくじ...
-
Page 7: 製品使用上のご注意
集塵機取扱説明書 設置・メンテナンス編 [文書番号] CIM-40002-06 1 製品使用上のご注意 1.1 安全警告表示 作業者の事故防止のため、重要安全注意情報として下記の警告ラベルを貼っています。 重 要 警告ラベルが汚損/破損した場合は、速やかに当社までご連絡ください。 高温警告シール ヒューズ定格ラベル 高電圧警告シール 注意喚起シール 分解禁止シール MET認証ラベル ネームプレート 高電圧警告シール ネームプレート 高温度警告シール MET認証ラベル (NRTL認証品のみ) 注意喚起シール ヒューズ定格ラベル 分解禁止シール (NRTL認証品のみ) (NRTL認証品のみ) 1 製品使用上のご注意... -
Page 8: 装置の安全対策
集塵機取扱説明書 設置・メンテナンス編 [文書番号] CIM-40002-06 1.2 装置の安全対策 1.2.1 装置の非常停止 装置の異常動作や緊急事態が発生した場合 は、主電源スイッチをOFFにして装置を停止し てください。 非常停止の実行 主電源スイッチをOFFにします。 装置が即時停止します。 ※ リモート接続の際は、操作パネルは操作できません。 装置の再起動 装置を再起動する前に、必ず異常原因を取り除いてください。 エラー発生時の対処については「7.1」、「エラー! 参照元が見つかり ません。」を参照してください。 主電源スイッチをONにします。 装置が正常に動作していることを確認してください。 1 製品使用上のご注意... -
Page 9: 安全上のご注意
集塵機取扱説明書 設置・メンテナンス編 [文書番号] CIM-40002-06 1.3 安全上のご注意 1.3.1 各作業に共通のご注意 ご使用になる前に取扱説明書をよく読み、十分に理解してから作業してください。 すべての警告および注意を遵守し、正しくご使用ください。 本書に書かれていない方法、目的のために、装置を運転しないでください。 事故につながる恐れがあります。 装置の設置、接続、運転、操作、点検、故障診断は、必ず訓練を受けた有資格者が 行ってください。 許可された作業者に対し、書面化することを推奨します。 装置に直接水をかけないでください。 漏電、感電の恐れがあります。 装置または電気系統に異常が発生した場合は、直ちに電路遮断し、当社までご連 絡ください。 異常がある装置を使用すると、事故につながる恐れがあります。 装置を分解、改造しないでください。 感電や怪我をする恐れがあります。 内部の点検や修理は、お買い上げになった販売店にご連絡ください。 装置は、事業用電気工作物への接続を想定して設計しておりますので、一般用電 気工作物へは、接続しないでください。 電源コードをコンセントに差し込む際は、必ずアース接地をしてください。 アース接地をしないと、漏電した場合に感電する恐れがあります。 装置の廃棄方法は、自治体のルールに従い、産業廃棄物として適切に処分してく ださい。 1.3.2 運搬・保管・輸送時のご注意 運搬は、2人以上で行ってください。 落下などにより、けがをする恐れがあります。 輸送機器の運転は必ず有資格者が行ってください。 輸送作業は、安全のため、運転者の他に監視者が必要です。 輸送に使用する機器(玉掛け・クレーン・フォークリフト)は点検整備された、装置の 荷重に適切な容量のものを使用してください。 1. 装置の吊り上げは所定の吊り位置を使用してください。 2. フックで吊り上げる場合は、装置を傷つけないように当て板などを使用してく ださい。... -
Page 10: 設置時のご注意
集塵機取扱説明書 設置・メンテナンス編 [文書番号] CIM-40002-06 装置は重量および重心を考慮して固定してください。 1. 輸送中は装置を垂直にし、転倒しないよう固定してください。 2. 吊り上げ中は、装置が水平に上がるよう考慮し、衝撃を与えないよう、ゆっくり 降ろしてください。 吊り上げ作業中は、吊り荷の下に人が絶対に入らないようにしてください。 吊り荷が落下した場合、事故につながるおそれがあります。 輸送する場合は保管環境に注意してください。 1. 温度-10℃~60℃、湿度 80%以下の環境に装置を保管してください。 2. 輸送中は機械を垂直にし、転倒しないよう固定してください。 3. 輸送中に激しい振動を与えないでください。 1.3.3 設置時のご注意 据付作業時は必ず電路遮断してください。 電源がオンの状態で作業すると、感電する恐れがあります。 ※ 1. 作業中にオンにならないよう電源をロックアウト してください。 2. 「作業中」を示す札をつける、または他の作業者が監視してください。 ※ ロックアウトとは、設備内に作業者が入って作業する場合に第三者が機器を作動させることがない ようにするシステムのことです。 装置は、事業用電気工作物への接続を想定して設計しておりますので、一般用電 気工作物へは、接続しないでください。 電源ケーブルをコンセントに差し込む際は、必ずアース接地をしてください。 アース接地をしないと、漏電した場合に感電する恐れがあります。 装置は、環境条件を満足する場所に設置してください。 守られなかった場合は、思わぬ事故につながる恐れがあります。 設置環境は「3.1」(P21)を参照してください。 ゼオライトには不純物として石英が含まれております。取り扱い時には、リスク分... -
Page 11: 運転時のご注意
集塵機取扱説明書 設置・メンテナンス編 [文書番号] CIM-40002-06 フィルターは正しく取り付けてください。 フィルターに異常がある状態で運転すると、モーター内へ異物が混入し、故障する 恐れがあります。 1.3.4 運転時のご注意 粉塵爆発のおそれのない乾いた粉塵の吸引に使用してください。 <爆発性粉塵> アルミニウム、マグネシウム、チタン、亜鉛、コバルト、ニッケル、小麦粉など 引火性、爆発性、腐食物質の霧、煙、ガスが滞留している場所や周囲で、装置の運 転や吸引をしないでください。 ケーブルを無理に曲げたり、引っ張ったりしないでください。 火災や感電の恐れがあります。 装置の運転、操作、点検は、必ず訓練を受けた有資格者が行ってください。 許可された作業者に対し、書面化することを推奨します。 装置に直接水をかけないでください。 漏電、感電の恐れがあります。 装置または電気系統に異常が発生した場合は、直ちに電路遮断し、当社までご連 絡ください。 異常がある装置を使用すると、事故につながる恐れがあります。 装置の運転中は、装置を移動しないでください。 停電や装置が不意に停止した場合は、電路を遮断してください。 装置が不意に動き出すと、事故につながる恐れがあります。 1.3.5 清掃・メンテナンス時の注意事項 清掃時は必ず、電源コードを抜くなど、電路を遮断してください。 電源がオンの状態で作業すると、感電するおそれがあります。 交換部品は、必ず当社指定の純正品を使用してください。 指定品以外を使用して故障した場合は、保証できません。 1 製品使用上のご注意... - Page 12 集塵機取扱説明書 設置・メンテナンス編 [文書番号] CIM-40002-06 作業中は、適切な服装および保護具を着用してください。 ヘルメット、手袋、安全靴などの着用を徹底し、安全に作業できるよう対策してく ださい。 ゼオライトには不純物として石英が含まれております。取り扱い時には、リスク分 析を行ない、粉塵への暴露を最小化する措置を行なって下さい。 例)保護手袋・防塵マスクの着用、換気装置の設置など 1 製品使用上のご注意...
-
Page 13: 仕様および外観
集塵機取扱説明書 設置・メンテナンス編 [文書番号] CIM-40002-06 2 仕様および外観 2.1 装置仕様 CBA-1000AT3-HC-DSA-V1 型式 -UL2 /-UL1 / 出力 500W ※1 100V 単相 電圧 200V 単相 220-230V 単相 100-115V 単相(UL1) 電流値 7.8A 4.9A 4.5A 短絡電流定格 100A 周波数 50/60Hz 3.2m /min 最大吸込風量 (ゼオライト付着時:2.7-2.9m /min) 最大吸込静圧 9.3-9.5kPa ※2... -
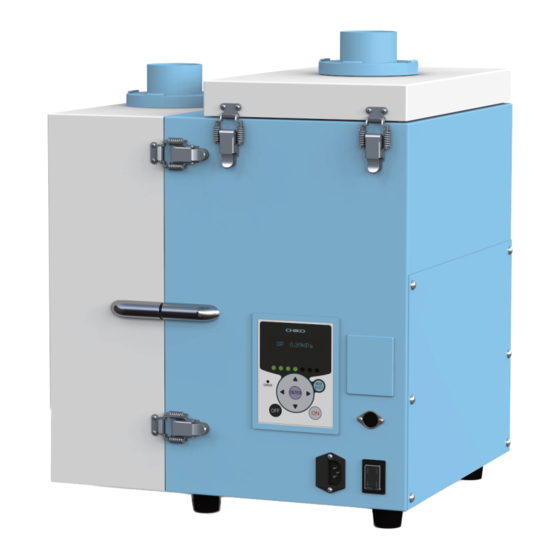
Page 14: 装置外観および各部の名称
集塵機取扱説明書 設置・メンテナンス編 [文書番号] CIM-40002-06 2.2 装置外観および各部の名称 番号 名称 働き 1次フィルター室 1次フィルターを収納します。 吸込口(脱着フランジ) 吸気ダクトを接続します。 排気フィルター室 活性炭カセットおよび排気HEPAフィルターを収納します。 排気口(脱着フランジ) 排気ダクトを接続します。 パッチン錠 排気フィルター室を固定します。 パッチン錠 1次フィルター室を固定します。 操作パネル(AT3パネル) 装置を操作します。 主電源スイッチ 装置の電源のON/OFFを切り替えます。 ヒューズを収納します。 ヒューズボックス NRTL認証品のみ、安全カバーが付いています。 電源インレット 電源ケーブルを接続します。 リモートコネクター リモートケーブル(別売)を接続します。 1次フィルター 粉塵やヒュームを収集、吸着します。 シェイキングモーター室 1次フィルターの目詰まりを軽減します。 2次フィルター 電気・電子部品を粉塵から保護します。 2 仕様および外観... -
Page 15: 付属品
集塵機取扱説明書 設置・メンテナンス編 [文書番号] CIM-40002-06 2.3 付属品 100V仕様 200V(-T仕様) 220-230V(-CE仕様) 100-115V(-UL1仕様) 220-230V(-UL2仕様) 番号 名称 働き 数量 1次フィルター 粉塵やヒュームを捕集、吸着します。 2次フィルター 電気・電子部品を粉塵から守ります。 活性炭カセット 臭いを吸着します。 排気HEPAフィルター 排気をクリーンにします。 脱着フランジ(φ75) 吸気、排気ダクトを接続します。(3.3.3) スタートアップガイド 装置起動後の簡易マニュアルです。 電源ケーブル(3m) 100V 仕様 ※ 100-115V(-UL1仕様) 電源インレットに接続します。 200V(-T仕様) 電源仕様により形状が異なります。 220-230V(-CE仕様) 220-230V(-UL2仕様) ※ 100-115Vの地域で使用できます。 2 仕様および外観... -
Page 16: 操作パネル(At3パネル
集塵機取扱説明書 設置・メンテナンス編 [文書番号] CIM-40002-06 2.4 操作パネル(AT3パネル) 番号 名称 働き 参照 ディスプレー 運転状態や各種設定内容を表示します。 エラー・警告発生時は、エラー・警告 No.を表示します。 能力レベルランプ 能力レベルを緑色のランプで表示します。(レベル1~7) 停止中、運転中: ボタン • ディスプレーの表示内容を切り替えます。 セレクトモード時: • 設定項目の切り替え、設定する数値データを変更します。 異常ランプ エラー発生時に、赤色ランプが点灯/点滅します。 ランプ点灯: 運転を停止するエラーが発生しています。 • ランプ点滅: 運転を継続するエラー、警告が発生しています。 • 運転中: • ボタン ボタンを押すと、能力が1レベルずつ降下/上昇します。 セレクトモード時: • ボタンを押すと、カーソルが1つずつ左/右に移動します。 OFFボタン 運転を停止します。 OFFボタンを長押し(3秒以上)すると、登録さ... -
Page 17: 脱着フランジ(オプション
集塵機取扱説明書 設置・メンテナンス編 [文書番号] CIM-40002-06 2.5 脱着フランジ(オプション) 脱着フランジは、使用する吸気配管に適したサイズのものを使用してください。 フランジ径(mm) 品番 φ38 FRJ-D-38-35-108 φ50 FRJ-D-50-35-108 φ65 FRJ-D-65-35-108 φ75(標準) FRJ-D-75-35-108 2.6 リモートケーブル(オプション) 2.6.1 リモートコントロールについて リモートケーブル(オプション)を使用すると、 周辺機器と連動した遠隔操作が可能になりま す。 • リモートケーブル: MT-173-8(3m) • 遠隔操作内容: 運転ON/OFF、能力レベル(風量)変更 リモートケーブル 差込口 2.6.2 リモート操作内容 <リモート操作で運転ON/OFFする場合> ④ピンと⑧ピンを短絡します。詳細は「2.6.4」を参照してください。 • ①ピンを短絡: 運転ON • ①ピンを短絡しない:... -
Page 18: 標準接続図
集塵機取扱説明書 設置・メンテナンス編 [文書番号] CIM-40002-06 2.6.3 標準接続図 2 仕様および外観... - Page 19 集塵機取扱説明書 設置・メンテナンス編 [文書番号] CIM-40002-06 接続例 <①、④ピン(入力)> 集塵機側 客先装置側 電圧を印加しないで ください。 ①または④ピン ⑧ピン <②ピン(アナログ出力)> 集塵機側 客先装置側 出力電圧:+1~5V±0.2V 計測器側 ②ピン モニタ ⑧ピン ¥ <③、⑤、⑥ピン(オープンコレクタ出力)> 集塵機側 客先装置側 定格を超えないように (最大定格:50V) 保護回路を追加してく ださい。 負荷 ③または⑤または ⑥ピン 100mA 以下 ⑧ピン 推奨 DC 電圧・電流:最大定格 1/2 以下 <⑦ピン(入力)> 集塵機側...
-
Page 20: ピンアサイン
集塵機取扱説明書 設置・メンテナンス編 [文書番号] CIM-40002-06 2.6.4 ピンアサイン ピン 線色 信号名称 内容 番号 黒 ① 運転入力信号 遠隔信号 ④と⑧を短絡後、①を短絡して運転を開始し (※1) (入力) ます。 赤/白 ④ 遠隔操作切替信号 ④と⑧を短絡し、リモート操作に移行します。 (※1) 短絡すると、AT3パネルの通常操作はできま せん。 黄 ⑦ 能力レベル変更 ⑦と⑧の間で、0~5Vの電圧を印加し、能力 (※2) レベルを変更します。(下表参照) 黄/白 ⑧ - 黒/白 ② 運転圧力信号 出力信号 現在の運転圧力を出力します。 アナログ信号:... -
Page 21: 通信機能(オプション
集塵機取扱説明書 設置・メンテナンス編 [文書番号] CIM-40002-06 2.7 通信機能(オプション) 通信ボードセット(型式:RS-485またはRS-EN)を使用すると、運転ON/OFFや能力レベル変更 などの制御、目詰まりや圧力不足などの情報の読み出しができます。 詳細は別冊「AT3 通信仕様書」を参照してください。 2.7.1 RS-485通信ボードセット RS-485通信ボードの詳細は、取扱説明書を参照してください。 2.7.2 イーサネット通信用LANボードセット イーサネット用LANボードの詳細は、取扱説明書を参照してください。 「Com Setting」(通信フォーマット設定モード)の設定内容については、 重 要 別冊「AT3 通信仕様書」を参照してください。 2 仕様および外観... -
Page 22: 設置環境
集塵機取扱説明書 設置・メンテナンス編 [文書番号] CIM-40002-06 3 設置 3.1 設置環境 使用上の安全および本機の性能を十分に発揮させるため、下記の条件を満たす場所に設置してく ださい。 電源 過電圧カテゴリーが区分Ⅱの電源で使用してください。 CBA-1000AT3-HC-DSA-V1 型式 /-UL1 -CE/-UL2 ※ 100V 単相 電圧 200V 単相 220-230V 単相 100-115V 単相(UL1) ※ 100-115Vの地域で使用できます。 温度・湿度 • 温度: 0℃~40℃ • 湿度: 80%RH以下の範囲(ただし、結露のないこと) 周囲条件 装置は屋内の以下の条件を満たす場所に設置してください。 • 海抜1000m以下の標高の場所 •... -
Page 23: 設置方法
集塵機取扱説明書 設置・メンテナンス編 [文書番号] CIM-40002-06 3.2 設置方法 1. 設置作業時は必ず電路遮断してください。 電源がオンの状態で作業すると、感電する恐れがあります。 2. 装置は、環境条件を満足する場所に設置してください。 守られなかった場合は、思わぬ事故につながる恐れがあります。 装置の質量に十分耐え、水平位置を保てる場所に据え付けます。 排気口の周囲は塞がないでください。 排気口が塞がれていると、吸引力が弱まり十分に冷却できません。 モーター焼けや電気・電子部品が故障する恐れがあります。 <設置スペース> 排気口の周囲は100mm以上のスペースが必要です。 2. 操作パネルの保護フィルム、脚およびフランジの養生テープをはがします。 排気口(脱着フランジ) 吸込口(脱着フランジ) 養生テープ 保護フィルム 操作パネル 脚 養生テープ 3 設置... -
Page 24: 配線、配管
集塵機取扱説明書 設置・メンテナンス編 [文書番号] CIM-40002-06 3.3 配線、配管 配線、配管作業時は必ず電路遮断してください。 電源がオンの状態で作業すると、感電する恐れがあります。 3.3.1 配線 1. ケーブルを無理に曲げたり、引っ張ったりしないでください。 火災や感電の恐れがあります。 2. 装置の仕様と異なる電源で使用しないでください。 装置が破損する恐れがあります。 電源ケーブルをコンセントに差し込む際は、必ずアース接地をしてくだ さい。 アース接地をしないと、漏電した場合に感電する恐れがあります。 電源ケーブルは、タコ足配線をしないでください。 電圧の降下により故障する恐れがあります。 装置の電源インレットに、電源ケーブルを接続し ます。 1次電源 2. 1次電源に電源ケーブルを接続します。 アース 電源インレット 電源ケーブル 3 設置... -
Page 25: Removeステッカーの取外し
集塵機取扱説明書 設置・メンテナンス編 [文書番号] CIM-40002-06 3.3.2 REMOVEステッカーの取外し 装置内部のREMOVEステッカーを以下の手順ではがします。 ゼオライトには不純物として石英が含まれております。取り扱い時には、 リスク分析を行ない、粉塵への暴露を最小化する措置を行なって下さ い。 例)保護手袋・防塵マスクの着用、換気装置の設置など フィルターは正しく取り付けてください。 フィルターに異常があると、ブロワー内に異物が混入し、装置が故障す る恐れがあります。 1次フィルター室のパッチン錠を解除し、1次フィルター室を開きます。 2. 1次フィルターを取り外します。 3. 1次フィルターのREMOVEステッカーをはがします。 4. 1次フィルターを取り付けます。 5. 1次フィルター室を閉じ、パッチン錠で固定します。 1次フィルター パッチン錠 REMOVE ステッカー 3.3.3 配管 使用中の脱着フランジに適さないサイズの配管に変更する場合は、脱着フラ 重 要 ンジを交換する必要があります。当社までご連絡ください。 排気側には、吸気側より小径の配管を取り付けないで下さい。 吸気配管(お客様手配)を以下の手順で接続します。 a. 吸込口に脱着フランジを取り付けま 配管 す。 ホースバンド b. -
Page 26: 始業前点検
集塵機取扱説明書 設置・メンテナンス編 [文書番号] CIM-40002-06 4 運転 本章では、装置の運転方法について説明します。 作業前に本章と「1.3」(P8)をよく読み、十分に理解してから作業してください。 装置の運転中は、装置を移動しないでください。 停電や装置が意図せず停止した場合は、電源を遮断してください。 装置が不意に動き出すと、事故につながる恐れがあります。 4.1 始業前点検 項目 チェック フィルター室は完全に閉じている。 吸込口は塞がれていない。 排気口は塞がれていない。 装置の周囲に引火性物質はなく、吸引も行わない。 ガソリン、シンナー、ベンジン、灯油、塗料など • 装置の周囲に爆発性粉塵はなく、吸引しない。 アルミニウム、マグネシウム、チタン、亜鉛、ニッケル、コバルト、小麦粉など • 装置の周囲で火花を含む粉塵を発生させる作業は行われておらず、吸引 も行わない。 高速切断機、グラインダー、溶接機などを使用する作業 • 装置の周囲に火種はなく、吸引も行わない。 たばこ、油、液体の薬品など • 装置の周囲に水や液体はなく、吸引も行わない。 40℃以上の粉塵はない。 使用場所の雰囲気温度は 0~40℃の範囲内である。 配管に異常はないか。(異物などが詰まっていないか。) 各種エラー表示が出ていないか。 4 運転... -
Page 27: 装置の起動
集塵機取扱説明書 設置・メンテナンス編 [文書番号] CIM-40002-06 4.2 装置の起動 3分以上のインターバルをおいて、操作パネルのON/OFF操作を行ってく ださい。 3分未満、特に30秒未満で操作パネルのON/OFF操作を繰り返すと、故障 の原因になります。 ※リモート操作、通信機能による操作でも同様です。 OFFボタンを長押し(3秒以上)すると、登録されている初期圧がクリアされ メ モ ます。 主電源スイッチをONにします。 2. ディスプレーにプログラムバージョンと通 ディスプレー 信用のID番号が表示されていることを確 認します。 Ver*.** ID.** 3. 操作パネルの[ON]を押し、装置の運転を 開始します。 4. 正常に動作していることを確認します。 能力レベルランプ • 異常音がない • 吸引が適切である 5. 能力レベルランプを確認し、必要とする吸 引能力が異なる場合は[ ]で吸引レベルを設定します。 ※ リモート接続の際は、操作パネルは操作できません。 4.3 装置の設定 装置を初めて起動した場合は、以下の設定を行ってください。... -
Page 28: 設定/確認
集塵機取扱説明書 設置・メンテナンス編 [文書番号] CIM-40002-06 5 設定/確認 操作パネルでは、装置の各種設定およびエラー履歴の確認ができます。 5.1 操作パネルの画面遷移 5.1.1 各種モードの画面遷移 通常モード 主電源スイッチ セレクトモード 停止中 [MODE SELECT] 押し 初期圧登録削除 5.2.2 [OFF] [OFF] [ON] 3秒押し 初期圧登録 運転中 5.2.1 [ENTER] 3秒押し 5.1.2 装置情報の確認(運転OFF) プログラムバージョン、 Ver*.** ID.** RS-485通信用局番 5 設定/確認... -
Page 29: 運転状態の確認(運転On
集塵機取扱説明書 設置・メンテナンス編 [文書番号] CIM-40002-06 5.1.3 運転状態の確認(運転ON) 運転ON時に[ ]を押すと、運転状態が確認できます。 **.**kPa 外部圧 **.**kPa 吸込圧 **.**kPa 差圧 **.**kPa 排気圧 Blower ***.* C ブロワー周辺温度 Motor ******rpm ブロワー回転数 積算稼働時間(リセット可) リセット後からの稼働時間を Runtime ******h 表示します。 「5.3.5」参照 実働時間(リセット不可) Total ******h トータルの稼働時間を表示します。 5 設定/確認... -
Page 30: 初期圧の登録/削除
集塵機取扱説明書 設置・メンテナンス編 [文書番号] CIM-40002-06 5.2 初期圧の登録/削除 装置を初めて起動するときは、初期圧を必ず登録してください。 • 初期圧が未登録の状態で運転すると「初期圧力未登録警告(WARN6)」が発 重 要 生します。 1次/2次フィルターの交換や配管を変更したときは、初期圧を再登録してくだ • さい。 初期圧登録を行なうと、登録した差圧からフィルター目詰まりによる風量低下の判定ができます。 風力が低下すると、風量不足(WARN4)としてお知らせします。 5.2.1 初期圧の登録 「4.2」を参照し、装置の運転を開始しま す。 2. 操作パネルの[ENTER]を3秒間長押し します。 3. ディスプレーに「Initial DP Get Y」と 表示されたら[ENTER]を押します。 Initial DP Get Y 初期圧の取得動作が開始します。登録 が完了するまで、待機してください。 ※ 初期圧を更新しない場合は、 [MODE SELECT]を押してください。 <登録動作>... -
Page 31: 初期圧の削除
集塵機取扱説明書 設置・メンテナンス編 [文書番号] CIM-40002-06 5.2.2 初期圧の削除 操作パネルの[OFF]を押し、装置の運転 を停止します。 2. [OFF]を3秒間長押しします。 3. ディスプレーに「Initial DP Clr Y」と表 示されたら[ENTER]を押します。 Initial DP Clr Y ※ 初期圧の削除を中止する場合は、[MODE SELECT]を押してください。 4. 初期圧が削除されると、ディスプレーに 「Initial DP Clr」と表示されます。 Initial DP Clr 5 設定/確認... -
Page 32: 各種設定
集塵機取扱説明書 設置・メンテナンス編 [文書番号] CIM-40002-06 5.3 各種設定 5.3.1 各設定モードの表示 各種モードはモードセレクト画面より表示します。 操作パネルの[OFF]を押し、装置の運転 を停止します。 2. [MODE SELECT]を押します。 3. [ ]を押して、表示したいモードを 選択し、[ENTER]を押します。 <選択内容> • Shaking Set: シェイキング設定モード • Com Setting: 通信フォーマット設定モード • Volume Down ST: 風量不足お知らせタイミング設定モード • Other Setting: その他の設定モード – 積算稼働時間リセット – 設定データの初期化 •... -
Page 33: シェイキングの設定/操作
集塵機取扱説明書 設置・メンテナンス編 [文書番号] CIM-40002-06 5.3.2 シェイキングの設定/操作 シェイキング設定モードでは、シェイキングの動作に関する設定や、マニュアル操作が行えます。 オートシェイキングのインターバル時間の設定 オートシェイキングを起動させる間隔を設定します。 • 設定範囲: 0~60分 • 初期設定値: 60分 「5.3.1」を参照し、「Shaking Set」を表示します。 2. [ ] を 押 し て 、 「 Interval ***min」を選択します。 Interval ***min 3. [ENTER]を押します。 4. オートシェイキングの起動間隔を設定しま す。 • : 桁を移動 • : 数値を変更 5. -
Page 34: 通信フォーマットの設定
集塵機取扱説明書 設置・メンテナンス編 [文書番号] CIM-40002-06 シェイキングのマニュアル操作 シェイキングは、運転OFF中にマニュアル操作が可能です。 「5.3.1」を参照し、「Shaking Set」を表示します。 2. [ ] を 押 し て 、 「 Shaking Manual」を選択します。 Shaking Manual 3. [ENTER]を押します。 4. ディスプレーに「Shaking Start Y」が 表 示 さ れ て い る こ と を 確 認 し 、 Shaking Start Y [ENTER]を押します。... -
Page 35: 風量不足お知らせタイミングの設定
集塵機取扱説明書 設置・メンテナンス編 [文書番号] CIM-40002-06 5.3.4 風量不足お知らせタイミングの設定 風量不足お知らせタイミングは、初期圧を設定すると自動的に設定されます。 風量不足お知らせタイミング設定モードでは、風量不足警告(WARN4)を表示させるタイミン グを任意に変更できます。 • 設定範囲: 30~70%(5段階切替) • 初期設定値: 50% 「5.3.1」を参照し、「Volume Down ST」を表示します。 2. 現在の設定値を確認します。 <表示例> 3:Down to 50% 設定値が50%のときの場合「3:Down to 50%」を表示します。 3. 設定値を変更する場合は、[ ]を 押して、設定値を選択します。 <風量不足お知らせのタイミング> • 設定値を下げる: 遅くなる • 設定値を上げる: 早くなる 4. [ENTER]を押します。 5. -
Page 36: 積算稼働時間のリセット
集塵機取扱説明書 設置・メンテナンス編 [文書番号] CIM-40002-06 5.3.5 積算稼働時間のリセット 積算稼動時間をリセットします。 「5.3.1」を参照し、「Other Setting」を表示します。 2. [ ] を 押 し て 、 「 Runtime Reset」を選択します。 Runtime Reset 3. [ENTER]を押します。 4. ディスプレーに「Reset Runtime Y」と 表示されたら[ENTER]を押します。 Reset Runtime Y 積算稼働時間がリセットされます。 ※ 積算稼動時間のリセットを中止する場合 は 、 [MODE SELECT] を押 し て く だ さ い。... -
Page 37: 設定値の初期化
集塵機取扱説明書 設置・メンテナンス編 [文書番号] CIM-40002-06 5.3.6 設定値の初期化 設定値の初期化を実行すると、以下の項目が初期化されます。 • 通信フォーマット: 初期設定値 • 風量不足お知らせタイミング: 初期設定値 • 積算稼動時間: リセット • シェイキング設定モード: 初期設定値 「5.3.1」を参照し、「Other Setting」を表示します。 2. [ ]を押して、「Setting Reset」 を選択します。 Setting Reset 3. [ENTER]を押します。 4. ディスプレーに「1:YES」と表示されたら [ENTER]を押します。 1:YES 5. ディスプレーに「1:START」と表示され たら[ENTER]を押します。 1:START 設定値が初期化されます。 ※ 設 定 値 の 初 期 化 を 中 止 す る 場 合 は 、 [MODE SELECT]を押してください。... -
Page 38: 保守・点検
集塵機取扱説明書 設置・メンテナンス編 [文書番号] CIM-40002-06 6 保守・点検 6.1 装置の清掃 清掃時は必ず、電源コードを抜くなど、電路を遮断してください。 電源がオンの状態で作業すると、感電するおそれがあります。 ゼオライトには不純物として石英が含まれております。取り扱い時には、リ スク分析を行ない、粉塵への暴露を最小化する措置を行なって下さい。 例)保護手袋・防塵マスクの着用、換気装置の設置など 1. 洗剤や薬品は使用しないでください。 2. アルコールを装置に直接かけないでください。 装置の外側を、柔らかい布で拭きます。 汚れが落ちない場合は、アルコールで湿らせた布 で拭き取ってください。 2. パッチン錠を解除し、1次フィルター室を開き ます。 3. 1次フィルターを取り外します。 4. 1次フィルター室内を掃除機などで清掃しま す。 5. 1次フィルターを取り付けます。 6. 1次フィルター室を閉じ、パッチン錠で固定し ます。 パッチン錠 1次フィルター 6 保守・点検... -
Page 39: 部品交換時期
集塵機取扱説明書 設置・メンテナンス編 [文書番号] CIM-40002-06 6.2 部品交換時期 名称 交換時期 参照 1次フィルター 警告「WARN2」、「WARN4」が表示されたとき 6.3.1 2次フィルター 1次フィルター交換後、圧力が回復しないとき 6.3.2 排気HEPAフィルター 排気の臭いが気になるとき • 6.3.3 活性炭カセット 警告「WARN5」が表示されたとき • ヒューズ 過電流によりヒューズが切れたとき ブロワー 主電源スイッチ 基本的に交換しないでください。 電源インレット お客様側で交換した場合は、保証対象外となります。 操作パネル、メイン基板 電源基板、中継基板 6.3 フィルターの交換 交換作業時は必ず、電源コードを抜くなど、電路を遮断してください。 電源がオンの状態で作業すると、感電するおそれがあります。 ゼオライトには不純物として石英が含まれております。取り扱い時には、リ スク分析を行ない、粉塵への暴露を最小化する措置を行なって下さい。 例)保護手袋・防塵マスクの着用、換気装置の設置など フィルターは正しく取り付けてください。 フィルターに異常がある状態で運転すると、ブロワー内へ異物が混入し、故 障する恐れがあります。... - Page 40 集塵機取扱説明書 設置・メンテナンス編 [文書番号] CIM-40002-06 3. 新しい1次フィルターにOリングが取り付 O リング けられていることを確認します。 新しい 1次フィルター 4. 新しい1次フィルターのREMOVEステッ REMOVE カーをはがします。 ステッカー 5. 新しい1次フィルターを取り付けます。 6. 1次フィルター室を閉じ、パッチン錠で固定し ます。 7. 初期圧を登録します。(5.2.1) パッチン錠 新しい 1 次フィルター 6 保守・点検...
-
Page 41: 2次フィルターの交換
集塵機取扱説明書 設置・メンテナンス編 [文書番号] CIM-40002-06 6.3.2 2次フィルターの交換 1次フィルター交換後圧力が回復しない場合、或いは3~6か月毎に必要に応じ2次フィルター を交換してください。 2次フィルターの交換は、1次フィルター室を開くことができる十分なスペー 重 要 スがある場所で行ってください。 パッチン錠を解除し、1次フィルター室を開き ます。 2. シェイキングアームが中心で停止している場 合は、端に移動します。 シェイキングアーム 3. シェイキングガードのねじ(2か所)を緩め、 シェイキングガードを取り外します。 4. フィルター押さえ板のねじ( 2か所)を緩 め、フィルター押さえ板を取り外します。 ねじ ねじ フィルター押さえ板 シェイキングガード 5. 2次フィルターを取り外します。 2次フィルター 6 保守・点検... - Page 42 集塵機取扱説明書 設置・メンテナンス編 [文書番号] CIM-40002-06 6. 新しい2次フィルターにOリングが取り付けら O リング れていることを確認します。 新しい 2次フィルター 7. 新しい2次フィルターを取り付けます。 新しい2次フィルター 8. 手順3~4の逆手順で、シェイキングガード とフィルター押さえ板を取り付けます。 9. 1次フィルター室を閉じ、パッチン錠で固定 します。 10. 初期圧を登録します。(5.2.1) シェイキングガード パッチン錠 フィルター押さえ板 6 保守・点検...
-
Page 43: 排気Hepaフィルター、活性炭カセットの交換
集塵機取扱説明書 設置・メンテナンス編 [文書番号] CIM-40002-06 6.3.3 排気HEPAフィルター、活性炭カセットの交換 排気の臭いが気になる場合、警告「WARN5」が表示された場合、或いは6~12か月毎に必要 に応じ排気フィルターと活性炭カセットを交換してください。 重 要 交換作業は十分なスペースがある場所で行ってください。 排気口フタのパッチン錠を解除し、排気口 排気口フタ フタを取り外します。 2. 排気HEPAフィルターを取り出します。 排気HEPA フィルター 3. ACCプレートを持ち上げ、活性炭カセット 活性炭カセット を取り外します。 ACC プレート 6 保守・点検... - Page 44 集塵機取扱説明書 設置・メンテナンス編 [文書番号] CIM-40002-06 4. 新しい活性炭カセットを取り付けます。 新しい活性炭カセット パッキン側が下向きになるよう取り付け パッキン てください。 下側 5. 新しい排気HEPAフィルターを取り付けま 新しい排気HEPAフィルター す。 側面の矢印が上向きになるよう取り付けて ください。 矢印 6. 排気口フタを取り付け、パッチン錠で 排気口フタ パッチン錠 固定します。 6 保守・点検...
-
Page 45: ヒューズの交換(Nrtl認証品を除く)
集塵機取扱説明書 設置・メンテナンス編 [文書番号] CIM-40002-06 6.4 ヒューズの交換(NRTL認証品を除く) 交換作業時は必ず、電源コードを抜くなど、電路を遮断してください。 電源がオンの状態で作業すると、感電するおそれがあります。 内部機器のトラブルによる過電流でヒューズが切れたときは、ヒューズを交換してください。 交換するヒューズは当社指定品になります。 マイナスドライバーのような先の細いものを 差し込み、ヒューズボックスを引き出します。 ヒューズ ボックス 2. ヒューズを取り外します。 3. 新しいヒューズを取り付けます。 • 指定ヒューズ: Littelfuse 218シリーズ [0218010.MXP] ヒューズ 4. ヒューズボックスを元に戻します。 ヒューズ ボックス 6 保守・点検... -
Page 46: ヒューズの交換(Nrtl認証品のみ)
集塵機取扱説明書 設置・メンテナンス編 [文書番号] CIM-40002-06 6.5 ヒューズの交換(NRTL認証品のみ) 交換作業時は必ず、電源コードを抜くなど、電路を遮断してください。 電源がオンの状態で作業すると、感電するおそれがあります。 内部機器のトラブルによる過電流でヒューズが切れたときは、ヒューズを交換してください。 交換するヒューズは当社指定品になります。 安全カバーの上側のねじ(1か所)を緩め、安全カバーをずらし ます。 ※安全カバーの後ろに挟んであるスペーサーを失くさないよ うに注意して下さい 安全カバー 2. 「6.5」に従って、ヒューズを交換します。 3. 安全カバーの後ろにスペーサーを挟んでから、ねじ止めします。 スペーサー スペーサー を挟み込む 6 保守・点検... -
Page 47: トラブルシューティング
集塵機取扱説明書 設置・メンテナンス編 [文書番号] CIM-40002-06 7 トラブルシューティング エラー(ERR)および警告(WARN)が発生すると、操作パネルの異常ランプが点灯/点滅し、ディスプレー に表示データとエラーNo.が交互に表示されます。 「7.1」を参照し、対処してください。 エラー/警告が発生しない不具合の場合は、「7.3」を参照し、対処してください。 7.1 エラー/警告が発生した場合(ERR/WARN) エラー(ERR)/警告(WARN)が発生すると、操作パネルの異常ランプが点灯/点滅し、ディスプ レーに表示データとエラーNo.が交互に表示されます。 複数のエラー/警告が発生している時は、優先順位の高いものが表示されます。 エラー/警告内容を確認し、対処してからエラー/警告をリセットしてください。 エラー発生中の装置 • 運転を継続するエラー/警告の場合: すべてのボタンが有効です。 • 運転を停止するエラー/警告の場合: [ON]が無効になります。 エラー/警告を解除するまで運転は再開できません。 エラー発生時の対処 [MODE SELECT]を押してエラー確認モー ドに 移行 し 、ディ スプ レーに 表示 され るエ 2:ERR04 ラーNo.を確認します。 複数のエラー/警告が発生している時は、エ ラーNo.の左側に件数が表示されます。 2. -
Page 48: エラー・警告一覧
集塵機取扱説明書 設置・メンテナンス編 [文書番号] CIM-40002-06 6. ディスプレーに「ERROR CLEAR Y」と表示 されたら[ENTER]を押します。 ERROR CLEAR Y エラー/警告が解除されます。 WARN6とWARN7は、一度警告を解除すると、主電源スイッチを入れ直 重 要 すまで警告表示されません。 7.2 エラー・警告一覧 異常ランプ点滅: 運転継続 異常ランプ点灯: 運転停止 優先 異常 名称 原因 対処 順位 ランプ ERR03 回転数異常 ブロワーの回転数が下 点滅 「7.3.2」を参照し、対処し • がっている てください。 高 ブロワーが停止している •... -
Page 49: 故障かなと思ったら
集塵機取扱説明書 設置・メンテナンス編 [文書番号] CIM-40002-06 7.3 故障かなと思ったら 7.3.1 ディスプレーが表示しない 原因 対処 参照 電源がONになっていない 主電源スイッチをONにしてください。 ヒューズが切れている ヒューズを交換してください。 上記のいずれも該当しなかっ 直ちに装置を停止し当社までご連絡ください。 – た場合 7.3.2 ブロワーが起動しない、運転中に突然停止した 原因 対処 参照 パッチン錠が外れている パッチン錠で確実に固定してください。 – 1次/2次フィルターが取り付け 1次/2次フィルターを正しく取り付けてくださ られていない い。 過負荷により停止した 1. 以下の点検をし、問題がある場合は対処し – • 異常温度により停止した てください。 • 排気口/吸引口は塞がっていないか •... -
Page 50: 粒子が吹き漏れする
集塵機取扱説明書 設置・メンテナンス編 [文書番号] CIM-40002-06 7.3.4 粒子が吹き漏れする 原因 対処 参照 1次/2次/排気フィルターが正 1次/2次/排気フィルターを取り付け直してく 常に取り付けられていない ださい。 1次/2次/排気フィルターが破 1次/2次/排気フィルターを交換してください。 損している 1次/2次/排気フィルターが寿 1次/2次/排気フィルターを交換してください。 命である 1次/2次/排気フィルターが目 1次/2次/排気フィルターを交換してください。 詰まりしている 上記のいずれも該当しなかっ 直ちに装置を停止し当社までご連絡ください。 – た場合 7.3.5 ブロワーから異音がする 原因 対処 参照 ブロワー内へ異物が混入した 直ちに装置を停止し当社までご連絡ください。 – ブロワーの軸受けが破損した 直ちに装置を停止し当社までご連絡ください。 – 7.3.6 ブロワーが異常振動している 原因 対処... -
Page 51: 消耗品リスト
集塵機取扱説明書 設置・メンテナンス編 [文書番号] CIM-40002-06 8 付録 8.1 消耗品リスト ※ 品名 交換周期 品番 1次フィルター HDF-3535-120-F1-ZEO 3~6か月 2次フィルター CHF-2030-50-F1 排気HEPAフィルター HEP-3220-69 6~12か月 活性炭カセット ACC-3220-100 ※ 交換周期はお客様の使用頻度、シェイキングの頻度、環境、吸い込み濃度(材質と成分)により異なります。 8.2 電気回路図 8.2.1 CBA-1000AT3-HC-DSA-V1(-T/-CE) CBA-1000AT3-HC-DSA-V1(-T/-CE) 8 付録... - Page 52 集塵機取扱説明書 設置・メンテナンス編 [文書番号] CIM-40002-06 8.2.2 CBA-1000AT3-HC-DSA-V1(-UL1/-UL2) CBA-1000AT3-HC-DSA-V1(-UL1/-UL2) 8 付録...
-
Page 53: 海外規格対応
集塵機取扱説明書 設置・メンテナンス編 [文書番号] CIM-40002-06 8.3 海外規格対応 8.3.1 EU規格(適合宣言書) 8 付録... - Page 54 集塵機取扱説明書 設置・メンテナンス編 [文書番号] CIM-40002-06 8.3.2 UL/CSA規格(MET認定証) 8 付録...
- Page 55 集塵機取扱説明書 設置・メンテナンス編 [文書番号] CIM-40002-06 MEMO...
- Page 56 集塵機 取扱説明書 設置・メンテナンス編 第6版:2023.05.01 文書番号:CIM-40002-06 発行元:チコーエアーテック株式会社 ©2023 (許可なしに転載複製を禁ずる。)...
- Page 57 集塵機 取扱説明書 オペレーター編 CBA-1000AT3-HC-DSA-V1 [文書番号] CIM-41002-06 チコーエアーテック株式会社 CHIKO AIRTEC CO., LTD...
- Page 58 集塵機取扱説明書 オペレーター編 [文書番号] CIM-41002-06 はじめに このたびは、レーザーマーカー用集塵機をお買い上げいただき、誠にありがとうございます。 レーザーマーカー用集塵機は、「風の技術」に消臭機能を付加し、コンパクトにまとめた省エネ形のクリーン BOXです。 本書はオペレーター向けに装置の取扱方法を記載しています。 ご使用前に本書をよくお読みいただき、内容を十分に理解してから、正しく使用してください。 • 本書は、必要なときにいつでもご覧になれるよう、お手元で大切に保管してください。 • 本書の内容については万全を期していますが、万一ご不明な点や誤り、お気付きの点がござい ましたら、当社までご連絡ください。 • 本書を紛失または汚損した場合、警告ラベルを損傷した場合は、速やかに当社までご連絡くださ い。 • 記載内容は、改良のため細部において異なることがあります。ご質問などはお気軽に当社まで お問い合わせください。 製品改良のため、本書に記載している仕様の一部を予告なく変更することがあります。 転載・複写について • 本書の著作権は、チコーエアーテック株式会社が所有しています。 • 本書の内容の一部あるいは全部を無断で転載や複写することは固くお断りします。 Copyright © 2023 CHIKO AIRTEC All Rights Reserved はじめに...
- Page 59 集塵機取扱説明書 オペレーター編 [文書番号] CIM-41002-06 安全に関する表示 本取扱説明書の中で、作業者の事故防止と装置の損傷防止などのため、下記に示す絵表示とシグナル ワードによる注意事項などを記載しています。 危険、警告、注意は装置を正しく使用し、所定の性能を得るために必要な情報です。 常に遵守してください。 本文中の表示 表示内容を無視して誤った使い方をしたときに生じる危害や損害の程度を、下記の表示で区分し、説明し ています。 取扱いを誤った場合、死亡または重傷を負う危険な状態が生じることが想定され、かつ危 険発生時の警告の緊急性(切迫の度合)が高い限定的の場合 取扱いを誤った場合、死亡または重傷を負う危険な状態が生じることが想定される場合 取扱いを誤った場合、傷害を負う危険な状態が生じることが想定される場合 取扱いを誤った場合、物的損害のみ生じることが想定される場合 図記号の説明 お守りいただく内容の種類を次の表示で区分し、説明しています。 禁止 装置の取扱いにおいて、その行為を する内容 強制 装置の取扱いにおいて、必ず実行していただく する内容 その他、知っていると役立つ事項などを、次の表示で区別し、説明しています。 重 要 本機の機能を十分に発揮するための情報 メ モ 装置を取扱う上で知っていると役に立つ事項 凡例 参照先 本書内に参照先がある場合は「章番号/節番号」または(章番号/節番号)、(Pページ番号)で表記します。 例) 装置の起動方法については「4.1」を参照してください。 装置を起動します。(4.1) 交換部品を点検します。(P10) 安全に関する表示...
- Page 60 (4) 当社製品以外の装置による故障 (5) 当社以外の分解、改造、修理による故障 (6) 自然災害や想定外の外的要因による故障 (7) 出荷時の科学、技術水準では予見できない事由による故障 (8) その他、当社の責任に起因しない故障 3. 保証の対象 保証は、当社と最初にご契約したお客様に適用されます。 転売後のお客様は保証の対象外となります。 4. 責任の制限 当社は、故障によって生じるいかなる損害に関して、一切の責任を負いかねます。 5. 仕様の変更 改良のため、本書に記載している仕様を予告なく変更することがあります。 6. サービス範囲 技術者派遣の費用は、製品販売価格に含まれていません。 ご希望に応じて、別途相談させていただきます。 アフターサービス 装置に関するお問い合わせは、「型番」「製造番号」「弊社受注番号」をお控えのうえ、当社までご連絡くだ さい。 チコーエアーテック株式会社 〒562-0012 大阪府箕面市白島2丁目27-24 <お問い合わせ先> TEL: 072-720-5151 [受付時間] 9:00~18:00(土日祝休み) FAX: 072-720-5133 URL: https://chiko-airtec.jp/ 保証とアフターサービスについて...
- Page 61 集塵機取扱説明書 オペレーター編 [文書番号] CIM-41002-06 もくじ はじめに ....................1 転載・複写について ..................1 安全に関する表示 ..................2 凡例 ......................2 保証とアフターサービスについて ..............3 1 製品使用上のご注意 ................5 1.1 安全警告表示 ........................5 1.2 装置の安全対策 ........................6 1.2.1 装置の非常停止 ............................6 1.3 安全上のご注意 ........................7 1.3.1 各作業に共通のご注意 ........................... 7 1.3.2 運転時のご注意...
-
Page 62: 製品使用上のご注意
集塵機取扱説明書 オペレーター編 [文書番号] CIM-41002-06 1 製品使用上のご注意 1.1 安全警告表示 作業者の事故防止のため、重要安全注意情報として下記の警告ラベルを貼っています。 重 要 警告ラベルが汚損/破損した場合は、速やかに当社までお問い合わせください。 高温警告シール ヒューズ定格ラベル 高電圧警告シール 注意喚起シール 分解禁止シール ネームプレート MET認証ラベル 高電圧警告シール ネームプレート 高温度警告シール MET認証ラベル (NRTL認証品のみ) 注意喚起シール ヒューズ定格ラベル 分解禁止シール (NRTL認証品のみ) (NRTL認証品のみ) 1 製品使用上のご注意... -
Page 63: 装置の安全対策
集塵機取扱説明書 オペレーター編 [文書番号] CIM-41002-06 1.2 装置の安全対策 1.2.1 装置の非常停止 装置の異常動作や緊急事態が発生した場合 は、主電源スイッチをOFFにして装置を停止し てください。 非常停止の実行 主電源スイッチをOFFにします。 装置が即時停止します。 ※ リモート接続の際は、操作パネルは操作できません。 装置の再起動 装置を再起動する前に、必ず異常原因を取り除いてください。 主電源スイッチをONにします。 装置が正常に動作していることを確認してください。 1 製品使用上のご注意... -
Page 64: 安全上のご注意
集塵機取扱説明書 オペレーター編 [文書番号] CIM-41002-06 1.3 安全上のご注意 1.3.1 各作業に共通のご注意 ご使用になる前に取扱説明書をよく読み、十分に理解してから作業してください。 すべての警告および注意を遵守し、正しくご使用ください。 本書に書かれていない方法、目的のために、装置を運転しないでください。 事故につながる恐れがあります。 装置の運転、操作、点検は、必ず訓練を受けた有資格者が行ってください。 許可された作業者に対し、書面化することを推奨します。 装置に直接水をかけないでください。 漏電、感電の恐れがあります。 装置または電気系統に異常が発生した場合は、直ちに電路遮断し、当社までご連 絡ください。 異常がある装置を使用すると、事故につながる恐れがあります。 装置を分解、修理、改造しないでください。 感電や怪我をする恐れがあります。 内部の点検や修理は、お買い上げになった販売店にご連絡ください。 装置は、事業用電気工作物への接続を想定して設計しておりますので、一般用電 気工作物へは、接続しないでください。 電源コードをコンセントに差し込む際は、必ずアース接地をしてください。 アース接地をしないと、漏電した場合に感電する恐れがあります。 装置の廃棄方法は、自治体のルールに従い、産業廃棄物として適切に処分してく ださい。 1 製品使用上のご注意... -
Page 65: 運転時のご注意
集塵機取扱説明書 オペレーター編 [文書番号] CIM-41002-06 1.3.2 運転時のご注意 粉塵爆発のおそれのない乾いた粉塵の吸引に使用してください。 <爆発性粉塵> アルミニウム、マグネシウム、チタン、亜鉛、コバルト、ニッケル、小麦粉など 引火性、爆発性、腐食物質の霧、煙、ガスが滞留している場所や周囲で、装置の運 転や吸引をしないでください。 ケーブルを無理に曲げたり、引っ張ったりしないでください。 火災や感電の恐れがあります。 装置の運転、操作、点検は、必ず訓練を受けた有資格者が行ってください。 許可された作業者に対し、書面化することを推奨します。 装置に直接水をかけないでください。 漏電、感電の恐れがあります。 装置または電気系統に異常が発生した場合は、直ちに電路遮断し、当社までご連 絡ください。 異常がある装置を使用すると、事故につながる恐れがあります。 装置の運転中は、装置を移動しないでください。 停電や装置が意図せず停止した場合は、電路を遮断してください。 装置が不意に動き出すと、事故につながる恐れがあります。 1 製品使用上のご注意... -
Page 66: 仕様および外観
集塵機取扱説明書 オペレーター編 [文書番号] CIM-41002-06 2 仕様および外観 2.1 装置仕様 CBA-1000AT3-HC-DSA-V1 型式 /-UL1 -CE/-UL2 出力 500W ※1 100V 単相 電圧 200V 単相 220-230V 単相 100-115V 単相(UL1) 電流値 7.8A 4.9A 4.5A 短絡電流定格 100A 周波数 50/60Hz 3.2m /min 最大吸込風量 (ゼオライト付着時:2.7-2.9m /min) 最大吸込静圧 9.3-9.5kPa ※2 騒音値... -
Page 67: 装置外観および各部の名称
集塵機取扱説明書 オペレーター編 [文書番号] CIM-41002-06 2.2 装置外観および各部の名称 番号 名称 働き 1次フィルター室 1次フィルターを収納します。 吸込口(脱着フランジ) 吸気ダクトを接続します。 排気フィルター室 活性炭カセットおよび排気HEPAフィルターを収納します。 排気口(脱着フランジ) 排気ダクトを接続します。 操作パネル(AT3パネル) 本機を操作します。 主電源スイッチ 装置の電源のON/OFFを切り替えます。 ヒューズを収納します。 ヒューズボックス NRTL認証品のみ、安全カバーが付いています。 電源インレット 電源ケーブルを接続します。 リモートコネクター リモートケーブル(別売)を接続します。 2 仕様および外観... -
Page 68: 操作パネル(At3パネル
集塵機取扱説明書 オペレーター編 [文書番号] CIM-41002-06 2.3 操作パネル(AT3パネル) 番号 名称 働き 参照 ディスプレー 運転状態や各種設定内容を表示します。 エラー・警告発生時は、エラー・警告No.を表示します。 能力レベルランプ 能力レベルを緑色のランプで表示します。(レベル1~7) 停止中、運転中: ボタン • ディスプレーの表示内容を切り替えます。 セレクトモード時: • 設定項目の切り替え、設定する数値データを変更します。 異常ランプ エラー発生時に、赤色ランプが点灯/点滅します。 ランプ点灯: 運転を停止するエラーが発生しています。 • ランプ点滅: 運転を継続するエラー、警告が発生しています。 • 運転中: • ボタン ボタンを押すと、能力が1レベルずつ降下/上昇します。 セレクトモード時: • ボタンを押すと、カーソルが1つずつ左/右に移動します。 OFFボタン 運転を停止します。 OFFボタンは長押し(3秒以上)しないでくだ 重... -
Page 69: 始業前点検
集塵機取扱説明書 オペレーター編 [文書番号] CIM-41002-06 3 運転 本章では、装置の運転方法について説明します。 作業前に本章と「1.3」(P7)をよく読み、十分に理解してから作業してください。 装置の運転中は、装置を移動しないでください。 停電や装置が意図せず停止した場合は、電路を遮断してください。 装置が不意に動き出すと、事故につながる恐れがあります。 3.1 始業前点検 項目 チェック フィルター室は完全に閉じている。 吸込口は塞がれていない。 排気口は塞がれていない。 装置の周囲に引火性物質はなく、吸引も行わない。 ガソリン、シンナー、ベンジン、灯油、塗料など • 装置の周囲に爆発性粉塵はなく、吸引も行わない。 アルミニウム、マグネシウム、チタン、亜鉛、ニッケル、コバルト、小麦粉など • 装置の周囲で火花を含む粉塵を発生させる作業は行われておらず、吸引 も行わない。 高速切断機、グラインダー、溶接機などを使用する作業 • 装置の周囲に火種はなく、吸引も行わない。 たばこ、油、液体の薬品など • 装置の周囲に水や液体はなく、吸引も行わない。 40℃以上の粉塵はない。 使用場所の雰囲気温度は 0~40℃の範囲内である。 配管に異常はないか。(異物などが詰まっていないか) 各種エラー表示が出ていないか。 3 運転... -
Page 70: 装置の起動
集塵機取扱説明書 オペレーター編 [文書番号] CIM-41002-06 3.2 装置の起動 3分以上のインターバルをおいて、操作パネルのON/OFF操作を行ってく ださい。 3分未満、特に30秒未満で操作パネルのON/OFF操作を繰り返すと、故障 の原因になります。 ※リモート操作、通信機能による操作でも同様です。 OFFボタンは長押し(3秒以上)しないでください。 重 要 登録されている初期圧がクリアされます。 主電源スイッチをONにします。 2. ディスプレーにプログラムバージョンと通 ディスプレー 信用のID番号が表示されていることを確 認します。 Ver*.** ID.** 3. 操作パネルの[ON]を押し、装置の運転を 開始します。 4. 正常に動作していることを確認します。 能力レベルランプ • 異常音がない • 吸引が適切である 5. 能力レベルランプを確認し、必要とする吸 引能力が異なる場合は[ ]で吸引レベルを設定します。 ※ リモート接続の際は、操作パネルは操作できません。 3.3 装置の停止 操作パネルの[OFF]を押し、装置の運転を停止します。... -
Page 71: ディスプレーの表示内容
集塵機取扱説明書 オペレーター編 [文書番号] CIM-41002-06 3.4 ディスプレーの表示内容 3.4.1 装置情報の確認(運転OFF) プログラムバージョン、 Ver*.** ID.** RS-485通信用局番 3.4.2 運転状態の確認(運転ON) 運転ON時に[ ]を押すと、運転状態が確認できます。 **.**kPa 外部圧 **.**kPa 吸込圧 **.**kPa 差圧 **.**kPa 排気圧 Blower ***.* C ブロワー周辺温度 Motor ******rpm ブロワー回転数 積算稼働時間 Runtime ******h リセット後からの稼働時間を 表示します。 実働時間 Total ******h トータルの稼働時間を表示します。 3 運転... -
Page 72: シェイキング(塵落とし機能)の設定/操作
集塵機取扱説明書 オペレーター編 [文書番号] CIM-41002-06 3.5 シェイキング(塵落とし機能)の設定/操作 シェイキングの動作に関する設定やマニュアル操作は、シェイキング設定モードで行います。 3.5.1 シェイキング設定モードの表示 操作パネルの[OFF]を押し、装置の運転 を停止します。 2. [MODE SELECT]を押します。 3. [ ]を押して、「Shaking Set」を 選択します。 Shaking Set 4. [ENTER]を押します。 3.5.2 オートシェイキングのインターバル時間の設定 オートシェイキングを起動させる間隔を設定します。 • 設定範囲: 0~60分 • 初期設定値: 60分 「3.5.1」を参照し、「Shaking Set」を表示します。 2. [ ] を 押 し て 、 「 Interval ***min」を選択します。... -
Page 73: シェイキング稼働時間の設定
集塵機取扱説明書 オペレーター編 [文書番号] CIM-41002-06 6. [MODE SELECT]を押して、通常モー ドに戻ります。 3.5.3 シェイキング稼働時間の設定 オートシェイキング起動後、シェイキングの稼動時間を設定します。 • 設定範囲: 20~180秒 • 初期設定値: 20秒 「3.5.1」を参照し、「Shaking Set」を表示します。 2. [ ] を 押 し て 、 「 ShakeTime ***sec」を選択します。 ShakeTime ***sec 3. [ENTER]を押します。 4. シェイキングの稼働時間を設定します。 • ]: 桁を移動 • ]:... -
Page 74: 異常ランプが点灯した場合
集塵機取扱説明書 オペレーター編 [文書番号] CIM-41002-06 4. ディスプレーに「Shaking Start Y」が 表 示 さ れ て い る こ と を 確 認 し 、 Shaking Start Y [ENTER]を押します。 シェイキング動作が開始します。 5. [MODE SELECT]を押して、通常モー ドに戻ります。 3.6 異常ランプが点灯した場合 装置に異常が発生しています。 直ちに装置を停止し、メンテナンス担当者または当社までお問い合わせください。 3 運転... - Page 75 集塵機取扱説明書 オペレーター編 [文書番号] CIM-41002-06 MEMO...
- Page 76 集塵機 取扱説明書 オペレーター編 第6版:2023.05.01 文書番号:CIM-41002-06 発行元:チコーエアーテック株式会社 ©2023 (許可なしに転載複製を禁ずる。)...
- Page 77 Dust Collector Instruction Manual for Installation and Maintenance CBA-1000AT3-HC-DSA-V1 Document No.: CIM-40002-06 CHIKO AIRTEC CO., LTD.
-
Page 78: Reprinting And Copying
Reprinting and Copying • This manual is copyrighted by CHIKO AIRTEC CO., LTD. • Unauthorized reprinting or copying of part or all of this manual is strictly prohibited. Copyright © 2023 CHIKO AIRTEC All Rights Reserved... -
Page 79: Safety-Related Symbols
Dust Collector Instruction Manual for Installation and Maintenance Document No.: CIM-40002-06 Safety-Related Symbols This manual contains instructions indicated by the symbols and signal words listed below to prevent worker accidents and damage to the machine. Instructions marked DANGER, WARNING, or CAUTION are information necessary in order to use the machine correctly and to ensure the desired performance. -
Page 80: Warranty And After-Sales Service
Please contact us if you need such service. After-Sales Service For inquiries about the machine, please contact us with the model number, serial number, and sales order number. CHIKO AIRTEC CO., LTD. 2-27-24, Hakunoshima, Minoh-shi, Osaka, 562-0012 Japan Contact Information... - Page 81 Dust Collector Instruction Manual for Installation and Maintenance Document No.: CIM-40002-06 Table of Contents 4.3 Configuring the Machine ........26 INTRODUCTION ........... 1 4.4 Stopping the Machine ..........26 REPRINTING AND COPYING ......1 5 CONFIGURING SETTINGS AND CHECKING SAFETY-RELATED SYMBOLS ......2 INFORMATION ........
- Page 82 Dust Collector Instruction Manual for Installation and Maintenance Document No.: CIM-40002-06 8.2 Electrical Circuit Diagram ........50 8.3 Compliance with International Standards .... 52 8.2.1 CBA-1000AT3-HC-DSA-V1(-T/-CE) ........50 8.3.1 EU Standards (Declaration of Conformity) ......52 8.2.2 CBA-1000A3-HC-DSA-V1(-UL1/-UL2) ........51 8.3.2 UL/CSA Standards (MET Certificate) ........53...
-
Page 83: Precautions For Using The Product
Dust Collector Instruction Manual for Installation and Maintenance Document No.: CIM-40002-06 1 Precautions for Using the Product Safety Warning Labels The warning labels shown below are attached to the machine to provide important safety information that helps prevent worker accidents. Important If a warning label is defaced or damaged, please contact us immediately. -
Page 84: Safety Measures For The Machine
Dust Collector Instruction Manual for Installation and Maintenance Document No.: CIM-40002-06 1.2 Safety Measures for the Machine 1.2.1 Stopping the Machine in an Emergency If the machine malfunctions or an emergency occurs, turn off the main power switch to stop the machine. -
Page 85: Safety Precautions
Dust Collector Instruction Manual for Installation and Maintenance Document No.: CIM-40002-06 Safety Precautions 1.3.1 General Precautions WARNING Carefully read this manual and fully understand all instructions before beginning work. Observe all warnings and cautions and use the machine correctly. Do not operate the machine in a manner or for a purpose not specified in this manual. Doing so may result in an accident. -
Page 86: Precautions For Installation
Dust Collector Instruction Manual for Installation and Maintenance Document No.: CIM-40002-06 WARNING Use transportation equipment (such as slings, cranes, and forklifts) that has been inspected and maintained, and has adequate capacity for the load of the machine. 1. When hoisting the machine, use the appropriate lifting points. 2. -
Page 87: Precautions For Operation
Dust Collector Instruction Manual for Installation and Maintenance Document No.: CIM-40002-06 NOTE Use an appropriately sized pipe for the suction port. Using a thin pipe for the suction port may cause the motor to become hot due to increased pressure. Install the machine in a dust-free environment of 40°C or lower. -
Page 88: Precautions For Cleaning And Maintenance
Dust Collector Instruction Manual for Installation and Maintenance Document No.: CIM-40002-06 1.3.5 Precautions for Cleaning and Maintenance WARNING Always unplug the power cord or otherwise turn off the power before cleaning. Failure to do so may cause electric shock. Be sure to use genuine replacement parts specified by us. We cannot guarantee against malfunctions caused by using non-specified parts. -
Page 89: Specifications And Appearance
Dust Collector Instruction Manual for Installation and Maintenance Document No.: CIM-40002-06 2 Specifications and Appearance 2.1 Machine Specifications CBA-1000AT3-HC-DSA-V1 Model /-UL1 -CE/-UL2 Power 500W 100V, single phase 220–230V, Voltage 200V, single phase 100–115V, single(UL1) single phase Current value 7.8A 4.9A 4.5A... -
Page 90: Exterior Features
Dust Collector Instruction Manual for Installation and Maintenance Document No.: CIM-40002-06 2.2 Exterior Features Name Function Primary filter chamber Contains the primary filter. Suction port Connect an intake duct. (removable flange) Exhaust filter chamber Houses an activated carbon cassette and exhaust HEPA filter. Exhaust port Connect an exhaust duct. -
Page 91: Items Included
Dust Collector Instruction Manual for Installation and Maintenance Document No.: CIM-40002-06 2.3 Items Included 100V 220–230V(for Model -CE) 200V(for Model -T) 100-115V(for Model -UL1) 220-230V(for Model -UL2) Name Function Primary filter Collects and adsorbs dust and fumes. Secondary filter Protects electrical and electronic components from dust. Activated carbon Absorbs odors. -
Page 92: Control Panel (At3 Panel)
Dust Collector Instruction Manual for Installation and Maintenance Document No.: CIM-40002-06 2.4 Control Panel (AT3 Panel) Name Function Display Displays operating status and various settings. Also displays an error or warning number when an error or warning has occurred. Suction level The suction level is indicated by green lights. -
Page 93: Removable Flanges (Optional)
Dust Collector Instruction Manual for Installation and Maintenance Document No.: CIM-40002-06 2.5 Removable Flanges (Optional) Use removable flanges of the appropriate size for the intake pipe to be used. Flange Diameter (mm) Part Number ⌀38 FRJ-D-38-35-108 ⌀50 FRJ-D-50-35-108 ⌀65 FRJ-D-65-35-108 ⌀75 (standard) FRJ-D-75-35-108 2.6 Remote Cable (Optional) -
Page 94: Standard Connection Diagram
Dust Collector Instruction Manual for Installation and Maintenance Document No.: CIM-40002-06 2.6.3 Standard Connection Diagram Dust collector side Customer’s equipment side Relay Fault output signal Internal circuit Relay Operation output signal ON during operation Relay Filter clogging output signal Output voltage: +1 to 5 V Operating pressure signal Applied voltage: +1 to 5 V... - Page 95 Dust Collector Instruction Manual for Installation and Maintenance Document No.: CIM-40002-06 Connection Examples Pins 1 and 4 (input) Dust collector side Customer’s equipment side Do not apply voltage. Pin 1 or 4 Pin 8 Pin 2 (analog output) Dust collector side Customer’s equipment side Measuring...
-
Page 96: Pin Assignment
Dust Collector Instruction Manual for Installation and Maintenance Document No.: CIM-40002-06 2.6.4 Pin Assignment Wire Color Signal Name Description Black Operation input Remote Short-circuit pins 4 and 8 and then short- signal signal(*1) circuit pin 1 to start operation. (input) Red/white Remote control Short-circuit pins 4 and 8 to switch to... -
Page 97: Communication Feature (Optional)
Dust Collector Instruction Manual for Installation and Maintenance Document No.: CIM-40002-06 2.7 Communication Feature (Optional) The communication board set (model: RS-485 or RS-EN) can be used to operate or stop the machine, change the suction level, and otherwise control the machine. It also allows you to read out information indicating problems such as clogging and insufficient pressure. -
Page 98: Installation
To ensure safety during use and to maximize the performance of the machine, install it in a location that meets the conditions below. Power Supply Use a power supply rated for Overvoltage Category II. CBA-1000AT3-HC-DSA-V1 Model /-UL1 -CE/-UL2 100V, single phase... -
Page 99: How To Install The Machine
Dust Collector Instruction Manual for Installation and Maintenance Document No.: CIM-40002-06 3.2 How to Install the Machine 1. Be sure to shut off the power before installation. Failure to do so may cause electric shock. WARNING 2. Install the machine in a location that meets environmental requirements. Failure to do so may result in unexpected accidents. -
Page 100: Wiring And Piping
Dust Collector Instruction Manual for Installation and Maintenance Document No.: CIM-40002-06 3.3 Wiring and Piping Be sure to shut off the power before wiring or piping work. Failure to do so may cause electric shock. WARNING 3.3.1 Wiring 1. Do not bend or pull any cables too hard. Doing so may cause fire or electric shock. -
Page 101: Removing The Remove Sticker
Dust Collector Instruction Manual for Installation and Maintenance Document No.: CIM-40002-06 3.3.2 Removing the REMOVE Sticker Follow the steps below to remove the REMOVE sticker. Zeolite contains quartz as an impurity. When handling, perform a risk analysis and take measures to minimize exposure to dust. Example) Wearing protective gloves and dust masks, installation of WARNING ventilation equipment, etc. -
Page 102: Operation
Dust Collector Instruction Manual for Installation and Maintenance Document No.: CIM-40002-06 4 Operation This chapter describes how to operate the machine. Before you begin, carefully read this chapter and “1.3” (p.8), and fully understand all instructions. Do not move the machine while it is in operation. If the power fails or the machine stops unexpectedly, shut off the power. -
Page 103: Starting The Machine
Dust Collector Instruction Manual for Installation and Maintenance Document No.: CIM-40002-06 4.2 Starting the Machine Please operate the control panel ON/OFF after an interval of at least 3 minutes. Repeated ON/OFF operation of the control panel within 3 minutes, especially NOTE within 30 seconds, may cause malfunction. -
Page 104: Configuring Settings And Checking
Dust Collector Instruction Manual for Installation and Maintenance Document No.: CIM-40002-06 5 Configuring Settings and Checking Information The control panel allows you to configure various machine settings and check the error history. 5.1 Screen Transitions on the Control Panel 5.1.1 Screen Transitions for Different Modes Normal Mode Machine... -
Page 105: Checking Operating Status (During Operation)
Dust Collector Instruction Manual for Installation and Maintenance Document No.: CIM-40002-06 5.1.3 Checking Operating Status (During Operation) Press [ ] during operation to check operating status. OP **.**kPa External pressure SP **.**kPa Suction pressure DP **.**kPa Differential pressure EP **.**kPa Exhaust pressure Blower ***.* C Blower ambient temperature... -
Page 106: Registering And Clearing Initial Pressure
Dust Collector Instruction Manual for Installation and Maintenance Document No.: CIM-40002-06 5.2 Registering and Clearing Initial Pressure • When starting the machine for the first time, be sure to register the initial pressure. Operating the machine without registering initial pressure will cause the “WARN6” Important warning (initial pressure not registered) to appear. -
Page 107: Clearing The Initial Pressure
Dust Collector Instruction Manual for Installation and Maintenance Document No.: CIM-40002-06 5.2.2 Clearing the Initial Pressure Press [OFF] on the control panel to stop the machine. Press and hold [OFF] for 3 seconds. When the display shows “Initial DP Clr Y”, press [ENTER]. -
Page 108: Configuring Settings
Dust Collector Instruction Manual for Installation and Maintenance Document No.: CIM-40002-06 5.3 Configuring Settings 5.3.1 Displaying Setup Modes You can display each mode from the Mode Select screen. Press [OFF] on the control panel to stop the machine. Press [MODE SELECT]. Press [ ] to select the mode you want to display, and press [ENTER]. -
Page 109: Configuring Shaking Settings And Performing Shaking
Dust Collector Instruction Manual for Installation and Maintenance Document No.: CIM-40002-06 5.3.2 Configuring Shaking Settings and Performing Shaking Shaking Setup mode allows you to configure shaking settings and to perform shaking manually. Setting the Interval Time for Auto-Shaking Set the interval at which you want to activate auto-shaking. •... -
Page 110: Configuring Communication Format Settings
Dust Collector Instruction Manual for Installation and Maintenance Document No.: CIM-40002-06 Performing Shaking Manually Shaking can be performed manually during non-operation. Display [Shaking Set] by referring to “5.3.1”. Press [ ] to select [Shaking Manual]. Press [ENTER]. Check that [Shaking Start Y] is shown on the display, and press [ENTER]. -
Page 111: Setting When To Display Insufficient Airflow Notifications
Dust Collector Instruction Manual for Installation and Maintenance Document No.: CIM-40002-06 5.3.4 Setting When to Display Insufficient Airflow Notifications The insufficient airflow notification timing is set automatically when the initial pressure is set. In Insufficient Airflow Notification Timing Setup mode, you can change when to display the insufficient-airflow warning (WARN4), as desired. -
Page 112: Resetting The Cumulative Operating Hours
Dust Collector Instruction Manual for Installation and Maintenance Document No.: CIM-40002-06 5.3.5 Resetting the Cumulative Operating Hours Follow the steps below to reset the cumulative operating hours. Display [Other Setting] by referring to “5.3.1”. Press [ ] to select [Runtime Reset]. Runtime Reset Press [ENTER]. -
Page 113: Initializing Settings
Dust Collector Instruction Manual for Installation and Maintenance Document No.: CIM-40002-06 5.3.6 Initializing Settings Performing this procedure initializes the settings for the following items: • Communication format: Default • Insufficient airflow notification timing: Default • Cumulative operating hours: Reset • Shaking Setup mode: Default Display [Other Setting] by referring to “5.3.1”. -
Page 114: Maintenance And Inspection
Dust Collector Instruction Manual for Installation and Maintenance Document No.: CIM-40002-06 6 Maintenance and Inspection 6.1 Cleaning the Machine Always unplug the power cord to shut down the electric path before cleaning. Otherwise, it may cause electric shock. Zeolite contains quartz as an impurity. When handling, perform a risk analysis WARNING and take measures to minimize exposure to dust. -
Page 115: When To Replace Parts
Dust Collector Instruction Manual for Installation and Maintenance Document No.: CIM-40002-06 6.2 When to Replace Parts Name When to Replace When the “WARN2” or “WARN4” warning is Primary filter 6.3.1 displayed When the pressure fails to recover after the Secondary filter 6.3.2 primary filter is replaced Exhaust HEPA filter... - Page 116 Dust Collector Instruction Manual for Installation and Maintenance Document No.: CIM-40002-06 Make sure that an O-ring is seated on the O-ring new primary filter. New primary filter Remove the REMOVE sticker from the new REMOVE primary filter. sticker Install the new primary filter. Close the primary filter chamber and lock it with the snap locks.
-
Page 117: Replacing The Secondary Filter
Dust Collector Instruction Manual for Installation and Maintenance Document No.: CIM-40002-06 6.3.2 Replacing the Secondary Filter If pressure fails to recover after the primary filter is replaced, or every 3 to 6 months as necessary, replace the secondary filter. Replace the secondary filter in a location with enough space to open the primary Important filter chamber. - Page 118 Dust Collector Instruction Manual for Installation and Maintenance Document No.: CIM-40002-06 Make sure that an O-ring is seated on the new O-ring secondary filter. secondary filter Install the new secondary filter. New secondary filter Install the shaking guard and filter retaining plate, reversing Steps 3 and 4.
-
Page 119: Replacing The Exhaust Hepa Filter And Activated Carbon
Dust Collector Instruction Manual for Installation and Maintenance Document No.: CIM-40002-06 6.3.3 Replacing the Exhaust HEPA Filter and Activated Carbon Cassette If an exhaust odor is noticeable, if the “WARN5” warning is displayed or every 6 to 12 months as necessary, replace the exhaust HEPA filter and activated carbon cassette. - Page 120 Dust Collector Instruction Manual for Installation and Maintenance Document No.: CIM-40002-06 Install a new activated carbon cassette. New activated Make sure that the gasket is facing down. carbon cassette Gasket Bottom side Install a new exhaust HEPA filter. New exhaust HEPA filter Make sure that the arrow on the side is pointing up.
-
Page 121: Replacing The Fuse (Excluding The Nrtl Certified Products)
Dust Collector Instruction Manual for Installation and Maintenance Document No.: CIM-40002-06 6.4 Replacing the Fuse (Excluding the NRTL certified products) Always unplug the power cord to shut down the electric path before replacement. WARNING Otherwise, it may cause electric shock. Replace the fuse if it has blown due to an overcurrent caused by an internal reason. -
Page 122: Replacing The Fuse (The Nrtl Certified Products Only)
Dust Collector Instruction Manual for Installation and Maintenance Document No.: CIM-40002-06 6.5 Replacing the Fuse (the NRTL certified products only) Always unplug the power cord to shut down the electric path before replacement. WARNING Otherwise, it may cause electric shock. Replace the fuse if it has blown due to an overcurrent caused by an internal reason. -
Page 123: Troubleshooting
Dust Collector Instruction Manual for Installation and Maintenance Document No.: CIM-40002-06 7 Troubleshooting If an error (ERR) or warning (WARN) occurs, the error indicator on the control panel lights up or flashes, and the display alternately shows relevant data and the error number. See “7.1”... -
Page 124: List Of Errors And Warnings
Dust Collector Instruction Manual for Installation and Maintenance Document No.: CIM-40002-06 When the display shows “ERROR CLEAR Y”, press [ENTER]. This clears the errors or warnings. Once WARN6 or WARN7 has been cleared, no warnings are displayed until the Important main power switch is turned back on. -
Page 125: Troubleshooting
Dust Collector Instruction Manual for Installation and Maintenance Document No.: CIM-40002-06 7.3 Troubleshooting 7.3.1 Nothing Appears on the Display Cause Solution The machine is not turned on. Turn on the main power switch. The fuse is blown. Replace the fuse. Neither of the above applies. -
Page 126: Dust Leaks Out
Dust Collector Instruction Manual for Installation and Maintenance Document No.: CIM-40002-06 7.3.4 Dust Leaks Out Cause Solution The primary/secondary/exhaust Reinstall the primary/secondary/exhaust filter. filter is not installed properly. The primary/secondary/exhaust Replace the primary/secondary/exhaust filter. filter is damaged. The primary/secondary/exhaust Replace the primary/secondary/exhaust filter. filter has reached the end of service life. -
Page 127: Appendix
Exhaust HEPA filter HEP-3220-69 6 to 12 months Activated carbon cassette ACC-3220-100 The replacement cycle depends on the frequency of use, frequency of shaking, environment, and suction concentration (material and composition). 8.2 Electrical Circuit Diagram 8.2.1 CBA-1000AT3-HC-DSA-V1(-T/-CE) CBA-1000AT3-HC-DSA-V1(-T/-CE) 8 Appendix Original instruction... -
Page 128: Cba-1000A3-Hc-Dsa-V1(-Ul1/-Ul2)
Dust Collector Instruction Manual for Installation and Maintenance Document No.: CIM-40002-06 8.2.2 CBA-1000A3-HC-DSA-V1(-UL1/-UL2) CBA-1000AT3-HC-DSA-V1(-UL1/-UL2) 8 Appendix Original instruction... -
Page 129: Compliance With International Standards
Dust Collector Instruction Manual for Installation and Maintenance Document No.: CIM-40002-06 8.3 Compliance with International Standards 8.3.1 EU Standards (Declaration of Conformity) 8 Appendix Original instruction... -
Page 130: Ul/Csa Standards (Met Certificate)
Dust Collector Instruction Manual for Installation and Maintenance Document No.: CIM-40002-06 8.3.2 UL/CSA Standards (MET Certificate) 8 Appendix Original instruction... - Page 131 Dust Collector Instruction Manual for Installation and Maintenance Document No.: CIM-40002-06 Notes...
-
Page 132: Document No.: Cim-40002-06
Dust Collector Instruction Manual for Installation and Maintenance 6th edition: May 01, 2023 Document No.: CIM-40002-06 Published by CHIKO AIRTEC CO., LTD. ©2023 (Reproduction without permission is prohibited.) - Page 133 Dust Collector Instruction Manual for Operators CBA-1000AT3-HC-DSA-V1 Document No.: CIM-41002-06 CHIKO AIRTEC CO., LTD.
- Page 134 Reprinting and Copying • This manual is copyrighted by CHIKO AIRTEC CO., LTD. • Unauthorized reprinting or copying of part or all of this manual is strictly prohibited. Copyright © 2023 CHIKO AIRTEC All Rights Reserved...
- Page 135 Dust Collector Instruction Manual for Operators Document No.: CIM-41002-06 Safety-Related Symbols This manual contains instructions indicated by the symbols and signal words listed below to prevent worker accidents and damage to the machine. Instructions marked DANGER, WARNING, or CAUTION are information necessary in order to use the machine correctly and to ensure the desired performance.
- Page 136 Please contact us if you need such service. After-Sales Service For inquiries about the machine, please contact us with the model number, serial number, and sales order number. CHIKO AIRTEC CO., LTD. 2-27-24, Hakunoshima, Minoh-shi, Osaka 562-0012, Japan Contact Information Phone: +81-72-720-5151 Business hours: 9:00 a.m.
- Page 137 Dust Collector Instruction Manual for Operators Document No.: CIM-41002-06 Table of Contents INTRODUCTION ........................1 REPRINTING AND COPYING....................1 SAFETY-RELATED SYMBOLS ....................2 CONVENTIONS ........................2 WARRANTY AND AFTER-SALES SERVICE ................3 1 PRECAUTIONS FOR USING THE PRODUCT ..............5 1.1 Safety Warning Labels ............................
-
Page 138: Precautions For Using The Product
Dust Collector Instruction Manual for Operators Document No.: CIM-41002-06 1 Precautions for Using the Product 1.1 Safety Warning Labels The warning labels shown below are attached to the machine to provide important safety information that helps prevent worker accidents. Important If a warning label is defaced or damaged, please contact us immediately. -
Page 139: Safety Measures For The Machine
Dust Collector Instruction Manual for Operators Document No.: CIM-41002-06 1.2 Safety Measures for the Machine 1.2.1 Stopping the Machine in an Emergency If the machine malfunctions or an emergency occurs, turn off the main power switch to stop the machine. Performing an Emergency Stop Turn off the main power switch. -
Page 140: Safety Precautions
Dust Collector Instruction Manual for Operators Document No.: CIM-41002-06 1.3 Safety Precautions 1.3.1 General Precautions WARNING Carefully read this manual and fully understand all instructions before beginning work. Observe all warnings and cautions and use the machine correctly. Do not operate the machine in a manner or for a purpose not specified in this manual. Doing so may result in an accident. -
Page 141: Precautions For Operation
Dust Collector Instruction Manual for Operators Document No.: CIM-41002-06 1.3.2 Precautions for Operation WARNING Use the machine to suck up non-explosive dry dust. Explosive dust: Aluminum, magnesium, titanium, zinc, cobalt, nickel, wheat flour, etc. Do not operate the machine or perform suction in or around areas with stagnant fog, smoke, or gas containing flammable, explosive, or corrosive substances. -
Page 142: Specifications And Appearance
Dust Collector Instruction Manual for Operators Document No.: CIM-41002-06 2 Specifications and Appearance 2.1 Machine Specifications CBA-1000AT3-HC-DSA-V1 Model -UL2 /-UL1 Power 500W 100V, single phase 220–230V, Voltage 200V, single phase single phase 100–115V, single(UL1) Current value 7.8A 4.9A 4.5A Short-circuit current... -
Page 143: Exterior Features
Dust Collector Instruction Manual for Operators Document No.: CIM-41002-06 2.2 Exterior Features Name Function Primary filter chamber Contains the primary filter. Suction port Connect an intake duct. (removable flange) Exhaust filter chamber Houses an activated carbon cassette and exhaust HEPA filter. Exhaust port Connect an exhaust duct. -
Page 144: Control Panel (At3 Panel)
Dust Collector Instruction Manual for Operators Document No.: CIM-41002-06 2.3 Control Panel (AT3 Panel) Name Function Display Displays operating status and various settings. Also displays an error or warning number when an error or warning has occurred. Suction level The suction level is indicated by green lights. (Levels 1 to 7) indicator lights buttons •... -
Page 145: Operation
Dust Collector Instruction Manual for Operators Document No.: CIM-41002-06 3 Operation This chapter describes how to operate the machine. Before you begin, carefully read this chapter and “1.3” (p.7), and fully understand all instructions. Do not move the machine while it is in operation. If the power fails or the machine stops unexpectedly, shut off the power. -
Page 146: Starting The Machine
Dust Collector Instruction Manual for Operators Document No.: CIM-41002-06 3.2 Starting the Machine Please operate the control panel ON/OFF after an interval of at least 3 minutes. Repeated ON/OFF operation of the control panel within 3 minutes, especially NOTE within 30 seconds, may cause malfunction. *The same applies to remote operation and operation via communication functions. -
Page 147: Display Items
Dust Collector Instruction Manual for Operators Document No.: CIM-41002-06 3.4 Display Items 3.4.1 Checking Machine Information (During Non-Operation) Program version, RS-485 Ver*.** ID.** communication station number 3.4.2 Checking Operating Status (During Operation) Press [ ] during operation to check operating status. **.**kPa External pressure **.**kPa... -
Page 148: Setting And Performing Shaking (Dust Shake-Off Feature)
Dust Collector Instruction Manual for Operators Document No.: CIM-41002-06 3.5 Setting and Performing Shaking (Dust Shake-Off Feature) Use Shaking Setup mode to configure settings for shaking operation and to perform shaking manually. 3.5.1 Displaying Shaking Setup Mode Press [OFF] on the control panel to stop the machine. -
Page 149: Setting The Shaking Time
Dust Collector Instruction Manual for Operators Document No.: CIM-41002-06 Press [MODE SELECT] to return to Normal mode. 3.5.3 Setting the Shaking Time Set the shaking time after auto-shaking is activated. • Setting range: 20 to 180 seconds • Default: 20 seconds Display [Shaking Set] by referring to “3.5.1”. -
Page 150: If The Error Indicator Lights Up
Dust Collector Instruction Manual for Operators Document No.: CIM-41002-06 Check that [Shaking Start Y] is shown on the display, and press [ENTER]. This starts shaking operation. Press [MODE SELECT] to return to Normal mode. 3.6 If the Error Indicator Lights Up It indicates that the machine has a problem. - Page 151 Dust Collector Instruction Manual for Operators Document No.: CIM-41002-06 Notes...
- Page 152 Dust Collector Instruction Manual for Operators 6th edition: May 01, 2023 Document No.: CIM-41002-06 Published by CHIKO AIRTEC CO., LTD. ©2023 (Reproduction without permission is prohibited.)
Need help?
Do you have a question about the CBA-1000AT3-HC-DSA-V1 and is the answer not in the manual?
Questions and answers