Table of Contents
Advertisement
Quick Links
INSTRUCTIONS
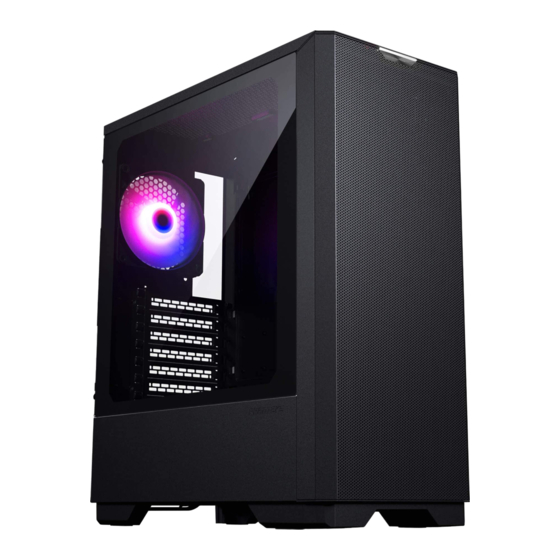
Thank you for choosing Phanteks. Please take a moment to
carefully go through the manual. This manual will walk you
through all of the features the Eclipse G300A has to offer and
installation steps to build a full system.
This manual is for the following models:
PH-EC300GA_DBK01
Satin Black
PH-EC300GA_DBK02
Satin Black
Phanteks will not take responsibility for any damages incurred due to incorrect
installation or usage of this product.
INCLUDED ACCESSORIES
ZIP TIE
6x
D-RGB MOTHERBOARD ADAPTER
1x
STAND-OFF TOOL
D-RGB 120MM FAN
1x pre-installed DBK01
1x
3x pre-installed DBK02
FAN & RADIATOR SUPPORT
FANS
FRONT
120mm
3x
140mm
-
RADIATOR
120mm
up to 360
140mm
-
360
FRONT AIO COOLER
Because of the special front bracket, the front supports a radiator
up to 360. When using this option, the maximum GPU length is
335mm.
120MM
120MM
335mm
|
1x D-RGB Fan Back
|
3x D-RGB Fans Front
PSU SCREW
4x
HDD SCREW
4x
SSD + MOTHERBOARD
SCREW
18x
MB STAND-OFF
1x
TOP
REAR
2x
1x
-
-
up to 240
up to 120
-
-
POWER BUTTON
CLEARANCE
CPU cooler height
160 mm
GPU length
365 mm with front fans
210 mm
E-ATX
up to 260 mm width
240
TOP AIO COOLER
The top supports a radiator up to 240. When using this option,
the maximum GPU length is 365mm with 3 front 120mm fans.
AIO 240
120MM
365mm
INSTALLATION GUIDE
VERSION 1.0
AUDIO/MIC
USB 3.0 TYPE-C
USB 3.0 TYPE-A
RESET BUTTON
120MM
| www.phanteks.com
01
Advertisement
Table of Contents

Related Manuals for Phanteks ECLIPSE G300A


Summary of Contents for Phanteks ECLIPSE G300A
- Page 1 Thank you for choosing Phanteks. Please take a moment to carefully go through the manual. This manual will walk you through all of the features the Eclipse G300A has to offer and installation steps to build a full system. This manual is for the following models:...
- Page 2 Slide in the power supply from the side and secure it with the For M-ATX Motherboards follow the motherboard instructions to 4x PSU screws. It is recommended to connect all needed cables move the stand-offs to the correct position. beforehand. INSTALLATION GUIDE | www.phanteks.com...
- Page 3 Hold the 3.5” HDD into place and secure it with 4x HDD screws from the bottom. FRONT I/O Connect the front I/O cables to the allocated connectors on the motherboard to use all front I/O buttons and inputs. MOTHERBOARD FRONT I/O POWER SWITCH RESET SWITCH POWER_SW | www.phanteks.com INSTALLATION GUIDE...
- Page 4 It can be easily installed in the PCI slot area. Follow the instructions that are included with the Vertical GPU bracket. SUPPORT & WARRANTY As a Phanteks customer, you are priority number one. We have a dedicated team across the globe to deliver the experience you deserve. CUSTOMER CARE...
Need help?
Do you have a question about the ECLIPSE G300A and is the answer not in the manual?
Questions and answers