Advertisement
Quick Links
ECLIPSE
EGO LV1
EXTENDER RAIL KIT
De-gas your marker, discharging any stored gas in a safe direction,
and remove the barrel, loader, air system and any paintballs to
make the marker easier and safer to work on.
The use of this product requires partial disassembly of the Ego LV1,
therefore the Ego LV1 User Manual MUST be read and understood
before attempting to use this product.
If you are at all unsure of how to use this product, contact your
nearest SERVICE CENTRE.
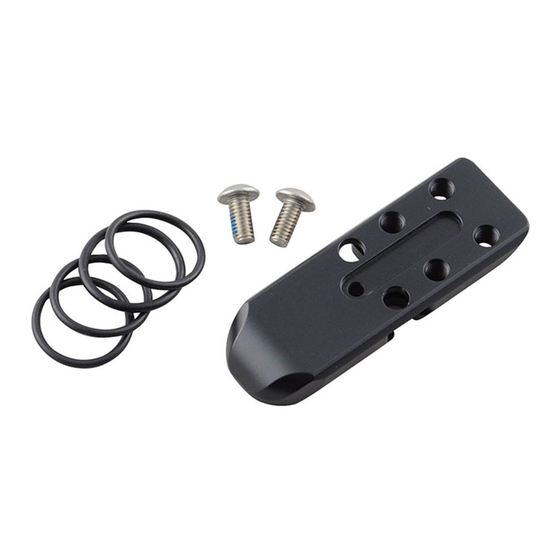
This extender rail kit allows the POPS and attached air system to be moved
further back from the fixed factory position, increasing the length of the marker
and air system "set-up". This may be beneficial to taller players, or simply those
who prefer a longer "set-up".
To attach the extender rail to the Ego LV1 remove the POPS unit, using a 5/32"
hex key to unscrew and remove the POPS retaining screws
Ensure the flat surface on the bottom of the frame is clear of any paint or debris
and the 18x2 o-ring is seated flat in its pocket
Insert the two 10-32 x 3/8" rail screws into the left and right D shaped slots on the
rail
.
(SEE FIGURE 3)
© Copyright 2013 - Planet Eclipse Ltd. Eclipse and the Estar
Logo Device are all either design trademarks, registered
trademarks or trademarks of Planet Eclipse Ltd. All other
trademarks are the property of their respective owners.
.
(SEE FIGURE 1)
.
(SEE FIGURE 2)
With both screws in the extender rail, align the screws with the threads in the
frame. Then using a 1/8" hex key tighten the screws into the frame
. You may need to do a 1/2 - 3/4 turn on each screw then swap to the next,
4)
continuing to alternate between the screws until the extender rail lies flat on the
bottom on the frame. Ensure the screws are tight in the frame.
Ensure the top and bottom surfaces of the rail are clean, then insert a 017 NBR70
o-ring into the bottom of the rail so that it lies flat in its pocket
Insert the two 10-32 x 1" POPS retaining screws into the POPS unit. Select one
of the two mounting positions for the POPS and tighten the POPS down onto the
extender rail with both screws
(SEE FIGURE 6)
With the POPS in the off position (bonnet forward)
air system and check there is no movement/play in the air system. If there is
movement, the screws will need tightening.
The extender rail has now been installed and is ready for use.
THE EXTENDER RAIL SHOWN MAY DIFFER VISUALLY OR OTHERWISE FROM
THE EXTENDER RAIL SUPPLIED.
FIG 1
(SEE FIGURE
.
(SEE FIGURE 5)
. Ensure the screws are tight.
, attach an
(SEE FIGURE 7)
MAN0007
Advertisement

Subscribe to Our Youtube Channel
Related Manuals for PLANET ECLIPSE EGO LV1


Summary of Contents for PLANET ECLIPSE EGO LV1
- Page 1 “set-up”. This may be beneficial to taller players, or simply those who prefer a longer “set-up”. To attach the extender rail to the Ego LV1 remove the POPS unit, using a 5/32” hex key to unscrew and remove the POPS retaining screws...
- Page 2 FIG 2 FIG 7 © Copyright 2013 - Planet Eclipse Ltd. Eclipse and the Estar Logo Device are all either design trademarks, registered trademarks or trademarks of Planet Eclipse Ltd. All other trademarks are the property of their respective owners.
Need help?
Do you have a question about the EGO LV1 and is the answer not in the manual?
Questions and answers