Table of Contents
Advertisement
Advertisement
Table of Contents

Related Manuals for PLANET ECLIPSE EMF100


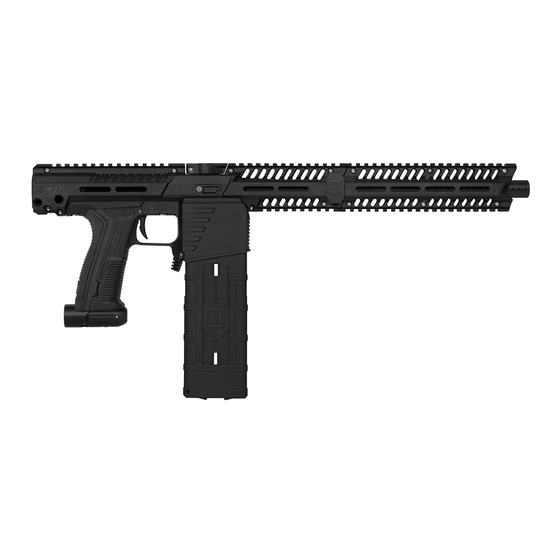
Summary of Contents for PLANET ECLIPSE EMF100
- Page 1 PLANET ECLIPSE: EMF100 USER MANUAL / ENGLISH SHAPED ROUND COMPATIBLE EMF100...
- Page 2 Any installations, modifications or repairs should be carried out by Never look into the barrel or breech area of the EMF100 whilst the Diese Bedienungs - und Always follow guidelines given with your first stage regulator for safe a qualified individual at a licensed and insured paintball facility.
-
Page 3: Table Of Contents
QUICK START (06 - 30) MAINTENANCE (31 - 33) Setting up the EMF100 - MagFed On-line maintenance videos Setting up the EMF100 - Hopper Fed Fault-finding tables The EMF100 safety button Changing between MagFed and Hopper Fed TECHNICAL (34 - 43) -
Page 4: Quick Start
Push the safety button to SAFE before you begin. IMPORTANT! The feedtube plug must be fitted correctly for the Make sure the EMF100 is in Magfed mode. EMF100 to operate in magfed mode. Insert the feedtube plug (see pages 12-13). -
Page 5: Setting Up The Emf100 - Hopper Fed
Push the safety button to SAFE before you begin. IMPORTANT! Hopper will not attach if PAL feedneck is not fitted. Make sure the EMF100 is in hopper fed mode. Attach the PAL feedneck (see pags 12-13). IMPORTANT! Safety precaution if marker fires accidentally. -
Page 6: The Emf100 Safety Button
QUICK START QUICK START THE EMF100 SAFETY BUTTON THE EMF100 SAFETY BUTTON SAFE FIRE FIG-1 FIG-1 FIG-1 FIG-1 The safety button is located on the frame and is used to switch The safety button is located on the frame and is used to switch between safe (PUSH SAFE) and fire (PUSH FIRE). -
Page 7: Changing Between Magfed And Hopper Fed
ALWAYS ensure that the marker is degased and free from projectiles before ALWAYS ensure that the marker is degased and free from projectiles before beginning these procedures. beginning these procedures. EMF100 EMF100... -
Page 8: Inserting The Magazine
Make sure the marker is set to SAFE when installing a loaded magazine if you Make sure the marker is set to SAFE when installing a loaded magazine if you are not in a playing environment. are not in a playing environment. EMF100 EMF100... -
Page 9: Loading / Reloading
Be careful when removing springs when they’re under tension. anyone’s) face. For safety always place your hand over the top of a magazine yourself or anyone else. before opening the chamber covers. EMF100 Make sure the new followers are installed the correct way up, facing outwards. EMF100... - Page 10 The PAL system WILL NOT improve the performance of non-PAL gravity-fed Always make sure the marker is set to SAFE when installing a loader. loaders nor will it affect the performance of any force-fed loaders. EMF100 EMF100...
-
Page 11: Attaching A Front Shroud
ACCESSORY MOUNTING FRONT SHROUD FIG-1 FIG-1 To attach the front shroud and complete the full EMF100 rail kit setup To attach after-market accessories to the shroud sections you must first simply push the front shroud section over the barrel and into the remove and separate both halves of the shroud . -
Page 12: Attaching A Stock
QUICK START FIG-1 FIG-2 FIG-7 FIG-8 ATTACHING A STOCK ATTACHING A STOCK The EMF100 will only accept Tippmann98™ style stock buffer tubes using the adaptors supplied. FIG-7 The blanking plug needs to be removed from the marker. FIG-1 The stock... -
Page 13: Velocity Adjustment
DO NOT turn the adjuster screw in too far. This will prevent the your finger tips, to gently lift the rubber detent from its seat. EMF100 from firing. Detent cover screw DO NOT exceed 300 FPS when using .68 calibre paintballs. -
Page 14: Unloading The Emf100 - Magfed
QUICK START QUICK START UNLOADING THE EMF100 UNLOADING THE EMF100 MAGFED MAGFED FIG-1 FIG-1 ALWAYS always remove rounds from the breech before handling the marker. Push the safety button to SAFE before you begin unloading. Attach a barrel blocking device. -
Page 15: Unloading The Emf100 - Hopper Fed
QUICK START QUICK START UNLOADING THE EMF100 UNLOADING THE EMF100 HOPPER FED HOPPER FED FIG-1 FIG-1 ALWAYS always remove rounds from the breech before handling the marker Push the safety button to SAFE before you begin. Attach a barrel blocking device. -
Page 16: Storage And Transportation
Never carry your marker un-cased when not on a playing field. The non-playing public and law enforcement personnel may not be able to distinguish between a paintball marker and a real firearm. For your own safety and to protect the image of paintball always carry the Eclipse EMF100 (or any other paintball marker) in a suitable marker case such as the one in which it was supplied. -
Page 17: Fault-Finding Tables
The gasket between the three-way body and gun Ensure the gasket is seated correctly. body, o-ring on air transfer pipe or the gasket under Replace the gaskets if damaged using EMF100 parts kit. The EMF100 does not fire. The POPS bonnet is not engaged. -
Page 18: Technical
Marker body shell Trigger assembly Back cap Grip retaining clip Bolt assembly Regulator assembly Rubber detent Magazine well Safety switch ASA assembly Three-way assembly Magazine release catch assembly Rear frame screw Barrel o-ring #016 NBR70 Front frame screw EMF100 EMF100... -
Page 19: Emf100 Inline Regulator
Three-way valve body #6 Seal (custom) Purge poppet spring Reset the EMF100 regulator to factory after re-assembly. Only use the spring provided with the EMF100 regulator. Failure to re-install the purge poppet assembly correctly Adjuster bottom #6 Seal (custom) could seriously damage the EMF100. -
Page 20: Bolt Assembly (68Cal)
#013 NBR70 #004 NBR70 #013 NBR70 #020 NBR70 Push rod 14 x 2 NBR70 #008 NBR70 Latch spring #011 NBR70 Spool spring Latch button POPS screw 10-32 UNF x 1” cap head socket #016 NBR70 Spring guide Back cap EMF100 EMF100... -
Page 21: Frame Assembly
Short clamping feed screw Magazine well Feed swivel 10-32 UNF x 1/2” The EMF100 PAL clamping feedneck incorporates our Deftek system (patent pending), meaning the feedneck Safety button Long clamping feed screw is designed to be slightly offset to neutralise any Three-way body pin 10-32 UNF x 5/8”... - Page 22 TECHNICAL TECHNICAL FIG-1 TWO-PIECE GRIPS MAGAZINE The EMF100’s toolless two-piece grip system makes it incredibly easy FIG-1 FIG-1 to remove and clean the grips after a big day out in the field. Magazine shells FIG-1 Magazine chamber covers Locate and pull back the rear grip locking tab.
-
Page 23: Magazine
Regulator: 02,03,04,07,09,32,33,36,47 23,24,27,29,30,45 Feedtube plug: 07,12,13 Warranty: 44,45,46 FIRE: 07,09,10,11,27,29 Followers: 17 For more information about our Planet Eclipse Approved Tech Centres, visit our Frame: 10,11,35,40,42 servicing page online: Youtube: 31 PLANETECLIPSE.COM/SITE/SERVICE-CENTRES * Conditions apply, see online policies for full details at planeteclipse.com... - Page 24 12 months from the time of original purchase**. I verify that I am least 18 years of age and I have read Warranty cover is dependent on successful completion, and receipt by Planet Eclipse Limited, of warranty registration and proof the manual supplied with my Eclipse paintball marker ®...
- Page 25 SUPPORT LICK. NOTES GET MORE - PLANETECLIPSE.COM STICK. SEND. PLANET ECLIPSE 130 FRANKLIN STREET BUILDING L4 & L5 WARREN RHODE ISLAND 02885 U.S.A. TO BENEFIT FROM OUR INDUSTRY-LEADING GLOBAL TECH SUPPORT PLEASE REGISTER YOUR MARKER ONLINE TODAY WARRANTY.PLANETECLIPSE.COM EMF100 EMF100...
- Page 26 Building L4 & L5 Trafford Park Road, Trafford Park Langenberger Str. 9 Tor 5 & 6 trademarks of Planet Eclipse Ltd. Warren, RI, 02885, USA Manchester, M17 1GA, England Düsseldorf 40233, Germany Call: +1 401 247 9061...
Need help?
Do you have a question about the EMF100 and is the answer not in the manual?
Questions and answers