Teltonika Telematics FTC921 Quick Manual
Small and smart tracker
Hide thumbs
Also See for Telematics FTC921:
- First start-up quick start manual (2 pages) ,
- Quick manual (17 pages) ,
- Quick manual (23 pages)
Table of Contents
Advertisement
Quick Links
Advertisement
Table of Contents

Related Manuals for Teltonika Telematics FTC921


Summary of Contents for Teltonika Telematics FTC921
- Page 1 FTC921 Small and smart tracker Quick Manual v1.0...
-
Page 2: Table Of Contents
CONTENT Know your device ........................................3 Pinout ...........................................4 Set up your device ......................................5 PC Connection (Windows) ....................................6 How to install USB drivers (Windows) ................................6 Configuration (Windows) ....................................7 Mounting recommendations.....................................8 Safety information ......................................9 Quick Manual v1.0 // FTC921... -
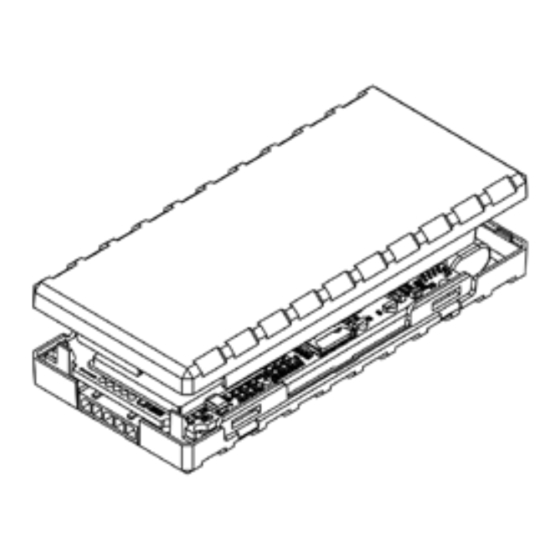
Page 3: Know Your Device
KNOW YOUR DEVICE BOTTOM VIEW (WITHOUT COVER) TOP VIEW (WITHOUT COVER) TOP VIEW BATTERY GNSS SOCKET ANTENA SOCKET STATUS NAVIGATE SLOT Quick Manual v1.0 // FTC921... -
Page 4: Pinout
PINOUT PIN NUMBER PIN NAME DESCRIPTION (Red) Power supply VCC (10-90) VDC (+) +10...90 V DC (+10-90 V DC) GND (-) (Black) Ground (Yellow) Digital input, DIN1 channel 1. DEDICATED DIN1 FOR IGNITION INPUT (Grey) Analog input, AIN1 AIN1 channel 1. Input range: 0-90 V DC DOUT1 (White) Digital output. -
Page 5: Set Up Your Device
SET UP YOUR DEVICE HOW TO INSERT MICRO-SIM CARD AND CONNECT THE BATTERY COVER REMOVAL COVER REMOVAL SIM CARD INSERT You will receivyour device partly closed. Gently remove side cover. Insert SIM card as shown. Make sure Nano-SIM card cut-off corner is pointing towards SIM slot. -
Page 6: Pc Connection (Windows)
Extract and run TeltonikaCOMDriver.exe. Click Next in driver installation window. In the following window click Install button. Setup will continue installing the driver and eventually the confirmation window will appear. Click Finish to complete the setup. wiki.teltonika-gps.com/images/d/d0/TeltonikaCOMDriver.zip Quick Manual v1.0 // FTC921... -
Page 7: Configuration (Windows)
CONFIGURATION (WINDOWS) At first FTC921 device will have default factory settings set. These settings should be changed according to the user's needs. Main configuration can be performed via Teltonika Configurator tool (TCT). wiki.teltonika-gps.com/view/QSG_New_platform MS .NET REQUIREMENTS Operating system MS .NET Framework version... -
Page 8: Mounting Recommendations
MOUNTING RECOMMENDATIONS DEVICE FASTENING • Locate the battery in your vehicle. If present remove the battery cover to access the battery. • There is a double sided tape on the back of the device, use it to attach the device on the battery, so that the GNSS antenna and LEDs indicators are facing up. -
Page 9: Safety Information
SAFETY INFORMATION Do not disassemble the device. If the device is damaged, the power supply cables are not isolated or the isolation is damaged, DO NOT touch the device before unplugging the power supply. This message contains information on how to operate FTC921 All wireless data transferring devices produce safely.
Need help?
Do you have a question about the Telematics FTC921 and is the answer not in the manual?
Questions and answers