Table of Contents
Advertisement
Quick Links
SL-845GVI / 845GVI-L
Chapter 1 Specification
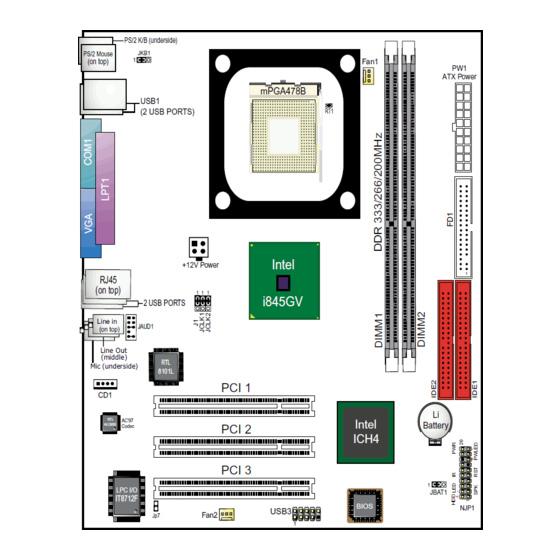
1-1 Mainboard Layout and Components Setup
LAN Controller
J1
RJ45 connector
VGA
Connector
Analog
Monitor
Front Audio
Connector
CD-ROM Audio
Connector
LAN Controller
(only for 845GVI-L)
For 845GVI-L only :
(1) LAN Controller
(2) RJ45
(3) J1 (to enable
LAN controller)
}
For 845GVI-L only
PS/2 K/B (underside)
PS/2 Mouse
JKB1
(on top)
USB1
(2 USB PORTS)
+12V Power
RTL
AC'97
ALC650
Codec
LPC I/O
IT8712F
Jp7
Use a 4-pin connector to connect USB pin-header to 1 USB port
First USB Port Pin-Assignment for 1 Front USB port
Red
2
1
Red
mPGA478B
Intel
i845GV
PCI 1
PCI 2
PCI 3
USB3
1
White Green black
+5V
D1-
D1+
+5V
D2-
D2+
White
Green
Second USB Port Pin-Assignment
for another Front USB port
5
Chapter 1 Specification
CPU Fan
Connector
RT1
Intel
ICH4
BIOS
GND
10
4-pin connector
to support 1USB
port only.
GND
black
PW1
ATX Power
1
Li
Battery
JBAT1
NJP1
Advertisement
Table of Contents

Related Manuals for SOLTEK SL-845GVI


Summary of Contents for SOLTEK SL-845GVI
-
Page 1: Chapter 1 Specification
Chapter 1 Specification SL-845GVI / 845GVI-L Chapter 1 Specification 1-1 Mainboard Layout and Components Setup LAN Controller CPU Fan For 845GVI-L only Connector RJ45 connector PS/2 K/B (underside) PS/2 Mouse JKB1 (on top) ATX Power mPGA478B USB1 (2 USB PORTS) -
Page 2: Mainboard Specification Table
Chapter 1 Specification SL-845GVI / 845GVI-L 1-2 Mainboard Specification Table SL-845GVI / 845GVI-L Specifications and Features Socket 478B for Intel P4 CPU (Hypere Threading and Prescott include) North Bridge Intel 845GV, supporting *800/533/400MHz FSB South Bridge Intel ICH4 BIOS AMI BIOS... - Page 3 Chapter 1 Specification SL-845GVI / 845GVI-L 1-3 CPU and CPU Fan Installation with Socket 478B 1-3.1 CPU Installation with Socket 478B (1) Pentium 4 CPU Pin 1 (2) Pull up the lever and insert P4 CPU into socket 478 Pin 1...
-
Page 4: Atx V 2.03 Power Supply Installation
Chapter 1 Specification SL-845GVI / 845GVI-L 1-3.2 Hyper-threading CPU supported by Win XP This mainboard supports Hyper- threading dual-in-one CPU, the func- tion of which can be enabled by Win- dows XP. (See illustration on the right.) ( If Hyper-Threading CPU is... -
Page 5: Jumper Settings
Chapter 1 Specification SL-845GVI / 845GVI-L 1-5 Jumper Settings The following diagrams show the locations and settings of jumper blocks on the mainboard. JKB1: Keyboard/Mouse Power On / Wake Up 1-2 closed (default) Disabled 2-3 closed Enabled PS/2 K/B (underside) - Page 6 Chapter 1 Specification SL-845GVI / 845GVI-L 1-6 Other Connectors Setup 1-6.1 Front Audio Connector PS/2 K/B (underside) PS/2 Mouse JKB1 This Mainboard is designed with a Front (on top) ATX Power mPGA478B Panel Audio connector “JAUD1” which USB1 (2 USB PORTS) provides connection to your chassis.
- Page 7 Chapter 1 Specification SL-845GVI / 845GVI-L 1-6.3 Complex Header (Front Panel Connectors) PS/2 K/B (underside) PS/2 Mouse JKB1 (on top) ATX Power mPGA478B USB1 (2 USB PORTS) Intel +12V Power i845GV PCI 1 AC'97 Intel Battery ALC650 Codec PCI 2...
-
Page 8: Chapter 2 Software Setup
Chapter 2 Software Setup SL-845GVI / 845GVI-L Chapter 2 Software Setup 2-1 To Open up the Support CD 1. Please put the Support CD enclosed in your mainboard package into the CD-ROM drive. In a few seconds, the Main Menu will automatic- ally appear, displaying the contents to be installed for this series: 2. - Page 9 Chapter 2 Software Setup SL-845GVI / 845GVI-L 2-2.3 Installing AC’97 6-channel Audio Driver 1. Following the procedures of opening the Support CD, click to “ AC’97 Audio Driver” to proceed. 2. Instantly, the “installShield Wizard” screen appears to guide you through the “Avance AC’97 Audio Setup””.
- Page 10 Chapter 2 Software Setup SL-845GVI / 845GVI-L 2-2 5 To Install USB 2.0 Driver for Windows 2000/XP USB V2.0 with its 480Mb/s transfer rate supports operating system Windows 2000 and Windows XP via the Windows 2000 and Windows XP Service Pack. For archieving Intel USB 2.0 support, users should install the latest Service Pack for Windows 2000 or Windows XP.
-
Page 11: Chapter 3 Ami Bios Setup
Chapter 3 BIOS Setup SL-845GVI / 845GVI-L Chapter 3 AMI BIOS Setup 3-1 To Update BIOS • “AMIFLASH.EXE” is a Flash EPROM Programming utility that up- dates the BIOS by uploading a new BIOS file to the programmable flash ROM on the mainboard. This program only works in DOS environment, the utility can not be executed in Windows 95/98, ME, NT, 2000 or Windows XP environment. - Page 12 Chapter 3 BIOS Setup SL-845GVI / 845GVI-L 3-2 BIOS SETUP by CMOS Setup Utility 1. Power on your system. 2. At the initial screen, enter CMOS Setup Utility by pressing < Del > key before POST(Power on Self Test) is complete and the main program screen will appear as follows.
- Page 13 SL-845GVI / 845GVI-L Multi-Lingual Setup Guide SL-845GVI / 845GVI-L Quick Installation Guide Brochage composite Gesamtübersicht Conector de dispositivos Совмещённая контактная площадка (pin-header) Conectores em Pinos 複合ヘッダ 複合ヘッダ 複合ヘッダ 複合ヘッダ 複合ヘッダ 設備連接埠 設備連接埠 다목적 設備連接埠 設備連接埠 다목적 다목적 콘넥터 콘넥터 設備連接埠 다목적...
- Page 14 Multi-Lingual Setup Guide Выбор LAN-контроллера LAN Controller Ausgewählt Sélection du contrôleur LAN J1 (Nur SL-845GVI-L) J1 (uniquement sur la SL-845GVI-L) J1 (только для модели SL-845GVI-L) 1-2=Lan zur verfügung (Standard) 1-2=LAN activé (par défaut) 1-2= Включено (По умолчанию) 2-3=Lan nicht verfügbar 2-3=LAN désactivé...
Need help?
Do you have a question about the SL-845GVI and is the answer not in the manual?
Questions and answers