Advertisement
Quick Links
Thank you for purchasing a BN Thermic product. Manufactured to a high standard, this product will, if used
according to these instructions and properly maintained, give you years of trouble free performance. Please
ensure instructions remain with your customer for their reference.
REGISTER: PLEASE REGISTER THIS PRODUCT ONLINE TO ACTIVATE
IMPORTANT: PLEASE READ THESE INSTRUCTIONS, NOTE THE SAFE OPERATIONAL
REQUIREMENTS, WARNINGS, AND CAUTIONS. USE THIS PRODUCT CORRECTLY,
AND WITH CARE FOR THE PURPOSE FOR WHICH IT IS INTENDED. FAILURE TO DO SO
MAY CAUSE DAMAGE AND/OR PERSONAL INJURY AND WILL INVALIDATE THE
WARRANTY
S E C T I O N A – U S E R I N S T R U C T I O N S .
For installation instructions go to page 7
1 . I N T R O D U C T I O N & S P E C I F I C A T I O N .
The CX6 Thermostat is an easy to
install and use 7 Day, or 5 / 2 Day
Programmable
Room
which offers two, four or six time and
temperature changes each day, with
different programmes available for
weekdays and for weekends. It is
designed to provide automatic time
and temperature control of SystemX
heating systems. A backlit LCD screen
and easy to use function buttons
ensures simplified programming and
operation for all users.
The
Thermostat
includes
features
designed
energy. All settings are stored in the
controller with battery back-up. If you
wish to place the thermostat in a
different location from the heaters an
optional remote sensor can be added
to the controller.
YOUR GUARANTEE AT www.bnthermic.co.uk
.
Thermostat
special
to
save
you
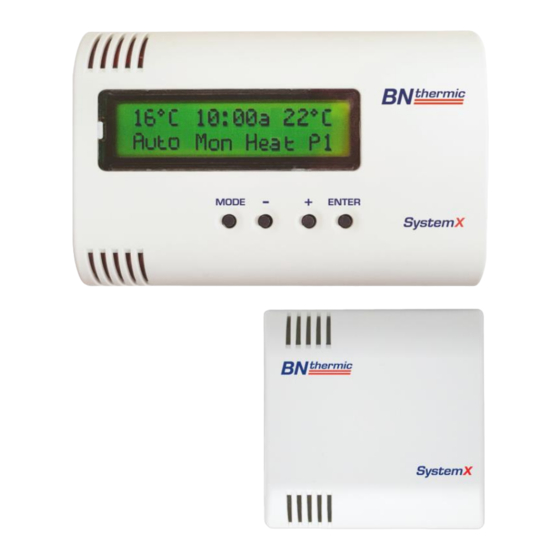
PROGRAMMABLE HEATER CONTROLLER
CXS – Remote Sensor
(Optional Extra)
Advertisement

Related Manuals for BN Thermic SystemX CX6


Summary of Contents for BN Thermic SystemX CX6
- Page 1 PROGRAMMABLE HEATER CONTROLLER Thank you for purchasing a BN Thermic product. Manufactured to a high standard, this product will, if used according to these instructions and properly maintained, give you years of trouble free performance. Please ensure instructions remain with your customer for their reference.
- Page 2 Specification CX6- Programmable Heater Controller Programming 7 Day or 5/2 Day Powered from any SystemX heater through network cable Power Supply (battery back-up) Temperature Sensor Type ±1°C at 20°C Temperature Adjustment Range 5°C to 30°C Plastic Thermoplastic, flame retardant Number of Programs Per Day 2, 4 or 6 (Default: 2) Factory Pre-Set Programs per Day 2, 4 or 6 (Default: 2)
- Page 3 2 . Q U I C K O P E R A T I N G G U I D E . ❺ ❶ ❷ ❸ ❹ ❶ Main Display :– Back lit when you touch any button displays actual temperature, set temperature, time, day of week, program number and mode of operation.
- Page 4 3 . F A C T O R Y P R E - S E T P R O G R A M M E S . This Programmable Controller has been designed to be a simple to use thermostat, requiring minimal user intervention with a pre-programmed heating profile.
- Page 5 5 . C H A N G I N G T H E P R O G R A M S E T T I N G S . If you wish to change the number of programs per day go to “Master Settings” section 19 page 10 and adjust the number of programs per day before continuing.
- Page 6 6 . T E M P O R A R Y A D J U S T I N G T E M P E R A T U R E S E T P O I N T I N A U T O M O D E . The set point can be temporarily adjusted in auto mode by pressing the + or –...
-
Page 7: Electrical Safety
S E C T I O N B – I N S T A L L A T I O N A N D M A S T E R S E T T I N G S . 1 1 . I N S T A L L A T I O N S A F E T Y I N S T R U C T I O N S . 11.1 ELECTRICAL SAFETY WARNING! Under No circumstances may you take a 230V supply to this controller. - Page 8 1 3 . M O U N T I N G T H E C O N T R O L L E R . To remove the back plate from the front of the controller gently push the bottom of the back plate whilst gently prising the front panel away.
- Page 9 1 6 . U S I N G W I T H A N E X T E R N A L S W I T C H O R K E Y S W I T C H . You can disable or enable the controller from working by removing the link between T1 and T2 and connecting...
- Page 10 1 9 . C H A N G I N G T H E M A S T E R / D E F A U L T S E T T I N G S . There are various master / default settings that can be changed by entering the default settings. To enter these settings, press the MODE button and the ENTER button simultaneously and hold for 3 seconds.
- Page 12 IMPORTANT: No liability is accepted for incorrect use of this product. 34 Stephenson Way, WARRANTY: Your BN Thermic product is guaranteed for one year from date of Crawley, RH10 1TN purchase. We will repair or replace at our discretion any part found to be defective.
Need help?
Do you have a question about the SystemX CX6 and is the answer not in the manual?
Questions and answers