Advertisement
Quick Links
Advertisement

Related Manuals for Fab Fours Z1550


Summary of Contents for Fab Fours Z1550
- Page 1 Installation manual SMARTCAP FLOOR DISPLAY Product number: z1550 Application: universal...
- Page 2 Use own good judgment and take your time. WARNINGS • Failure to observe the following warnings • Fab Fours, Inc. only approves installing this and instructions provided in this manual product according to these written instructions could lead to severe injury and/or death.
- Page 3 SAFETY / DISCLAIMER TABLE OF CONTENTS A MESSAGE FROM THE OWNER GETTING STARTED PROVIDED MATERIAL CONTACT...
- Page 4 A message from the owner Fab Fours’ was born out of a passion for customizing vehicles and a love of the outdoors. Our engineering team uses the latest 3D design software to turn new product ideas into reality. In our factory, designs come to life with the combination of cutting edge technology for metal cutting and forming and an American workforce that puts its’...
- Page 5 Getting started Before you begin the installation process of your new Fab Fours product, we suggest laying out all materials and parts on a pad or protective surface. Failure to fully account for all components before beginning installation may leave vehicle...
- Page 6 Provided materials TOOLS REQUIRED • 7/16” SOCKET WRENCH • 7/16” COMBINATION WRENCH • 9/16” COMBINATION WRENCH • 5/32” ALLEN WRENCH assistance We recommend two people perform the installation as items 22842 –RIGHT 22844 –RIGHT 22845 –LEFT 22843 –LEFT FRONT/ are heavy and may need to be held FRONT/LEFT REAR FRONT/LEFT REAR FRONT/RIGHT...
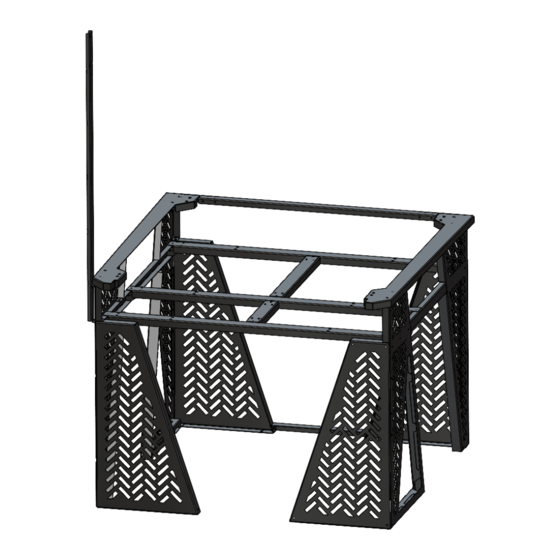
- Page 7 Hardware kit | Z1550-IM Fab Fours Component Identification Description 50361-HW 1/4"-20, BHCS Bolt, Plain, SS 50361-HW 1/4”, Flat Washer, Plain, SS 50361-HW 1/4”, Nut, Plain, SS 50361-HW 3/8"-16, Nut, Plain, SS 50361-HW 3/8”, Flat Washer, Plain, SS Exploded View...
- Page 8 Assembly Use 5/32” Allen Wrench and 7/16” combination wrench (or socket) to attach 22842 to 22844 and 22843 to 22845. (Figure 1) Repeat this for all four (4) corners. Align three (3) holes and attach using three (3) ¼” Stainless Steel Cap head bolts, six (6) stainless flat washers, and three (3) stainless nuts per corner. Thread on one (1) 3/8”...
- Page 9 Attach 22846 (RH) and 22847 (LH) to corner assemblies using five (5) ¼” Stainless cap head bolts, ten (10) stainless flat washers, five (5) stainless nuts per side. (Figure 2) NOTE: Do not attach frontmost bolt on RH side of rack. This will be installed with flagpole in step 9. Insert three (3) ¼”...
- Page 10 Attach two (2) 22848 cross pieces to front and rear of rack. Ensure center connector pieces face into the center of the rack. (Figure 4) Attach 22849 to center of rack. Use six (6) ¼” Stainless Steel Cap head bolts, twelve (12) stainless flat washers, and six (6) stainless nuts per cross piece. Do not tighten hardware at this time.
- Page 11 Attach 22852 (RH) and 22853 (LH) top pieces to corners placing on outer corner pieces and aligning appropriate holes. (Figure 6) Attach two (2) bolts in front, and two (2) bolts in rear. Use four (4) ¼” Stainless Steel Cap head bolts, ten (10) stainless flat washers, and five (5) stainless nuts per side. Attach two (2) 22855 c-channel connectors, one per side.
- Page 12 Attach 22854 rear cross section to c-channel connectors installed in step 6. Use four (4) ¼” bolts, eight (8) flat washers, and four (4) hex nuts per side. Shorter leg of C-channel should face FRONT. Tighten all hardware in step 6 & 7 at this time. (Figure 8) Attach 22938 to 22839 using four (4) ¼”...
- Page 13 Attach flag assembled in step 12, to 22884 flagpole using two (2) ¼” bolts. (Figure 10) Attach flag graphic panel to lower edge of flag assembly using four (4) 1⁄4” bolts and flat washers. (Figure 11)
- Page 14 Attach metal red panels to both side of flag using six (6) #10 bolts, flat washers and lock washers. (Figure 12) Attach 22884 flagpole to front right corner. Align with holes in 22844. (Figure 13) Use ¼” bolts and appropriate washers and nuts. Figure 13...
- Page 15 Attach wall mount (22857) to top rear c-channel (22854) using two (2) ¼” bolts, four (4) flat washers, and two (2) hex nuts. (Figure 14) Figure 14 Using a level, adjust height of feet (61807) to make rack system level. Using 9/16”...
- Page 16 Install front and side graphic panels to rack using 1/4” bolts and flat washers. Be sure not to over tighten bolts to avoid damaging graphics. (Figure 15) Figure 15...
- Page 17 Contact information Fab Fours Inc. 2213 Industrial Park Road Lancaster, SC 29720 Phone: (866) 385-1905 Fax: 970-385-1914 Email: support@fabfours.com fabfours.com...
- Page 18 “If you’re looking for more of the same, Then you’ve come to the wrong place.” - Greg Higgs...
Need help?
Do you have a question about the Z1550 and is the answer not in the manual?
Questions and answers