Table of Contents
Advertisement
Available languages
Available languages
Quick Links
KOBALT and logo design are trademarks
or registered trademarks of LF, LLC.
All rights reserved.
ATTACH YOUR RECEIPT HERE
Serial Number
Questions, problems, missing parts? Before returning to your
retailer, call our customer service department at 888-3KOBALT
(888-356-2258), 8:00 a.m.-8:00 p.m., EST, Monday-Sunday.
You could also contact us at partsplus@lowes.com.
SS22212
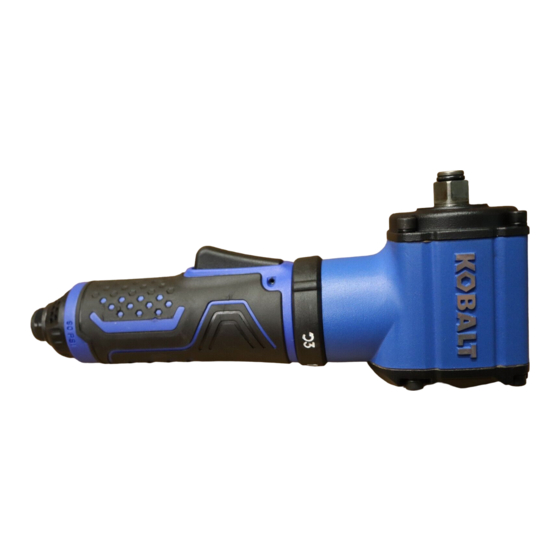
1/2-IN 350-FT-LB
AIR RIGHT ANGLE
IMPACT WRENCH
Purchase Date
1
ITEM #5091971
MODEL #SGY-AIR290
Español p. 18
Advertisement
Chapters
Table of Contents

Related Manuals for Kobalt SGY-AIR290


Summary of Contents for Kobalt SGY-AIR290
- Page 1 ITEM #5091971 1/2-IN 350-FT-LB AIR RIGHT ANGLE IMPACT WRENCH MODEL #SGY-AIR290 Español p. 18 KOBALT and logo design are trademarks or registered trademarks of LF, LLC. All rights reserved. ATTACH YOUR RECEIPT HERE Serial Number Purchase Date Questions, problems, missing parts? Before returning to your retailer, call our customer service department at 888-3KOBALT (888-356-2258), 8:00 a.m.-8:00 p.m., EST, Monday-Sunday.
-
Page 2: Table Of Contents
TABLE OF CONTENTS Compressor Requirements................2 Product Specifications..................3 Safety Information..................3 Package Contents..................9 Preparation....................10 Assembly Instructions...................10 Operating Instructions..................12 Care and Maintenance.................13 Troubleshooting....................14 Warranty.......................15 Replacement Parts List................16 COMPRESSOR REQUIREMENTS SCFM Tool Requirements Exigences relatives aux outils Requisitos de herramientas IMPORTANT: To operate correctly, this tool requires airflow of at least 6.4 Standard Cubic Feet per Minute (SCFM) at 90 Pounds per Square Inch (PSI) at the tool. -
Page 3: Product Specifications
PRODUCT SPECIFICATIONS COMPONENT SPECIFICATIONS DRIVE 1/2 IN. FREE SPEED 7,000 RPM MAXIMUM TORQUE 350 FT.-LBS. AVERAGE AIR CONSUMPTION 6.4 SCFM AIR INLET 1/4 IN. NPT AIR HOSE 3/8 IN. WORKING PRESSURE 90 PSI SAFETY INFORMATION Please read and understand this entire manual before attempting to assemble, operate or install the product. - Page 4 SAFETY INFORMATION WARNING RISK OF EYE OR HEAD INJURY WHAT COULD HAPPEN HOW TO PREVENT IT This air powered tool is capable of Always wear ANSI approved Z87.1 propelling materials such as safety glasses. fasteners, metal chips, and other Never leave operating tool unattended.
- Page 5 SAFETY INFORMATION WARNING RISK OF ENTANGLEMENT WHAT COULD HAPPEN HOW TO PREVENT IT Loose hair, clothing, jewelry or other Do not wear loose clothing, jewelry, loose objects can become entangled or anything that may get caught or in the moving elements of this tool tangled when using tool.
- Page 6 SAFETY INFORMATION WARNING RISK OF ELECTRIC SHOCK WHAT COULD HAPPEN HOW TO PREVENT IT Never use air tools where they may This tool is not provided with an come in contact with energized insulated gripping surface. Contact electrical wiring. with a “live” wire will also make exposed metal parts of the tool “live”...
- Page 7 SAFETY INFORMATION WARNING RISK OF PERSONAL INJURY WHAT COULD HAPPEN HOW TO PREVENT IT Always make sure the workpiece is Air tools can cause the workpiece to secure. Use clamps or other devices move upon contact, leading to injury. to prevent movement. Loss of control of the tool can lead Before changing accessories, to operator injury or injury to others...
- Page 8 SAFETY INFORMATION WARNING RISK OF PERSONAL INJURY WHAT COULD HAPPEN HOW TO PREVENT IT Improperly maintained tools and Maintain the tool and accessories accessories can cause serious injury. with care. Keep tools clean and properly oiled for best and safest performance. Using an accessory not intended for Always use accessories and a specific tool increases the risk of...
-
Page 9: Package Contents
PACKAGE CONTENTS PART DESCRIPTION QUANTITY 1/2 in. Impact Wrench Anvil Trigger Reverse Rotary Forward Rotary Torgue and Direction Indicator Air Inlet PREPARATION Before assembling this tool, make sure all parts are present. Compare parts with package contents list. If any part is missing or damaged, do not attempt to assemble the tool. -
Page 10: Assembly Instructions
ASSEMBLY INSTRUCTIONS 1. Remove plastic air inlet protective cap from air inlet (F) (See Figure 1). 2. Insert the male plug into the air inlet (F). Tighten the male plug by turning it clockwise using a 9/16 in. (14 mm) wrench (not included) for an air tight connection. - Page 11 ASSEMBLY INSTRUCTIONS 4. Select the correct impact socket (not included) and push it onto the anvil (B) until it snaps into place (See Figure 4). WA R N I N G Use only adapters and sockets with a torque rating equal to or greater than the tool itself. Always make sure adapters and sockets are properly mounted and secure before using the tool.
-
Page 12: Operating Instructions
OPERATING INSTRUCTIONS 1. See Figure 1. NOTE: This tool has 3 forward and 1 reverse torque settings with the maximum torque being in the reverse direction. 2. To select a torque setting in the forward direction, rotate the collar to where the torque setting 1, 2 or 3 is aligned with the indicator (E) (See Figure 2). -
Page 13: Care And Maintenance
CARE AND MAINTENANCE ALWAYS DISCONNECT TOOL FROM THE AIR SUPPLY BEFORE PERFORMING ANY MAINTENANCE ON THE TOOL. Always make sure the tool is properly lubricated during operation. Proper lubrication is shown in this instruction manual. An in-line oiler (not included) is recommended to help increase tool life and keep the tool properly lubricated. -
Page 14: Troubleshooting
TROUBLESHOOTING If the tool runs slowly or will not operate, check these possible problems and take the required corrective action: POSSIBLE PROBLEM SOLUTION Grit or gum in tool Flush the tool with air tool oil. No oil in tool Lubricate the tool. Adjust the regulator on the tool to the maximum Low air pressure setting. -
Page 15: Warranty
WARRANTY This tool is warranted by the manufacturer to the original purchaser from the original purchase date for three (3) years subject to the warranty coverage described herein. This tool is warranted to the original user to be free from defect in material and workmanship. -
Page 16: Replacement Parts List
REPLACEMENT PARTS LIST... - Page 17 REPLACEMENT PARTS LIST PART DESCRIPTION PART DESCRIPTION Hex screw O-ring Gasket Copper Sleeve Hammer Case Trigger Pin Gasket Trigger Circlip O-ring O ring Rear Air Cover Anvil O-ring Hammer Pin O-ring Air Inlet Hammer Cage Air Inlet Screen Hammer Circlip Bearing Gasket Front end Plate...
- Page 18 LLAVE DE PERCUSIÓN NEUMÁTICA DE ÁNGULO RECTO DE 12,7 MM Y 48,38 KGF-M MODELO #SGY-AIR290 KOBALT y el diseño del logotipo son marcas comerciales o marcas registradas de LF, LLC. Todos los derechos reservados. ADJUNTE SU RECIBO AQUÍ Número de serie Fecha de compra ¿Preguntas, problemas, piezas faltantes? Antes de volver a la...
-
Page 19: Requerimientos Del Compresor
ÍNDICE Requerimientos del compresor..............19 Especificaciones del producto..............20 Información de seguridad................20 Contenido del paquete.................26 Preparación....................27 Instrucciones de ensamblaje................27 Instrucciones de funcionamiento..............29 Cuidado y mantenimiento................30 Solución de problemas.................31 Garantía....................... 32 Lista de piezas de repuesto ................ 33 REQUERIMIENTOS DEL COMPRESOR 620,52 181,22 Requerimientos... -
Page 20: Especificaciones Del Producto
REQUERIMIENTOS DEL COMPRESOR COMPONENTE ESPECIFICACIONES TRACCIÓN 12,7 MM VELOCIDAD SIN CARGA 7000 RPM TORSIÓN MÁXIMA 48,38 KGF-M CONSUMO DE AIRE PROMEDIO 181,22 LPM ENTRADA DE AIRE NPT DE 6,35 MM MANGUERA DE AIRE COMPRIMIDO 9,52 MM PRESIÓN DE TRABAJO 620,52 KPA INFORMACIÓN DE SEGURIDAD Lea y comprenda completamente este manual antes de intentar ensamblar, usar o instalar el producto. - Page 21 INFORMACIÓN DE SEGURIDAD ADVERTENCIA RIESGO DE LESIONES EN LOS OJOS O LA CABEZA LO QUE PODRÍA OCURRIR CÓMO EVITARLO Esta herramienta neumática puede Siempre utilice gafas de seguridad aprobadas por la norma ANSI Z87.1. lanzar materiales como sujetadores, Nunca deje la herramienta en astillas de metal y otros residuos a funcionamiento sin supervisión.
- Page 22 INFORMACIÓN DE SEGURIDAD ADVERTENCIA RIESGO DE ENREDOS LO QUE PODRÍA OCURRIR CÓMO EVITARLO El cabello, la ropa o las joyas sueltas, No use vestimenta suelta, joyas o elementos que puedan atascarse o u otros objetos sueltos pueden enredarse cuando utilice la herramienta. enredarse en los elementos móviles Sáquese las joyas que puedan de esta herramienta y provocar una...
- Page 23 INFORMACIÓN DE SEGURIDAD ADVERTENCIA RIESGO DE DESCARGA ELÉCTRICA LO QUE PODRÍA OCURRIR CÓMO EVITARLO Esta herramienta no se proporciona Nunca utilice herramientas con una superficie de agarre aislada. neumáticas en lugares donde El contacto con un cable “energizado” puedan entrar en contacto con algún también hará...
- Page 24 INFORMACIÓN DE SEGURIDAD ADVERTENCIA RIESGO DE LESIONES PERSONALES LO QUE PODRÍA OCURRIR CÓMO EVITARLO Las herramientas neumáticas pueden Asegúrese siempre de que la pieza provocar que la pieza de trabajo se de trabajo esté firme. Utilice mueva al tener contacto y causar abrazaderas u otros dispositivos lesiones.
- Page 25 INFORMACIÓN DE SEGURIDAD ADVERTENCIA RIESGO DE LESIONES PERSONALES LO QUE PODRÍA OCURRIR CÓMO EVITARLO Utilice siempre accesorios clasificados Los accesorios de mala calidad, para la velocidad de la herramienta inadecuados o dañados pueden eléctrica. desprenderse durante el uso y Nunca use herramientas que se lanzar proyectiles por el área de hayan caído, golpeado o dañado.
-
Page 26: Contenido Del Paquete
CONTENIDO DEL PAQUETE PIEZA DESCRIPCIÓN CANTIDAD Llave de percusión de 12,7mm Yunque Gatillo Giratorio de reversa Giratorio hacia delante Indicador de torsión y dirección Entrada de aire PREPARACIÓN Antes de comenzar a ensamblar esta herramienta, asegúrese de tener todas las piezas. Compare las piezas con la lista de contenido del paquete. No intente ensamblar la herramienta si alguna pieza falta o está... -
Page 27: Instrucciones De Ensamblaje
INSTRUCCIONES DE ENSAMBLAJE 1. Retire la tapa protectora plástica de la entrada de aire de la entrada de aire (F) (consulte la figura 1). 2. Coloque el conector macho en la entrada de aire (F). Apriete el conector macho. Para ello, gírelo en dirección de las manecillas del reloj con una llave de 14 mm (no se incluye) para lograr una conexión hermética. - Page 28 INSTRUCCIONES DE ENSAMBLAJE 4. Seleccione el dado de percusión correcto (no se incluye) y empújelo en el yunque (B) hasta que encaje en su lugar (consulte la figura 4). ADVERTENCIA Solo use adaptadores y dados que tengan una clasificación de torque igual o superior a la de la herramienta.
-
Page 29: Instrucciones De Funcionamiento
INSTRUCCIONES DE FUNCIONAMIENTO 1. Consulte la figura 1. NOTA: esta herramienta cuenta con 3 ajustes de torsión hacia delante y 1 de reversa, siendo esta última dirección la que posee la torsión máxima. 2. Para seleccionar un ajuste de torsión en la dirección hacia delante, gire el anillo hasta que el ajuste de torsión 1, 2 o 3 esté... -
Page 30: Cuidado Y Mantenimiento
CUIDADO Y MANTENIMIENTO Desconecte siempre la herramienta del suministro de aire antes de realizar cualquier tarea de mantenimiento. Siempre asegúrese de que la herramienta esté lubricada correctamente mientras dura su ejecución. La lubricación adecuada se muestra en este manual de instrucciones. Se recomienda usar un lubricador en línea (no incluido) para aumentar la vida útil de la herramienta y mantenerla correctamente lubricada. -
Page 31: Solución De Problemas
SOLUCIÓN DE PROBLEMAS Si la herramienta funciona lentamente o no funciona, verifique estos posibles problemas y realice la acción correctiva correspondiente: POSIBLE PROBLEMA SOLUCIÓN Hay polvo o goma en la Enjuague la herramienta con aceite para herramienta. herramientas neumáticas. No hay aceite en la Lubrique la herramienta. -
Page 32: Garantía
GARANTÍA Esta herramienta está garantizada por el fabricante para el comprador original desde la fecha de compra original por tres (3) años y está sujeta a la cobertura de garantía que se describe en el presente. Esta herramienta tiene una garantía para el usuario original contra defectos en los materiales y la mano de obra. -
Page 33: Lista De Piezas De Repuesto
LISTA DE PIEZAS DE REPUESTO... - Page 34 LISTA DE PIEZAS DE REPUESTO PIEZA DESCRIPCIÓN CANT. PIEZA PIEZA DESCRIPCIÓN DESCRIPCIÓN CANT. CANT. Tornillo hexagonal Junta tórica Empaque Manguito de cobre Caja de martillo Pasador del gatillo Empaque Gatillo Sujetador circular Junta tórica Junta tórica Cubierta de aire posterior Yunque Junta tórica Pasador del percutor...
Need help?
Do you have a question about the SGY-AIR290 and is the answer not in the manual?
Questions and answers