Table of Contents
Advertisement
Available languages
Available languages
PAC-SDW01RC-1
SIMPLE DUCTLESS WIRED
REMOTE CONTROLLER
INSTALLATION MANUAL
SDW01 Kit Includes:
• x1 Controller
• x1 Wall Plate
• x1 Adapter
DISCONNECT POWER
BEFORE BEGINNING INSTALLATION
Can cause electrical shock or equipment damage.
MUST INSTALLED BY A TRAINED,
EXPERIENCED TECHNICIAN
Read these instructions carefully. Failure to
follow these instructions can damage the
product or cause a hazardous condition.
Need Help? Get in Touch.
Web: www.MitsubishiComfort.com
Phone: 1-800-433-4822
Advertisement
Chapters
Table of Contents

Related Manuals for Mitsubishi PAC-SDW01RC-1


Summary of Contents for Mitsubishi PAC-SDW01RC-1
- Page 1 PAC-SDW01RC-1 SIMPLE DUCTLESS WIRED REMOTE CONTROLLER INSTALLATION MANUAL SDW01 Kit Includes: • x1 Controller • x1 Wall Plate • x1 Adapter DISCONNECT POWER BEFORE BEGINNING INSTALLATION Can cause electrical shock or equipment damage. MUST INSTALLED BY A TRAINED, EXPERIENCED TECHNICIAN Read these instructions carefully.
-
Page 2: Table Of Contents
Table of Contents Read Before Installing Table of Contents Mounting the Wall Plate ..........3 Connecting the Wires . -
Page 3: Mounting The Wall Plate
Mounting the Wall Plate 1) Open package to find the wall plate. Table of Contents 2) Position the wall plate in the desired location on the wall, then level and mark the hole positions. 3) Use the mounting hardware provided in the packaging to install the drywall anchors to the wall. -
Page 4: Initial Installer Setup
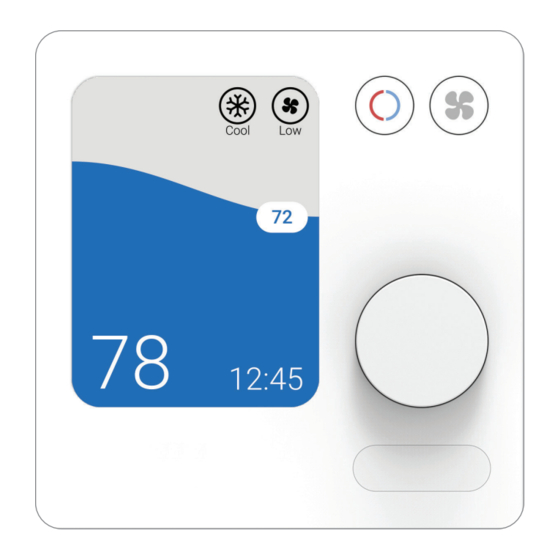
Initial Installer Setup Once the SDW01 controller has established commu- nication with the indoor unit, the initial settings for the indoor unit and SDW01 controller can be configured as described below. 1) Press the dial to open the general menu at the top of the screen, then scroll to the right and select “settings”... - Page 5 M- & P-Series Indoor Unit Function Codes Note: Default settings for Function Codes 1-28 Please refer to the indoor unit manual for unit specific function codes and the description of their values. A are automatically determined by the HVAC equipment. It may take up to 40 seconds to summary is shown in the following tables.
- Page 6 M- & P-Series Indoor Unit Function Codes Mode# Indoor Unit Compatibility Function Setting # Settings With compressor only SVZ/PVA Humidifier Control In Heat mode all the time Standard Change of Defrosting Control PCA/PKA High Humidity Swing 23 *D PLA-BA Vane Swing Wave air flow Not available (OFF) 23 *D...
-
Page 7: Installer Setup Options (Isu) - Advanced Menu
Installer Setup Options (ISU) – Advanced Menu ISU# ISU Name ISU Options Notes Set to Installed when connecting the system to any of the following central • Not installed controllers: AE-200, AE-50, EW-50. When set to Installed, dual setpoints Central Controller Present •... - Page 8 Installer Setup Options (ISU) – Advanced Menu ISU# ISU Name ISU Options Notes • Disabled If enabled, the controller will show a lock symbol for the fan menu, and Lockout Fan Speed • Enabled if the user attempts to modify the fan setting, they will be unable to. •...
-
Page 9: Static Pressure Settings
Static Pressure Settings PEAD-AA Function Code No. Function Code No. Wired or Wireless Wired or Wireless External Static External Static Remote Controller Remote Controller Pressure Pressure Mode No. 8 Mode No. 10 Mode No. 8 Mode No. 10 0.02 in. WG (5 Pa) 0.14 in. -
Page 10: Performing A System Test
Performing a System Test You can test system operation by performing the following steps. 1) Press the dial to open the general menu at the top of the screen, then scroll to the right and select “settings” by pressing the dial again. 2) Scroll down and select “Installer”. -
Page 11: Regulatory Information
• Increase the separation between the equipment and receiver • Connect the equipment into an outlet on a circuit ©2023 Mitsubishi Electric Trane HVAC LLC. different from that to which the receiver is connected Suwanee, GA 30024 • Consult the dealer or an experienced radio/TV... - Page 12 PAC-SDW01RC-1 CONTROLADOR REMOTO CABLEADO SIMPLE SIN DUCTOS MANUAL DE INSTALACIÓN El Kit SDW01 incluye: • 1 Controlador • 1 Plaqueta de pared • 1 Adaptador ESCONECTE LA ALIMENTACIÓN ANTES DE COMENZAR LA INSTALACIÓN Podría causar descargas eléctricas o daño al equipo.
- Page 13 Índice Lea antes de instalar Table of Contents Montaje de la plaqueta de pared ..........3 Conexión de los cables .
-
Page 14: Montaje De La Plaqueta De Pared
Montaje de la plaqueta de pared 1) Abra el paquete, donde encontrará la plaqueta de pared. Table of Contents 2) Coloque la plaqueta de pared en la ubicación deseada sobre la pared, luego póngala a nivel y marque las posiciones de los orificios. 3) Use las herramientas de montaje incluidas en el paquete para fijar a la pared los taquetes para pared de yeso. -
Page 15: Configuración Inicial Del Instalador
Configuración inicial del instalador Cuando el controlador del SDW01 ha establecido comunicación con a unidad interior, se pueden configurar los ajustes iniciales de la unidad interior y del controlador SDW01 como se describe a continuación. 1) Presione el dial para abrir el menú general de la parte superior de la pantalla y luego desplácese a la derecha y presione nuevamente el dial para seleccionar “Settings”... - Page 16 Unidad interior Series M y P Códigos de función Nota: El equipo de climatización determina au- En el manual de la unidad interior podrá encontrar los códigos de función específicos y la descripción de sus tomáticamente los ajustes predeterminados para los Códigos de función 1 a 28.
- Page 17 Unidad interior Series M y P Códigos de función Nro. de Compatibilidad Nro. de Función Ajustes modo de unidad interior ajuste Solo con compresor SVZ/PVA Control del humidificador En modo Calefacción todo el tiempo Cambio de control Normal PCA/PKA descongelamiento Alta humedad Oscilación 23 *D...
-
Page 18: Opciones De Configuración Del Instalador (Isu) - Menú Avanza
Opciones de configuración del instalador (ISU) – Menú avanzado Nombre de ISU Opciones de ISU Notas Configurar como Instalado al conectar el sistema a cualquiera de los siguientes • Not installed [No instalado] Central Controller Present controladores centrales: AE-200, AE-50, EW-50. Cuando se configura como Instalado, [Controlador central presente] •... - Page 19 Installer Setup Options (ISU) – Advanced Menu Nombre de ISU Opciones de ISU Notas Si se activa, el controlador mostrará un símbolo de candado para el menú Lockout Fan Speed [Bloquear • Disabled [Desactivado] del ventilador y el usuario no podrá modificar los ajustes del ventilador. de velocidad de ventilador] •...
-
Page 20: Configuración De Presión Estática
Configuración de presión estática PEAD-AA Nro. de código de función Nro. de código de función Controlador remoto cableado Controlador remoto cableado Presión estática Presión estática o inalámbrico o inalámbrico externa externa Modo Nro. 8 Modo Nro. 10 Modo Nro. 8 Modo Nro. -
Page 21: Ejecución De Prueba Del Sistema
Ejecución de prueba del sistema Para probar el funcionamiento del sistema puede realizar los siguientes pasos. 1) Presione el dial para abrir el menú general de la parte superior de la pantalla y luego desplácese a la derecha y presione nuevamente el dial para seleccionar “Settings”... -
Page 22: Información Normativa
• Reorientar o relocalizar la antena receptora. • Aumentar la separación entre el equipo y el receptor. ©2023 Mitsubishi Electric Trane HVAC LLC. • Conectar el equipo a un tomacorriente en un circuito Suwanee, GA 30024 distinto al que está...
Need help?
Do you have a question about the PAC-SDW01RC-1 and is the answer not in the manual?
Questions and answers
What is the my nevo qr code for the PAC-SDW01RC-1