Advertisement
Quick Links
CITY MULTI Control System
MA Remote Controller
Initial Setting Manual
This manual contains information on setting configurations (initial and maintenance settings). Please read the manual
thoroughly, and make the settings accordingly. Refer to the Installation Manual of this remote controller for how to install the
remote controller, and refer to the Installation Manual of the air conditioning units for how to install them and how to connect
the remote controller wiring. After reading this manual, pass the manual on to the end user to retain for future reference.
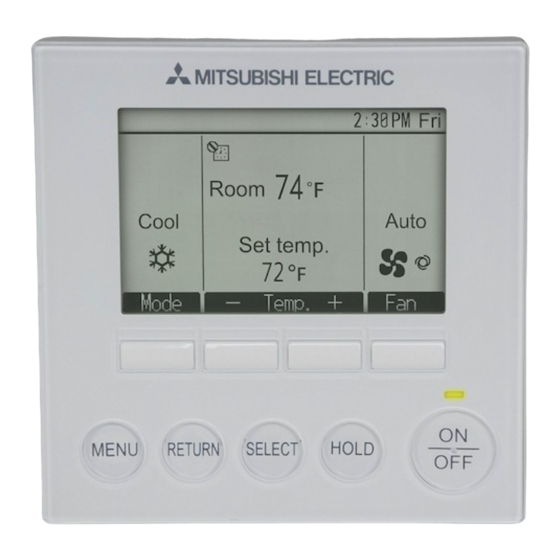
1. Remote controller button functions
(4) RETURN button
(3) MENU button
MENU
(5) SELECT button
(1) ON/OFF button
Use to turn ON/OFF the indoor unit.
(2) Function buttons
Use to select the operation mode or to set the temperature and fan speed
on the Main display.
Use to select items on other screens.
(3) MENU button
Use to bring up the Main menu.
(4) RETURN button
Use to return to the previous screen.
(5) SELECT button
Use to jump to the setting screen or to save the settings.
(6) HOLD button
Use to turn On/Off the hold function.
(7) Operation indicator
Stays lit during normal operation. Blinks during startup and when an error
occurs.
(8) Backlit LCD
Dot display.
When the backlight is off, pressing any button turns the backlight
t will stay lit for a certain period of time depending on the screen.
on and i
Performing any button operation keeps the backlight on.
Note:
When the backlight is off, pressing any button turns the backlight on and
does not perform its function. (except for the ON/OFF and HOLD buttons)
Button operations on the Main menu
Main
Main menu
Cursor
Vane·Louver·Vent. (Lossnay)
High power
Timer
Weekly timer
OU silent mode
Main display: RETURN
Cursor
F1
F2
PAR-30MAAU
(8) Backlit LCD
(2) Function buttons
(7) Operation indicator
(1) ON/OFF button
ON
RETURN
SELECT
HOLD
OFF
(6) HOLD button
Page
Page
F3
F4
For distribution to dealers and contractors
F1, F2, F3, and F4 from the left
Pressing the MENU button will bring up the Main menu as
shown below.
(Refer to section 2.(2) "Main display" for details.)
1/3 Vane
High power
Timer
Weekly timer
OU silent mode
2/3 Restriction
Energy saving
Filter information
Error information
Maintenance
3/3 Initial setting
Service
*1 Refer to the Instructions Book for details.
*2 Explained in this manual.
*3 If no buttons are pressed for 10 minutes on the initial
setting screens, or 2 hours on the service screens (10
minutes on some screens), the screen will automatically
return to the Main display. Any settings that have not
been saved will be lost.
The available items on the menu depend on the connected
indoor unit model. For items not described in the manuals
that are enclosed with the MA remote controller, refer to the
manuals that came with the air conditioning units.
Move the cursor to the desired function with the F1
and F2 buttons, and press the SELECT button to
go to the next page. Password may be required.
The function of the MENU, SELECT, and RETURN
buttons will appear on the setting screens.
Button function guide will appear at the bottom of
the screens.
– 1 –
WT06011X01
·
Louver
·
Vent. (Lossnay)
*1
*1
*1
*1
*1
*1
*1
*1
*1
*1
*2 *3
*2 *3
Advertisement

Subscribe to Our Youtube Channel
Related Manuals for Mitsubishi PAR-30MAAU


Summary of Contents for Mitsubishi PAR-30MAAU
- Page 1 WT06011X01 CITY MULTI Control System MA Remote Controller PAR-30MAAU Initial Setting Manual For distribution to dealers and contractors This manual contains information on setting configurations (initial and maintenance settings). Please read the manual thoroughly, and make the settings accordingly. Refer to the Installation Manual of this remote controller for how to install the remote controller, and refer to the Installation Manual of the air conditioning units for how to install them and how to connect the remote controller wiring.
-
Page 2: Turning On The Power
2. Turning on the power Make sure that the MA remote controller is properly installed according to the instructions in the Installation Manual and that the indoor and outdoor unit installation has been completed before turning on the power. (1) When the power is turned on, the following screen will appear. Notes Please Wait ·... - Page 3 (2) Main display setting Use the F3 or F4 button to select the display mode “Full” or “Basic.” (The factory setting is "Full.") Main display Room Room Auto Setback Full / Basic Setback Auto Set temp. Set temp. Select: SELECT Mode Temp.
- Page 4 (5) Auto mode setting [Button operation] Auto mode Whether or not to use the AUTO mode can be selected by using the F3 or F4 button. This setting is valid only when indoor units with the AUTO mode function are connected. (The factory setting is “Yes”.) Auto mode / No...
- Page 5 5. Service menu (Maintenance password is required.) At the Main display, press the MENU button and select “Service” to make the maintenance settings. When the Service menu is selected, a window will appear asking for the password. To enter the current maintenance password (4 numerical digits), move the cursor to the digit you want to change with the F1 or F2 button, and set each number (0 through 9) with the F3 or F4 button.
- Page 6 To make LOSSNAY interlock setting [3] Enter the addresses of the indoor unit and the LOSSNAY unit to be Lossnay Lossnay interlocked, with the F1 through F4 buttons, select "Set" in the "Function”, IU address IU address and press the SELECT button to save the settings. "Sending data" will Lossnay address Lossnay address appear on the screen.
-
Page 7: Remote Controller Check
[Resetting the error history] [2] Press the F4 button (OK) to Self check Self check [1] Press the F4 button (Reset) on M-NET address M-NET address delete the error history. If the screen that shows the error deletion fails, "Request rejected” history. - Page 8 HEAD OFFICE: TOKYO BLDG., 2-7-3, MARUNOUCHI, CHIYODA-KU, TOKYO 100-8310, JAPAN – 8 –...
Need help?
Do you have a question about the PAR-30MAAU and is the answer not in the manual?
Questions and answers