Table of Contents
Advertisement
Available languages
Available languages
Quick Links
Home power
NOA0025
SPC1234AT/27
READ IT OR WATCH IT
Read instructions or watch easy-to-follow video.
Scan QR code or visit https://byjasco.com/44873i
NOA0025T
ON
OFF
Installation instructions
1. Mounting the timer
• Mount the timer (A) onto a wall near a GFCI outlet.
• Install a nail or screw (not included) into a wall.
The nail or screw must extend at least 7/8in. from the wall and
allow the timer to be above ground level as far as possible.
A
• Hang the timer (A) from the eyelet on the top left
of the unit with the receptacles (D) facing downward so
moisture does not accumulate.
• Plug the grounded power cord (C) into a GFCI outlet.
• Plug the device you wish to control into either receptacle (D).
C
D
A
FCC STATEMENT:
Suppliers Declaration of Conformity | Model #:
NOA0025, SPC1234AT/27
lahoma city, OK 73114
Jasco Products Company LLC, 10 e memorial road Office ok
www.byjasco.com
This device complies with Part 15 of the FCC Rules. Operation is
subject to the following two conditions: (1) this device may not
cause harmful interference, and (2) this device must accept any
interference received, including interference that may cause
undesired operation.
FCC NOTE: The manufacturer is not responsible for any radio or
TV interference caused by unauthorized modifications to this
equipment. Such modifications could void the user's authority to
operate the equipment.
NOTE: This equipment has been tested and found to comply
with the limits for a Class B digital device, pursuant to Part
15 of the FCC Rules. These limits are designed to provide
reasonable protection against harmful interference in a
residential installation. This equipment generates, uses and
can radiate radio frequency energy and, if not installed and
used in accordance with the instructions, may cause harmful
interference to radio communications. However, there is
no guarantee that interference will not occur in a particular
installation. If this equipment does cause harmful interference
to radio or television reception, which can be determined by
turning the equipment off and on, the user is encouraged to
try to correct the interference by one or more of the following
measures:
— Reorient or relocate the receiving antenna.
— Increase the separation between the equipment
and receiver.
— Connect the equipment into an outlet on a circuit
different from that to which the receiver is connected.
—Consult the dealer or an experienced radio/TV
technician for help.
This equipment complies with FCC radiation exposure limits set forth for an uncontrolled
environment. This equipment should be installed and operated with minimum distance 20cm
between the radiator and your body.
2. Preparing the remote:
• Pull the plastic tab on the remote to activate battery.
3. Plug in the timer and press the remote's ON button. The timer
should turn on.
4. Pairing remote and timer:
Timer should be paired to the remote, but if it does not work:
• Plug in the timer, and within five seconds, unplug it. Repeat this
process three times until the red indicator light flashes.
• Press any button on the remote. The red indicator light on the
timer stops flashing when pairing is successful.
5. Changing the battery (B):
• Remove the Phillips screw and slide the battery cover
from the remote.
• Remove the battery and insert a new CR2032
battery — note polatiry.
• Replace the cover and screw.
+
CR2032
WARNING
|
RISK OF ELECTRIC SHOCK:
• FULLY INSERT THE PLUG INTO A GFCI CONTROLLED RECEPTACLE
• KEEP CHILDREN AWAY
• DO NOT USE WITH EXTENSION CORDS
• INSTALL TIMER AS FAR ABOVE GROUND LEVEL AS
POSSIBLE WITH THE RECEPTACLE FACING DOWNWARD
• NOT FOR WATER IMMERSION OR FOR USE WHERE DIRECTLY
EXPOSED TO DRIPPING OR SPLASHING WATER
• UNPLUG BEFORE CLEANING
RISK OF FIRE:
• DO NOT EXCEED ELECTRICAL RATINGS
• DO NOT USE TO CONTROL APPLIANCES THAT CONTAIN HEATING
ELEMENTS (COOKING APPLIANCES, HEATERS, IRONS, ETC)
BATTERY WARNING:
• BATTERIES MAY LEAK HARMFUL LIQUIDS OR IGNITABLE
MATERIALS OR EXPLODE CAUSING INJURY OR
PRODUCT DAMAGE
• DO NOT MIX OLD AND NEW OR OTHER BATTERY TYPES
• REPLACE ALL BATTERIES AT THE SAME TIME
• REPLACE FULLY DISCHARGED BATTERIES IMMEDIATELY
• REMOVE BATTERIES IF PRODUCT IS TO BE UNUSED FOR
AN EXTENDED PERIOD OF TIME
RECEIVER
Functional Range ........................................................................ Up to 80 ft.
Maximum Tungsten Load .......................................................1000 W, 8 A
Maximum Resistive Load ...................................................... 1875 W, 15 A
Rating .......................................................................................125 VAC/60 Hz
TRANSMITTER
Functional Range ........................................................................ Up to 80 ft.
Battery Type ........................................................ Use only CR2032 battery
Functional range may be adversely affected by one or more of the following
factors: weather, radio frequency interference, low transmitter battery, and
obstructions between the transmitter and receiver.
Troubleshooting
1. If the indicator light is not activated by pressing the
button, check the following:
• Ensure the button is pressed and held for at least
one second.
• Verify the battery orientation, noting the polarity.
• Replace the battery. Use only CR2032.
2. The device does not turn on
• Ensure the lamp or electronic device plugged into
the timer is turned ON.
• Ensure the AC power cord is securely plugged into
an AC power outlet.
100%
recyclable
Separate
paper
from plastic
before
recycling
B
byjasco.com/recycle
5023165
paper made from 25%
post consumer waste
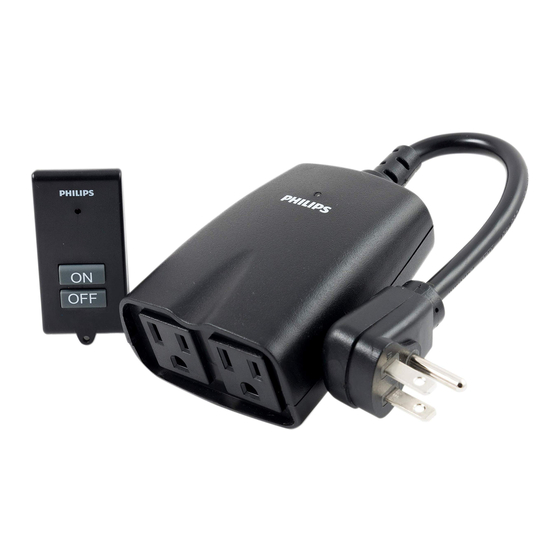
Product description
Indicator lights
On
ON
Off
OFF
2 outlets
A. Outdoor timer
Plug the device(s) to be controlled into the grounded
outlet(s) on the bottom of the outdoor timer.
B. Wireless remote transmitter
Press the ON button on the remote to turn on the lamp(s) or
device(s) plugged into the timer. Press the OFF button to turn
fixture(s) off.
See installation instructions.
MADE IN VIETNAM
Philips and the Philips Shield Emblem are registered trademarks of
Koninklijke Philips N.V. and are used under license. This product has
been manufactured by and is sold under the responsibility of Jasco
Products Company, and Jasco Products Company LLC, 10 E.
Memorial Rd., Oklahoma City, OK 73114 is the warrantor in relation
to this product.
This product has a 1-year limited warranty.
Visit www.philips.com/support for warranty details.
Questions? Contact our U.S.-based Consumer Care
at 1-844-816-0320, M-F, 7AM-8PM Central Time.
For product patent information, visit
www.byjasco.com/patents.
v2 03/2023
Advertisement
Table of Contents

Related Manuals for Philips NOA0025


Summary of Contents for Philips NOA0025
- Page 1 • Plug the device you wish to control into either receptacle (D). Philips and the Philips Shield Emblem are registered trademarks of Koninklijke Philips N.V. and are used under license. This product has been manufactured by and is sold under the responsibility of Jasco Products Company, and Jasco Products Company LLC, 10 E.
- Page 2 • Asegúrese de que la lámpara o el dispositivo electrónico 5. Cambiar la batería (B): enchufado al temporizador está encendido. • Retire el tornillo Philips y deslice la tapa de las pilas del mando a distancia. • Asegúrese de que el cable de alimentación de CA esté...
- Page 3 ISED Statement ‐ English: This device complies with Industry Canada license‐exempt RSS standard(s). Operation is subject to the following two conditions: (1) This device may not cause interference, and (2) This device must accept any interference, including interference that may cause undesired operation of the device. The digital apparatus complies with Canadian CAN ICES‐3 (B)/NMB‐3(B).
Need help?
Do you have a question about the NOA0025 and is the answer not in the manual?
Questions and answers