
Subscribe to Our Youtube Channel
Related Manuals for ESI ALL-FLEX FLEX2-SLV-V3


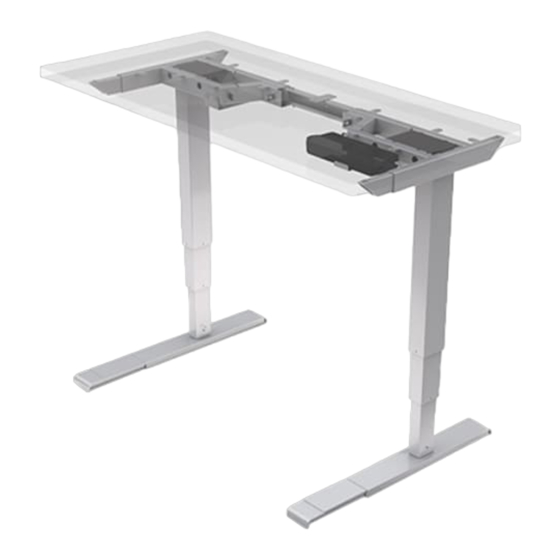
Summary of Contents for ESI ALL-FLEX FLEX2-SLV-V3
- Page 1 ALL-FLEX ™ Model FLEX2-SLV-V3 Model FLEX2-BLK Model FLEX2-WHT ELECTRIC TABLE BASE FLEX2 V3 Rev 01 7 /17 ASSEMBLY AND OPERATION...
-
Page 2: Table Of Contents
ALL-FLEX ELECTRIC TABLE BASE PARTS AND TOOLS ™ PLEASE REVIEW these instructions before beginning the assembly procedures. Check that all the parts shown below were provided with your order. Contact your supplier if any materials are missing. Do not discard the your satisfaction. - Page 3 ASSEMBLY ALL-FLEX ELECTRIC TABLE BASE ™ STEP 1 Allen Key • After turning the legs straight, use the 4mm to fasten the screws to the posts. M6x15 • Allen Key Use the 4mm to secure the screws within E-1 and F-1.
-
Page 4: Cross Channel
ALL-FLEX ELECTRIC TABLE BASE ASSEMBLY ™ STEP 2 Place the cross channel into the hinged posts and extend the frame to the full width of the table, allowing • a minimum space of 1" (25mm) on each side. The frame can be expanded from 34" (86cm) wide to 64" (163cm) wide. The inner channel includes guides to •... - Page 5 ASSEMBLY ALL-FLEX ELECTRIC TABLE BASE ™ STEP 4 Align Rear of Feet with Rear of Table Adjust the position of the frame before screwing it to the work surface. • Align the rear of the feet with the rear of the table. •...
-
Page 6: M10X45
ALL-FLEX ELECTRIC TABLE BASE ASSEMBLY ™ STEP 5 Change the length of the adjustable feet, if necessary. • The length of the feet may be either 22" (55.9cm) or 28" (71.2cm). The feet are shipped in the 28" length. They should be changed to the shorter length if the work surface depth is less than 28". •... - Page 7 ASSEMBLY ALL-FLEX ELECTRIC TABLE BASE ™ STEP 7 If the table depth is 30" (76cm) or more, expand the top supports on each side. • Remove the two machine screws from the top support using the 4mm Allen key. • Slide the top supports to the longer length, as shown below. •...
-
Page 8: Power Cable
ALL-FLEX ELECTRIC TABLE BASE ASSEMBLY ™ STEP 9 Attach the control unit bracket to the frame and Ø5x18 M6x15 the control unit to the work surface. • Secure the control unit bracket to the frame using two M6x15 screws and a 4mm Allen key. •... -
Page 9: Cable Clip
• If there are problems with operation, check that all cable and cord connections are secure. If problems continue, call ESI Customer Service. STEP 13 Use the pre-installed cable clips plus the additional ones provided to secure the cables in position. - Page 10 ALL-FLEX ELECTRIC TABLE BASE ASSEMBLY ™ STEP 14 IMPORTANT: There must be 1" (25mm) of clearance on all sides of the work surface (and other moving parts) to ensure free, unobstructed movement. • Adjust the leveling glides on the feet to level the work surface, if necessary. •...
- Page 11 OPERATION ALL-FLEX ELECTRIC TABLE BASE ™ Memory Table DOWN Memory Buttons Button Height Button Buttons CAUTION: The “zero setting” procedure must be completed before operating the table. See Step 16 on page 8. GENERAL OPERATION Table movement stops when you Move the table up or down by pressing UP or DOWN until...
- Page 12 800.833.3746 esiergo.com © 2017 ESI Ergonomic Solutions. All rights reserved. FLEX2 V3 Rev 01 7/17...
- Page 13 ALL-FLEX ™ Model FLEX3-SLV-V1 Model FLEX3-BLK-V1 Model FLEX3-WHT-V1 3 LEG ELECTRIC TABLE BASE FLEX3-V1 Rev B 11/17 ASSEMBLY AND OPERATION...
-
Page 14: 3Mm 4Mm
ALL-FLEX 3 LEG ELECTRIC TABLE BASE PARTS AND TOOLS ™ PLEASE REVIEW these instructions before beginning the assembly procedures. Check that all the parts shown below were provided with your order. Contact your supplier if any materials are missing. Do not discard the packaging until content that the product operates to your satisfaction. - Page 15 ASSEMBLY ALL-FLEX 3 LEG ELECTRIC TABLE BASE ™ STEP 1 With the worksurface facing down on a soft, clean surface, arrange the leg columns and center leg top supports as shown. • Unfold the hinged side legs and place them motor-side down at the ends of the worksurface. •...
-
Page 16: Cross Channel
ALL-FLEX 3 LEG ELECTRIC TABLE BASE ASSEMBLY ™ STEP 3 Route the side column motor cables under the notch on the angled portion of each frame. Route Cable Under Notch STEP 4 Install the cross channels. • Insert each cross channel into the frame and center leg top support. — The cross channel fits into the rear opening on the frame, under the set screws. - Page 17 ASSEMBLY ALL-FLEX 3 LEG ELECTRIC TABLE BASE ™ STEP 6 Attach the two-piece side top supports. One piece is attached to the frame; the other piece is separate. • Insert the separate piece of the top support into the top support attached to the frame. •...
- Page 18 ALL-FLEX 3 LEG ELECTRIC TABLE BASE ASSEMBLY ™ STEP 8 5mm Allen Key Attach a foot to each of the legs. • Use four M10x45 screws per foot. • Tighten the screws with an 5mm Allen key. M10x45 STEP 9 Adjust the position of the frame before attaching it to the worksurface.
-
Page 19: M5X18
ASSEMBLY ALL-FLEX 3 LEG ELECTRIC TABLE BASE ™ STEP 10 Once the frame is in its final position, attach it to the worksurface using the M5x18 screws (16 total required). • Attach the screws through the mounting tabs on the frame, center leg column, and center leg top supports, as well as the holes at the ends of the side column top supports. •... -
Page 20: M4X23
ALL-FLEX 3 LEG ELECTRIC TABLE BASE ASSEMBLY ™ STEP 12 Attach the control unit to the worksurface. M5x18 • Slide the control unit under the bracket and attach it using M5x18 wood screws. The motor cable and keypad ports should face away from the center column. -
Page 21: Cable Clip
• If there are problems with operation, check that all cable and cord connections are secure. If problems continue, call ESI Customer Service. STEP 16 Use the pre-installed cable clips plus the additional clips provided to secure the cables in position. - Page 22 ALL-FLEX 3 LEG ELECTRIC TABLE BASE ASSEMBLY ™ STEP 17 With the assistance of a helper, turn the table upright and place it in its final position. IMPORTANT: There must be 1" (25mm) of clearance on all sides of the worksurface (and other moving parts) to ensure free, unobstructed movement. • Adjust the leveling glides on the feet to level the worksurface, if necessary. •...
- Page 23 OPERATION ALL-FLEX 3 LEG ELECTRIC TABLE BASE ™ Memory Table DOWN Memory Buttons Button Height Button Buttons CAUTION: The “zero setting” procedure must be completed before operating the table. See Step 15 on page 9. GENERAL OPERATION Table movement stops when you Move the table up or down by pressing UP s or DOWN t until release the UP s or DOWN t button.
- Page 24 800.833.3746 esiergo.com © 2017 ESI Ergonomic Solutions. All rights reserved. FLEX3-V1 Rev B 6/17...
Need help?
Do you have a question about the ALL-FLEX FLEX2-SLV-V3 and is the answer not in the manual?
Questions and answers