Table of Contents
Advertisement
Quick Links
Advertisement
Table of Contents

Related Manuals for Garmin FUSION MS-ARX70


Summary of Contents for Garmin FUSION MS-ARX70
- Page 1 MS-ARX70 Instructions...
- Page 2 © 2018–2023 Garmin Ltd. or its subsidiaries All rights reserved. Under the copyright laws, this manual may not be copied, in whole or in part, without the written consent of Garmin. Garmin reserves the right to change or improve its products and to make changes in the content of this manual without obligation to notify any person or organization of such changes or improvements. Go to support.garmin.com...
-
Page 3: Table Of Contents
Table of Contents Remote Overview......1 Status LEDs..........1 Connecting the ARX70 Remote to a Stereo..........2 Mounting Considerations....2 Mounting the Remote Control....2 Selecting a Zone.......3 Replacing the Battery....... 3 Remote Specifications......4 Troubleshooting........4 物質宣言........... 5 Table of Contents... -
Page 5: Remote Overview
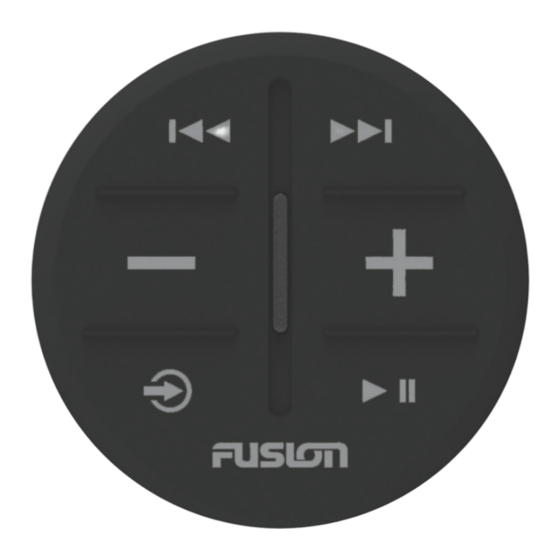
Remote Overview WARNING See the Important Safety and Product Information guide in the product box for product warnings and other important information. Radio sources: Press to tune to the previous station. Other sources: Press to skip to the beginning of the track or to the previous track. Radio sources: Press to tune to the next station. -
Page 6: Connecting The Arx70 Remote To A Stereo
2 Place the stereo into Bluetooth ® discoverable mode. For detailed information, see the stereo owner's manual at support.garmin.com. 3 On the ARX70 remote, press and hold until the status LED starts alternating green and red. The remote searches for the stereo. When the remote pairs successfully, the status LED turns on green briefly and then turns off. -
Page 7: Selecting A Zone
Selecting a Zone On compatible stereos, you can use the ARX70 remote control to select a zone and change the volume of the zone. Some stereos require a software update to enable this functionality of the remote. NOTE: When you connect to a stereo, all zones are selected by default. 1 Press to enter zone selection mode. -
Page 8: Remote Specifications
The battery is low or dead or is installed improperly. Replace the battery (Replacing the Battery, page 3). Withstands incidental exposure to water of up to 1 m for up to 30 min. and is protected against powerful jets of water. For more information go to garmin.com /waterrating. Remote Specifications... -
Page 9: 物質宣言
The LED is only red or orange when I press a button • Move closer to the stereo, and attempt to connect to it again (Connecting the ARX70 Remote to a Stereo, page 2). • Before mounting, make sure you have selected an optimal location for the remote (Mounting Considerations, page 2). - Page 10 TA-2019/5078 April 2023 GUID-8CCF0608-C811-4BBA-B2A2-22D994B0774D v6...
Need help?
Do you have a question about the FUSION MS-ARX70 and is the answer not in the manual?
Questions and answers