Table of Contents
Advertisement
Visit the webpage below
to see supported devices/
download app (scan the QR
code for easy access).
www.i-sens.com/smartlog
i-SENS, Inc.
43, Banpo-daero 28-gil
Seocho-gu, Seoul 06646, Korea
www.i-sens.com
© 2021 i-SENS, Inc. All Rights Reserved
PGL4E1005 REV4 2021-11
Medical Technology Promedt
Consulting GmbH
Altenhofstrasse 80
66386 St. Ingbert, Germany
User Manual
Easy Data Transfer by
•
Bluetooth Connection
2.5" Large, Backlit Display
•
Efficient Diabetes
•
Management with
Tagging Symbols
Blood Glucose
Monitoring System
Advertisement
Table of Contents

Related Manuals for i-SENS CareSens N Premier


Summary of Contents for i-SENS CareSens N Premier
- Page 1 2.5" Large, Backlit Display • Efficient Diabetes • Management with Tagging Symbols i-SENS, Inc. Medical Technology Promedt Consulting GmbH 43, Banpo-daero 28-gil Altenhofstrasse 80 Seocho-gu, Seoul 06646, Korea 66386 St. Ingbert, Germany www.i-sens.com © 2021 i-SENS, Inc. All Rights Reserved PGL4E1005 REV4 2021-11...
- Page 2 The CareSens™ N Premier Meter is designed to work with the SmartLog™ mobile app. When using the CareSens N Premier System, we suggest you pair your CareSens N Premier Meter with your smartphone and track your results.
- Page 3 ® trademarks owned by Bluetooth SIG, Inc. and any use ® of such marks by i-SENS, Inc. is under license. All other trademarks and trade names are those of their respective owners. Note The SmartLog mobile app may not be compatible with all smartphones.
-
Page 5: Table Of Contents
Specifications .................... 8 Inserting or Replacing the Batteries ............11 Caring for Your System ................13 CareSens N Blood Glucose Test Strip ............15 CareSens N Premier Blood Glucose Meter ..........17 Preparation Setting Up Your System................20 Setting Up Bluetooth ................ -
Page 6: Important Information: Read This First
For optimum safety and benefits, please read the entire manual contents before using the system. Intended use: CareSens N Premier Blood Glucose Monitoring System is used for the quantitative measurement of the glucose level in capillary whole blood as an aid in monitoring diabetes management effectively at home or in clinical settings. - Page 7 • to minimise code related errors in monitoring by using the no-coding function. The CareSens N Premier Blood Glucose Meter should be used • only with the CareSens N Test Strips. An abnormally high or low red blood cell count (hematocrit level •...
-
Page 8: Specifications
Size 103 x 54 x 17 mm Weight 71.7 g (with batteries) Bluetooth Frequency range: 2.4–2.4835 GHz • ® technology Operating range distance: • maximum 10 meters (unobstructed) Operating channels: 40 channels • Security encryption: 128-bit AES • (Advanced Encryption Standard) 8 www.i-sens.com... - Page 9 Operating ranges Temperature 5–50 °C Relative humidity 10–90 % Hematocrit 15–65 % Storage/transport conditions Meter (with batteries) 0–50 °C Temperature Test strip 1–30 °C Control solution 8–30 °C Relative humidity Test strip 10–90 % www.i-sens.com 9...
- Page 10 CareSens N Premier Blood Glucose Meter • Owner's Booklet • Quick Reference Guide • Batteries • CareSens N Premier Blood Glucose Monitoring System may include the following items: CareSens N Blood Glucose Test Strips • Lancets • Lancing Device •...
-
Page 11: Inserting Or Replacing The Batteries
Inserting or Replacing the Batteries The CareSens N Premier meter uses two 3.0 V lithium batteries. Before using the meter, check the battery compartment and insert batteries if empty. When the symbol appears on the display while the meter is in use, the batteries should be replaced as soon as possible. The test results may not be saved if the batteries run out. - Page 12 Place the cover on the battery compartment. Push it down until you hear the tab click into place. Note Removing the meter batteries will not affect your stored results. However you may need to reset your meter settings. See page 20. 12 www.i-sens.com...
-
Page 13: Caring For Your System
Do not apply samples other than capillary whole blood or • control solution to the test strip. Store the meter in a cool and dry place between between • 0–50 °C. www.i-sens.com 13... - Page 14 If you need to throw your meter away, you should follow existing policies and procedures of your own country or region. For information about correct disposal, please contact your local council or authority. If you need assistance, contact your authorised i-SENS sales representative or visit www.i-sens.com. 14 www.i-sens.com...
-
Page 15: Caresens N Blood Glucose Test Strip
CareSens N Blood Glucose Test Strip The CareSens N Premier Blood Glucose Monitoring System measures blood glucose quickly and accurately. It automatically absorbs the small blood sample applied to the narrow edge of the strip. Contact bars Gently push the test strip, with its... - Page 16 CareSens N test strip package insert. Caution Keep the meter and testing supplies away from young children. • Drying agents in the vial cap may be harmful if inhaled or • swallowed and may cause skin or eye irritation. 16 www.i-sens.com...
-
Page 17: Caresens N Premier Blood Glucose Meter
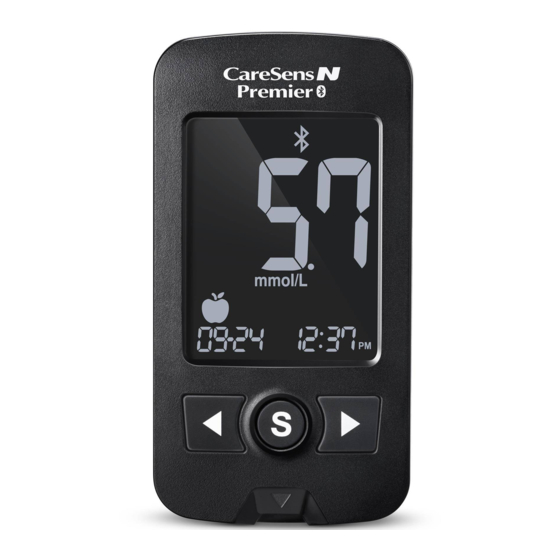
CareSens N Premier Blood Glucose Meter Data Port Display Used to transfer Shows results, data from the messages meter to a computer with a cable Button Button Turns the meter Turns the meter on, selects on/off, confirms or changes menu selections,... - Page 18 CareSens N Premier Blood Glucose Meter Display 11 12 appears when test results stored in 1 Memory symbol the memory are displayed appears when the post-meal alarm 2 PP2 alarm has been set 3 Bluetooth symbol indicates that Blutooth is turned on ®...
- Page 19 It is recommended to check if the display screen on the meter matches the illustration above every time the meter turns on. Do not use the meter if the display screen does not exactly match the illustration as the meter may show incorrect results. www.i-sens.com 19...
-
Page 20: Setting Up Your System
Follow steps 2–3 to pair your meter and smartphone. Pairing allows the meter to communicate wirelessly with your smartphone. Ensure that devices are within the maximum Bluetooth range (10 metres). Before pairing your meter and ® smartphone, download and install the SmartLog mobile app on your smartphone. 20 www.i-sens.com... -
Page 21: Setting Up Bluetooth
® on. When the symbol is not present on the screen, the Bluetooth feature is ® off. When you need to turn off/on the Bluetooth feature, press the button ® when OFF/On blinks on the screen. www.i-sens.com 21... - Page 22 Look for 'CareSens' and the last 4 characters of the meter Serial XXXXXXXXXXXX serial number on the SmartLog number mobile app screen to correctly identify your meter. Touch your meter's ID (CareSens XXXX) on the SmartLog mobile app screen. 22 www.i-sens.com...
- Page 23 'FAIL' and then 'OFF', repeat steps 2 to 5. Note Some smartphones, especially those that are not tested or approved by i-SENS, may be incompatible with your meter. Visit www.i-sens.com/smartlog for more information about supported smartphones. You can also scan the QR code on the back cover of this user manual.
-
Page 24: Adjusting The Date And Time
Step 6 Setting the Date Press the button until the correct date appears. Press the button to confirm the date and to go to the next step. 24 www.i-sens.com... - Page 25 After the hour is set, press the button to go to the next step. Step 9 Setting the Minute Press the button until the correct minute appears. After setting the minute, press the button to go to the next step. www.i-sens.com 25...
-
Page 26: Setting The Sound On/Off
If the sound is set to OFF, none of the sound functions will work. After setting the sound, press the button to progress to the next step. Note symbol is displayed only when the sound is set to OFF. 26 www.i-sens.com... -
Page 27: Turning On The Strip Expiration Date Indicator
'EP' when the test strip is inserted. 'EP' shows alternately also when the test result is displayed right after the test. If the expiration date is set to October of 2024, the meter will display 'EP' at the start of November, 2024. www.i-sens.com 27... -
Page 28: Turning On The Hypoglycemia (Hypo) Indicator
Caution Ask your healthcare professional to help you decide what your hypoglycemia level is before setting your level. 28 www.i-sens.com... -
Page 29: Setting The Strip Expiration Date Indicator
Setting the Month A number indicating the month will blink at the bottom of the screen. Press the button until the correct month appears. After setting, press and hold the button for 3 seconds to turn off the meter. www.i-sens.com 29... -
Page 30: Checking The System
(20–25 °C). Before using the control solution, shake the bottle, discard the • first few drops and wipe the tip clean. Close the control solution bottle tightly and store at a • temperature between 8–30 °C. 30 www.i-sens.com... -
Page 31: Control Solution Testing
Be careful not to bend the strip while pushing it in. symbol will show up. Step 2 You can flag the control solution test result by pressing the button for 3 seconds. To undo the control solution flag, press the button for 3 seconds again. www.i-sens.com 31... - Page 32 The display segments will rotate clockwise and a test result will appear after the meter counts down from 5 to 1. When flagged, the result is stored in the meter's memory but it is not included in the averages. 32 www.i-sens.com...
- Page 33 The range printed on the test strip vial is for the CareSens Control Solution only. It has nothing to do with your blood glucose level. Note The CareSens Control Solution can be purchased separately. Please contact your authorised i-SENS sales representative. www.i-sens.com 33...
-
Page 34: Comparing The Control Solution Test Results
If results continue to fall outside the range printed on the test strip vial, the CareSens N test strip and CareSens N Premier meter may not be working properly. Do not use your system and contact i-SENS sales representative. -
Page 35: Using The Lancing Device
You will need a lancing device in order to collect a blood sample. You may use the lancing device that is included in the CareSens N Premier Blood Glucose Monitoring System or any other medically approved lancing device. Lancet Holder... -
Page 36: Preparing The Lancing Device
Unscrew and remove the lancing device tip. Step 3 Firmly insert a new lancet into the lancet holder. Hold the lancet firmly. Gently twist to pull off protective disk. Save disk to recap lancet after use. Replace lancing device tip. 36 www.i-sens.com... - Page 37 To cock the lancing device, hold the body of lancing device in one hand and pull the sliding barrel with the other hand. The device is loaded when you feel a click and the load confirmation window turns red. www.i-sens.com 37...
-
Page 38: Preparing The Meter And Test Strip
Insert a test strip with the contact bars facing upwards into the meter’s test strip port. Push the strip in gently until the meter beeps. Be careful not to bend the test strip. The symbol will appear on the screen. 38 www.i-sens.com... -
Page 39: Applying Blood Sample
(thickness and stickiness) or insufficient volume, the Er4 message may appear. It is recommended to place the test strip vertically into the blood sample site as shown below. Good Insufficient Sample Sample www.i-sens.com 39... - Page 40 The blood sample may run down the surface of the test strip and flow into the test strip port. Do not store your meter in unsanitary or contaminated sites. • 40 www.i-sens.com...
- Page 41 • The SmartLog mobile app must be launched. • The meter will transmit data in the following cases, When the strip is ejected after measuring, • When the meter is turned on (only when untransmitted data • exists). www.i-sens.com 41...
- Page 42 If you do not want to add any flags on the test result, remove the strip after the test result is displayed. No flag Pre-meal flag Post-meal flag Fasting flag Control solution flag 42 www.i-sens.com...
-
Page 43: Discarding Used Lancets
Push the lancet ejector forward with the thumb to dispose of the used lancet in a proper biohazard container. Caution The lancet is for single use only. Never share or reuse a lancet. Always dispose of lancets properly. www.i-sens.com 43... -
Page 44: Alternate Site Testing
Then press the release button while continuing to apply pressure. Keep holding the lancing device against your skin until sufficient (at least 0.5 μL, actual size: ) blood is drawn. Carefully lift the lancing device away from your skin. 44 www.i-sens.com... - Page 45 During two (2) hours after a meal or exercise • When sick or when glucose levels seem quite lower than test • value When hypoglycemia is not well recognised • When insulin has the biggest effect • During two (2) hours after an insulin injection • www.i-sens.com 45...
- Page 46 If the sample drop of blood runs or spreads due to contact • with hair or with a line in your palm, do not use that sample. Try puncturing again in a smoother area. 46 www.i-sens.com...
-
Page 47: Hi And Lo Messages
(very low glucose levels). If 'Lo' is displayed again upon retesting, please contact your healthcare professional immediately. Note Please contact your authorised i-SENS sales representative if such messages are displayed even though you do not have hyperglycemia or hypoglycemia. www.i-sens.com 47... -
Page 48: Target Blood Glucose Ranges
140 mg/dL (7.8 mmol/L) two hours after meals. *Fasting is defined as no caloric intake for at least eight hours. Reference 1. American Diabetes Association (Standards of Medical Care in Diabetes – 2021. Diabetes Care, January 2021, vol. 44 (Supplement 1): S15-S33. 48 www.i-sens.com... -
Page 49: Transferring Test Results Using Cable
Transferring Test Results Using Cable Test results stored in CareSens N Premier meter can be transferred from the meter to a computer using SmartLog™ software and cable. The meter screen displays 'Pc' when it is connected to the computer using the data cable. For more information, contact your authorised i-SENS sales representative or visit www.i-sens.com. -
Page 50: Meter Memory
Meter Memory The CareSens N Premier meter can save up to 1,000 glucose test results with time and date. If the memory is full, the oldest test result will be deleted and the latest test result will be stored. The meter calculates and displays the averages of total test... - Page 51 Press the button to view button 1, 7, 14, 30 and 90-day Fasting average values and the average (1, 7, 14, 30, number of tests performed 90 days) during fasting with the symbol for the last test button period. www.i-sens.com 51...
- Page 52 Step 6 Use the button to scroll back through the averages seen previously. Press the button to turn off the meter. Note The control solution test results saved with the symbol are not included in the averages. 52 www.i-sens.com...
-
Page 53: Viewing Test Results Stored In Memory
After checking the stored test results hold the button to turn off the meter. Note The control solution test results saved with symbol will be displayed with symbol when you review the stored test results. www.i-sens.com 53... -
Page 54: Setting The Alarm Function
Setting the Alarm Function Four types of alarms can be set in the CareSens N Premier meter: one post-meal alarm (PP2 alarm) and three time set alarms (alarm 1–3). The PP2 alarm goes off 2 hours after setting the alarm. The alarms ring for 15 seconds and can be silenced by pressing the , button or by inserting a test strip. -
Page 55: Setting The Time Alarms (Alarm 1-3)
‘alarm 1’ will be displayed while ‘OFF’ blinks on the screen. Step 2 On pressing the button, ‘alarm 1’ is set and ‘On’ is displayed on the screen. Press the button again to cancel ‘alarm 1’. ‘OFF’ will blink on the screen. www.i-sens.com 55... - Page 56 Press the button to finish and to go to ‘alarm 2’ setting. Repeat steps 2 to 4 to set the remaining time alarms (alarm 2–3). Step 6 Press the button for 3 seconds to finish and turn the meter off. 56 www.i-sens.com...
-
Page 57: Understanding Error Messages
(5–50 °C) and repeat the test after the meter and test strips have reached a temperature within the operating range. The blood sample has abnormally high viscosity or insufficient volume. > Repeat the test after inserting a new test strip. www.i-sens.com 57... - Page 58 An electronic error occurred during the test. > Repeat the test with a new test strip. If the error message persists, contact your authorised i-SENS sales representative. Note If the error messages persist, contact your authorised i-SENS sales representative. 58 www.i-sens.com...
-
Page 59: General Troubleshooting
The test result doesn't match the Check the expiration date of the test • way you feel. strip. Perform control solution test. • Note If the problem is not resolved, please contact your authorised i-SENS sales representative. www.i-sens.com 59... -
Page 60: Performance Characteristics
The performance of CareSens N Premier Blood Glucose Monitoring System has been evaluated in laboratory and in clinical tests. Accuracy: The accuracy of the CareSens N Premier Blood Glucose Monitoring System (Model GM01AAB) was assessed by comparing blood glucose results obtained by patients with those obtained using a YSI Model 2300 Glucose Analyzer, a laboratory instrument. - Page 61 System accuracy results for glucose concentrations between 28.6 mg/dL (1.6 mmol/L) and 512 mg/dL (28.4 mmol/L) Within ±15 mg/dL (±0.83 mmol/L) and Within ±15 % 600/600 (100.0 %) Precision: The precision studies were performed in a laboratory using CareSens N Premier Blood Glucose Monitoring Systems. Within Run Precision 42 mg/dL SD = 1.8 mg/dL (2.3 mmol/L) (0.1 mmol/L)
-
Page 62: Influence Quantities
This study shows that there could be variation of up to 4.4 % Influence Quantities Packed Cell Volume (Hematocrit) Packed cell volume evaluation was conducted in various hematocrit levels. The range of hematocrit levels within the acceptance criteria is 15–65%. 62 www.i-sens.com... - Page 63 Cholesterol 500 mg/dL Creatinine 3 mg/dL Dopamine 13 mg/dL EDTA 180 mg/dL Galactose 60 mg/dL Gentisic acid 50 mg/dL Glutathione (Red) 17 mg/dL Hemoglobin 500 mg/dL Heparin 8000 U/dL Hydrocortisone 1 mg/dL Ibuprofen 40 mg/dL Icodextrin 2 mg/dL www.i-sens.com 63...
-
Page 64: User Performance Evaluation
100 lay persons showed the following results: 96.7 % within ±15 mg/dL (±0.83 mmol/L) of the medical laboratory values at glucose concentrations below 100 mg/dL (5.55 mmol/L), and 99 % within ±15 % of the medical laboratory values at glucose concentrations at or above 100 mg/dL (5.55 mmol/L). 64 www.i-sens.com... -
Page 65: Warranty Information
Warranty Information Manufacturer’s Warranty i-SENS, Inc. warrants that the CareSens N Premier meter shall be free of defects in material and workmanship in normal use for a period of five (5) years. The meter must have been subjected to normal use. The warranty does not cover improper handling, tampering, use, or service of the meter. - Page 66 MEMO 66 www.i-sens.com...
Need help?
Do you have a question about the CareSens N Premier and is the answer not in the manual?
Questions and answers