Advertisement
Quick Links
Advertisement

Related Manuals for Mercia Garden Products 03DTSHAX0608FGD4MW-V2


Summary of Contents for Mercia Garden Products 03DTSHAX0608FGD4MW-V2
- Page 1 2mm Drill bit...
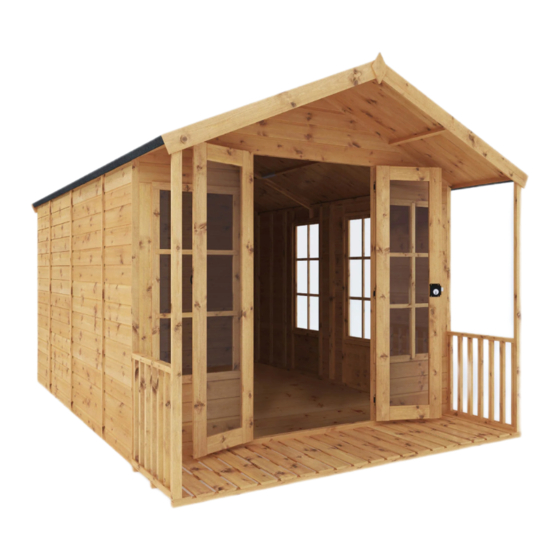
- Page 3 6x8 Summer House 6x8 Summer House with Veranda Pack Required: 03DTSHAX0608FGD4MW-V2QTY 1 Pack Required: Overall Dimensions: 03DTSHAX0608FGD4MW-V2 QTY 1 Width = 2494mm 03DTSHAX0208WCVPB-V2 QTY 1 Depth = 2457mm Overall Dimensions: Height = 2344mm Width = 2494mm Depth = 2457mm Base Dimensions:...
- Page 4 Building Content - Pack A Door Framing 28x28x940mm QTY 1 03DTSHAX0608FGD4MW-V2 FS2828-940mm Press Lock QTY 1 PI-07-0018 Door Frame Strip 12x40x996mm QTY 1 S1240-996mm Door Frame Strip 12x40x1740mm QTY 2 Ring Pull QT Y2 S1240-1740mm PI-07-0032 Door Cover Trim 12x43x940mm QTY 1...
- Page 5 Building Content - Pack B Building Content - Pack C 03DTSHAX0208NWPB-V2 03DTSHAX0208WCVPB-V2 Floor Block QTY 8 F2828-400mm Floor Extension QTY 2 Ridge Bar 27x70x599mm QTY 1 AI-R11MBF1175X600-V1 Rail QTY 2 F2770-599mm Veranda Floor QTY 2 AI-03FR600X595-V1 AI-R11STVF2380X622-V1 U Channel QTY 3 Roof Support - 27x44x1719mm QTY 2 PI-07-0013 F2744-G-1739mm...
-
Page 6: Pre-Assembly
2ft EXTENSION PACK Before assembly IMPORTANT: Pre-drill before xing screws. please make sure you have a Step 1a suitable base ready to erect your building Parts needed 8x8 Summer House - No. 37 QTY 2 10x8 Summer House - No. 37 QTY 4 Place the Floor Extensions (No.37) onto a rm and level base. - Page 7 Step 2 2ft EXTENSION PACK IMPORTANT: Pre-drill before xing screws. IMPORTANT: Pre-drill before xing screws. Parts Needed- No.2 QTY 1 Step 1b No.3 QTY 1 Parts needed - No. 6 QTY 2 Place the Side panel (No.2) and the Back No.
- Page 8 Step 3 Step 4 IMPORTANT: Pre-drill before xing screws. IMPORTANT: Pre-drill before xing screws. Parts Needed- No.2 QTY 1 Parts Needed- No.1 QTY 2 No.3 QTY 1 Place the Side Window panels (No.1) Place the Side panel (No.2) and the Back onto the oor.
- Page 9 2ft EXTENSION PACK Step 5 IMPORTANT: Pre-drill before xing screws. IMPORTANT: Pre-drill before xing screws. 10x8 SUMMER HOUSE ONLY Parts Needed- No.7 QTY 2 Place the Front Window panels (No.7) onto oor, x the corners using 3x50mm Step 4a screws Parts Needed- No.39 QTY 2 Do not secure the building to the oor Place the Plain Panel Extensions (No.39) onto the...
- Page 10 Step 6 Step 8 IMPORTANT: Pre-drill before xing screws. IMPORTANT: Pre-drill before xing screws. Parts Needed- No.15 QTY 1 Parts Needed- No.10 QTY 1 No.11 QTY 1 Place the Door Framing (No.15) onto the No.12 QTY 1 oor, between the Front Window Panels. No.13 QTY 1 Ensure the framing is ush to the Window Panel framing.
- Page 11 2ft EXTENSION PACK Step 9 IMPORTANT: Pre-drill before xing screws. IMPORTANT: Pre-drill before xing screws. Parts Needed- No.19 QTY 1 Step 9a No.31 QTY 2 8x8 Summer House Parts Needed - No.41 QTY 1 Fix the Corner Braces (No.31) to each - No.36 QTY 1 end of the Ridge Bar (No.19) using 10x8 Summer House Parts Needed...
- Page 12 Step 11 Step 10 IMPORTANT: Pre-drill before xing screws. IMPORTANT: Pre-drill before xing screws. Parts needed - No. 5 QTY 4 Parts Needed- No.14 QTY 2 No. 36 QTY 2 No.22 QTY 2 For 2ft Extension Pack, go to Step Locate the two Roof Truss’...
- Page 13 2ft EXTENSION PACK 2ft EXTENSION PACK IMPORTANT: Pre-drill before xing screws. IMPORTANT: Pre-drill before xing screws. Step 11a Step 11a Continued 8x8 Summer House Parts Needed 10x8 Summer House Parts Needed - No.5 QTY 4 - No.5 QTY 4 8x8 Summer House Parts Needed - No.38 QTY 2 - No.38 QTY 4 - No.36 QTY 2...
- Page 14 Step 12 2ft EXTENSION PACK IMPORTANT: Pre-drill before xing screws. IMPORTANT: Pre-drill before xing screws. Parts needed - No. 14 QTY 2 10X8 SUMMER HOUSE ONLY 8x8 Summer house = as below Step 12a 10x8 Summer House = See Step 12a Parts needed - No.
- Page 15 Step 13 Step 14 IMPORTANT: Pre-drill before xing screws. IMPORTANT: Pre-drill before xing screws. Parts needed - No. 20 QTY 2 No. 21 QTY 2 Once the Roof Truss is in place and secured, x the Roof panels to the Place Truss Block A (No.20) under the top building using...
- Page 16 Step 15 Step 16 IMPORTANT: Pre-drill before xing screws. IMPORTANT: Pre-drill before xing screws. Parts Needed - No.4 QTY 4 Once the roof is xed, attach the building No.32 QTY 16 to the Floor with 50mm screws. Fix the Window Blocks (No. 32) to the sides, Ensure the screws go through the panel top and bottom (internally) of the Window into the Floor framing...
- Page 17 Step 18 Step 20 IMPORTANT: Pre-drill before xing screws. IMPORTANT: Pre-drill before xing screws. Parts Needed - No.28 QTY 2 Parts Needed - No.27 QTY 1 No.18 QTY 1 Internal View Fix the Press lock (No.27) to the back Fix a Ring Pull (No. 28) to the front of (internally) of the Master door (No.
- Page 18 Step 22 2ft EXTENSION PACK IMPORTANT: Pre-drill before xing screws. IMPORTANT: Pre-drill before xing screws. Parts Needed- No.30 QTY 2 Step 23a 8x8 Summer House Parts Needed - No.25 QTY 9 Fix the Turn Buttons (No.30) above each door (externally) using 1x20mm 10x8 Summer House Needed - No.25 QTY 11 black screw per Turn Button.
- Page 19 Step 24 Step 25 IMPORTANT: Pre-drill before xing screws. IMPORTANT: Pre-drill before xing screws. Parts Needed- No.23 QTY 4 Parts Needed- No.24 QTY 2 Fix the Gable Cover Trims A (No.23) Fix the Gable Cover Trims B (No.24) to the to the building with 2x30mm screws front and back of building with 2x30mm per Trim.
-
Page 20: After Treatment
Step 26 Step 27 IMPORTANT: Pre-drill before xing screws. Parts Needed - No.34 QTY 1 Parts Needed - No.26 QTY 4 No.33 QTY 2 Cut the Felt (No. 34) into 3 sheets measuring: 2510mm (L0 x 1000mm (W) Fix the Fascia (No.26) to each end of and lay onto the roof in the order shown in the the roof, securing with 3x30mm diagram, making sure there is 50mm of overhang... - Page 21 Step 27b VERANDA PACK IMPORTANT: Pre-drill before xing screws. Parts Needed- No.42 QTY 4 IMPORTANT: Pre-drill before xing screws. Step 26b Place the assembled Veranda Floor (No.42) at the front of the building, ush to the front of Parts Needed - No.42 QTY 2 the building.
- Page 22 Step 29b IMPORTANT: Pre-drill before xing screws. Step 31b Parts Needed- No.44 QTY 2 Parts Needed- No.34 QTY 1 Fix the Roof Support (No.44) to the building Cut the Felt (No. 34) into 3 sheets measuring by screwing through the roof into the top of 2510mm (L) X 1000mm(W) the framing using 1x50mm screw and and lay onto the roof in the order shown in...
- Page 23 Step 32b IMPORTANT: Pre-drill before xing screws. Parts Needed - No.26 QTY 4 No.33 QTY 2 Locate the Fascias (No. 26) on each end of the roof, securing with 3x30mm screws per Fascia. Ensure the screws go through the roof framing Fix the Diamond Finials (No.33) to the Fascias using 2x30mm screws per nial.
Need help?
Do you have a question about the 03DTSHAX0608FGD4MW-V2 and is the answer not in the manual?
Questions and answers