
Related Manuals for iLiving ILG8SF16V-ST


Summary of Contents for iLiving ILG8SF16V-ST
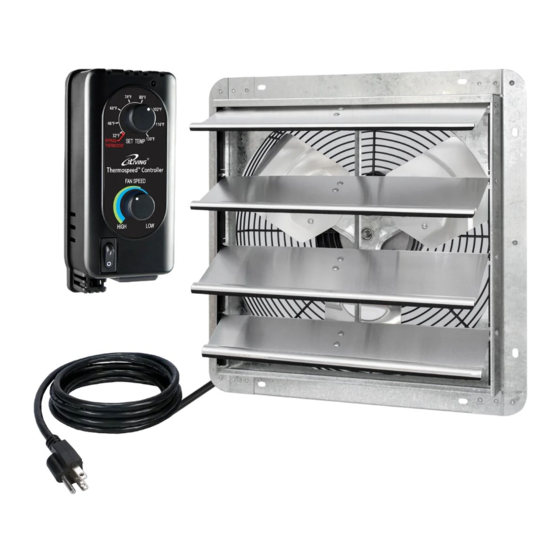
- Page 1 SHUTTER MOUNTED EXHAUST FAN WITH THERMOSPEED (TM) CONTROLLER Models: ILG8SF10V-ST/ILG8SF12V-ST/ILG8SF16V-ST ILG8SF18V-ST/ILG8SF20V-ST OWNER'S MANUAL PLEASE READ AND SAVE THESE INSTRUCTIONS...
-
Page 2: Electrical Requirements
PLEASE READ AND SAVE THESE INSTRUCTIONS. READ CAREFULLY BEFORE ATTEMPTING TO ASSEMBLE, INSTALL, OPERATE, OR MAINTAIN THE PRODUCT DESCRIBED. PROTECT YOURSELF AND OTHERS BY OBSERVING ALL SAFETY INFORMATION. FAILURE TO COMPLY WITH INSTRUCTIONS COULD RESULT IN PERSONAL INJURY AND/OR PROPERTY DAMAGE! RETAIN INSTRUCTIONS FOR FUTURE REFERENCE. -
Page 3: General Safety Instructions
GENERAL SAFETY INSTRUCTIONS 1. Do not depend on any switch as the sole means of disconnecting power when installing or servicing the fan. 2. Always disconnect, lock-out, and tag-out power source before installing or servicing. Failure to disconnect power source can result in fire, shock, or serious injury. -
Page 4: Installation Instructions
INSTALLATION INSTRUCTIONS INSTALLATION INSTRUCTION 1. The unit should be securely mounted in a rigid framework. NOTE: Allowing the fan frame to flex or move will result in excess vibrations, which may cause possible premature motor, propeller, or shutter failure. 2. Install any auxiliary components such as thermostats, switches, or speed controls. - Page 5 Installation Diagram for ILG8SF10V-ST, ILG8SF12V-ST Shutter Fan Models: (Fan Control ILG8SF12V-ST Model:ILG8SFST) ILG8SF10V-ST Installation Diagram for ILG8SF16V, ILG8SF18V, ILG8SF20V-1 Remove the 2 screws from the Junction Box. Open the Junction Box Cover. 2. Unscrew the Thread-Lock Sealing Nut. 3. Thread the supplied power cord through the Thread-Lock Sealing Nut and Cable Gland body in turn.
- Page 6 5. Tighten the Thread-Lock Sealing Nut. 6. Thread-Lock Sealing Nut tightening requirements: No movement of the power cord under a maximum tension of 36 LBS. 7. Install the junction box cover. 8.Insert the plug into the Fan Control (ILG8SFST). Shutter Fan Models: Fan Control Model:...
-
Page 7: General Specifications
GENERAL SPECIFICATIONS 115V, 60Hz Power source Mounting Position Vertical Frame Material Galvanized Steel Shutter Blade Material Aluminum Alloy Propeller Material Aluminum Alloy and Galvanized Steel Dimensions (Inches) Figure 3 Suggested Prop. wall opening Dia. MODEL (Sq) ILG8SF10V-ST 10" 13" 13" 5 3/4"... - Page 8 Performance CFM Air Delivery @ Static Pressure Shown Sones @ Prop. Nom. Nom. Bearing 0.0" SP @ MODEL Dia. Amps Type 0.00" 0.125" 0.25" ILG8SF10V-ST 10" 1/20 0.60 1650 Sleeve 6.19 ILG8SF12V-ST 12" 1/20 0.60 1650 Sleeve ILG8SF16V 16" 1/20 0.85 1550 Ball...
-
Page 9: Control Descriptions
FAN CONTROL (ILG8SFST) Control Descriptions Name and Function A. Set Temp Knob C. Power Switch B. Fan Speed Knob D.Power LED Display Operation Instruction Power control: Power Switch To start the controller, switch the power button to I position. To turn off the controller, switch the power button to position. - Page 10 Temperature control: 1. Adjust the setting temperature range from 32 degrees F to 130 degrees F using SET TEMP knob 2. When the room temperature drops to ≤ the set temperature -2~3 degree F, the fan stops running. When the room temperature rises to ≥ the set temperature+ 2~3 degree F, the fan will turn on.
- Page 11 MAINTAINANCE 1. Disconnect power source before servicing. 2. Periodically clean off accumulated dirt from the propeller, guard, motor, and shutter. Do not depend on any switch as the sole means of disconnecting power when installing or servicing. If power disconnect is not visible, utilize OSHA Lock out/Tag out procedure. Failure to do so may result in fatal electrical shock.
-
Page 12: Troubleshooting
TROUBLESHOOTING Symptom Possible Cause(s) Solution Dry motor bearings Re-lubricate motor bearings as per instructions or replace motor. Loose propeller Tighten set screws on propeller hub. Excessive noise Bent or damaged Replace propeller propeller Loose guard assembly or Tighten as required to 15- motor fasteners. - Page 13 Love it? Help us make the product more for you. Let us know with a customer review. Please visit: https://www.amazon.com/review/review-your-purchases# At iLiving USA, we are committed to bringing top quality products to our customers. iLIVING USA 860 Mahler Road, Burlingame, CA 94010...
Need help?
Do you have a question about the ILG8SF16V-ST and is the answer not in the manual?
Questions and answers