Table of Contents
Advertisement
Available languages
Available languages
Quick Links
Advertisement
Table of Contents

Subscribe to Our Youtube Channel
Related Manuals for Nivel System NL740R


Summary of Contents for Nivel System NL740R
- Page 2 Thank you for purchasing a Nivel System NL740R/G laser level. To best use the purchased instrument, please read the instructions carefully and put in a convenient spot so that in the future you will be able to use it.
- Page 3 There is a risk of fire, electric shock, or injury while self-repair. Repairs can be made only by Nivel System service or its authorized representatives. The laser beam can be hazardous to the human eye if the device is improperly operated.
-
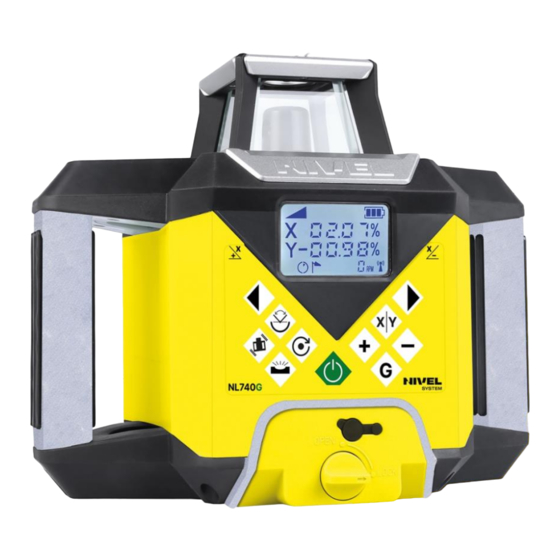
Page 4: Lcd Display
Exclusions of liability 1. It is expected from the user to comply all recommendations regarding to the use of this product and perform periodic reviews of the work of the instrument. 2. The manufacturer, or its representatives assume no liability for damages caused by improper handling or intentional improper use, including direct or indirect damage and loss of income. - Page 5 Description of functions: Controlling the state of power. Manual/Automatic: Controlling the mode of leveling. Laser will be in continuous rotating/self-leveling during high winds, heavy vibrations, and shocks. The Windy mode does not affect the accuracy. Speeding-up: circling knob. Speed of scanning includes 5-knots: 0-100-300-600-800 r.p.m Directional scanning: Circling knob.
- Page 6 5. Spin Continuous spinning: Press the Key to control the spinning speed of the laser module. If press the key repeatedly, the spinning speed of the laser module will continuously change as follows: 0-100-300-600- 800 r.p.m. Stepping spinning: Locate the Key Speeding-up at speed of 0 r.p.m, the laser module will stop spinning. And press the Key Right-spinning , the laser module will step-move clockwise.
- Page 7 5. Point the laser sensor at the laser beam - so that the laser automatically recognizes the direction (X, Y axis) - in which the Auto-alignment function will work NOTE - the laser cannot be turned upside down 6. When the laser recognizes the direction - information about the X or Y axis will appear on its display (on the rotating laser head you have information about the axes X, Y - in which the function will work) 7.
- Page 8 ATTENTIONS: During the auto-alignment mode, the direction of laser and receiver should be the same. Need to make sure there will have no extra light signal (mainly is reflected from laser) which will affect the receiver. Especially when place laser and receiver at smooth ground, all these extra signals will affect the judgement of receiver.
-
Page 9: Principle Of Operation
PRINCIPLE OF OPERATION Height Measurement Turn the power on to Level the instrument itself. Once leveled, the laser head starts to spin, setting the laser plane. Attach the laser sensor on the laser staff. Place a laser staff with attached sensor on a benchmark (zero point)- reset the position of sensor (adjust the height of the sensor to define a zero level, the laser staff should also indicate zero). - Page 10 4. Loosen the tripod fixing screw and rotate the instrument 180°. WARNING! Be careful not to move the instrument while the head is spinning. 5. Turn on the instrument once again and wait until it level automatically. 6. Once again mark the position of the laser beam on the sheet. 7.
-
Page 11: Laser Sensor
LASER SENSOR buzzer laser signal LCD display receiver LED’s MODE DISPLAY units Too high, the laser signal is below numeric / text display (please lower the sensor) - you will hear a high frequency sound You are in the right position accuracy - you will hear a continuous sound auto-alignment... -
Page 12: Terms And Conditions Of Warranty
Court with jurisdiction over the Warrantor’s registered office. 5. When the warranty services provided by the service centre are needed, please do not hesitate to contact your seller or a Nivel System service centre directly • e-mail: service@nivelsystem.com... - Page 13 NL740 technical specification Laser red beam (NL740R), green beam (NL740G) Light source class 2, 635 nm (NL720R); class 3R, 515 nm (NL720G) Accuracy ±0,72mm/10m Laser plummet red beam (650nm), ±1mm/1,5m Self-leveling range ±5° Slope (X and Y axis) ±10% (digital, manual)
- Page 14 Dziękujemy za zakupienie niwelatora laserowego firmy Nivel System model NL740 Aby móc jak najlepiej wykorzystać zakupiony instrument, prosimy uważnie przeczytać instrukcję i położyć w dogodnym miejscu, żeby w przyszłości móc z niej skorzystać.
-
Page 15: Wyświetlacz Lcd
WPROWADZENIE Wielozadaniowy niwelator laserowy to samopoziomujący laser budowlany, stosowany do wyznaczania różnicy wysokości przy pomiarach budowlanych. Model NL740 wykorzystuje wiązkę widzialnego światła i może być stosowany zarówno przy pracach wewnątrz budynku jak i na zewnątrz. Urządzenie zasilane jest z akumulatorków, które wykorzystują nowoczesną technologię... - Page 16 Włączanie, wyłączanie instrumentu. Kontrola automatycznego poziomowania: automatyczny (laser pracuje z kompensatorem), reczny (kompensator wyłączony, praca ze spadkami) TILT - tryb - wyłączony - po przesunięciu / silniejszym wstrząsie / zmianie wysokości laser wypoziomuje się i uruchomi ponownie. Laser będzie się ciągle obracał/samopoziomował...
- Page 17 tryb spadków ręcznych – na wyświetlaczu pojawi się symbol oraz ikona “X” – za pomocą przycisków +/- ustaw spadek w osi X. Naciśnij przycisk “X/Y” aby przełączyć oś i za pomocą przycisku +/- ustaw spadek w osi Y. Aby wyjść z trybu spadku ręcznego, naciśnij ponownie przycisk auto-poziomowania SPADKI CYFROWE –...
- Page 18 5. Skieruj czujnik laserowy na wiązkę lasera - tak, aby laser automatycznie rozpoznał kierunek (oś X, Y) - w którym będzie działać funkcja auto-wpasowania. UWAGA - lasera nie można odwrócić do góry nogami 6. Gdy laser rozpozna kierunek - na jego wyświetlaczu pojawi się informacja o osi X lub Y (na rotacyjnej głowicy laserowej masz informacje o osiach X, Y - w którym kierunku płaszczyzna będzie się...
- Page 19 Gdy laser i czujnik połączą się, ikona przestanie migać. Aby zapisać ustawienia należy wyłączyć i ponownie włączyć laser i czujnik. Pionownik laserowy Instrument posiada możliwość generowania linii pionowej do dołu i do góry. Dokładność wiązki laserowej 1mm/5m. Plamka laserowa nie może być wychwytywana przez czujnik laserowy i musi być...
-
Page 20: Zasada Działania
ZASADA DZIAŁANIA Pomiar wysokości Włącz zasilanie, instrument sam spoziomuje się. Po spoziomowaniu, głowica laserowa zacznie się kręcić, wyznaczając płaszczyznę laserową. Umocuj czujnik laserowy na łacie laserowej (za pomocą uchwytu). Na reperze (punkcie zerowym) ustaw łatę z czujnikiem - wyzeruj położenie (dostosuj wysokość położenia czujnika tak aby wyznaczał... - Page 21 SPRAWDZENIE Użytkownik powinien systematycznie sprawdzać następujące parametry pracy niwelatora • ustawienie płaszczyzny poziomej • błąd stożka • ustawienie płaszczyzny pionowej Sprawdzenie i kalibracja płaszczyzny poziomej i pionowej jest proste i w większości przypadków może być wykonana przez użytkownika. Sprawdzenie błędu stożka może być wykonane przez użytkownika, ale błąd ten może zostać...
- Page 22 CZUJNIK LASEROWY głośniczek detektor sygnału wyświetlacz laserowego diody LED tryby pracy WYSWIETLACZ jednostki miary za wysoko obniż czujnik aby dostosować wyświetlacz numeryczny go do poziomu wiązki laserowej jesteś na zadanej wysokości dokładność Ikona auto-wpasowania za nisko ustaw czujnik do góry aby dostosować komunikacja radiowa go do poziomu wiązki laserowej poziom baterii...
-
Page 23: Warunki Gwarancji
Gwaranta. W przypadku potrzeby skorzystania z usług serwisu gwarancyjnego prosimy o kontakt ze sprzedawcą lub bezpośrednio z serwisem Nivel System • e-mail: service@nivelsystem.com •... - Page 24 NL740 - specyfikacja wiązka czerwona (NL740R), wiązka zielona (NL740G) Laser Źródło światła klasa 2, 635 nm (NL740R); klasa 3R, 515 nm (NL740G) Dokładność ±0,72mm/10m Pionownik czerwona (650nm), ±1mm/1,5m Zakres samo-poziomowania ±5° Wyznaczanie spadków (oś X i Y) ±10% (cyfrowe) Zasięg pracy (średnica) 700 m (with sensor) Prędkość...
-
Page 25: Certificate Of Calibration
Rotating laser level Trade mark Nivel System Model NL720R, NL720G Serial number The date of the check Instrument checked and calibrated Calibration technician EC declaration of conformity We declare that products Nivel System NL720R, NL720G conform to: EN 61010-1:2010, EN 61326-1:2013... - Page 27 WARNING: The device contains a rechargeable Li-ion batteries which must be recycled and should be disposed in accordance with the requirements...
Need help?
Do you have a question about the NL740R and is the answer not in the manual?
Questions and answers