
Related Manuals for PERMASTEEL PS-207


Summary of Contents for PERMASTEEL PS-207
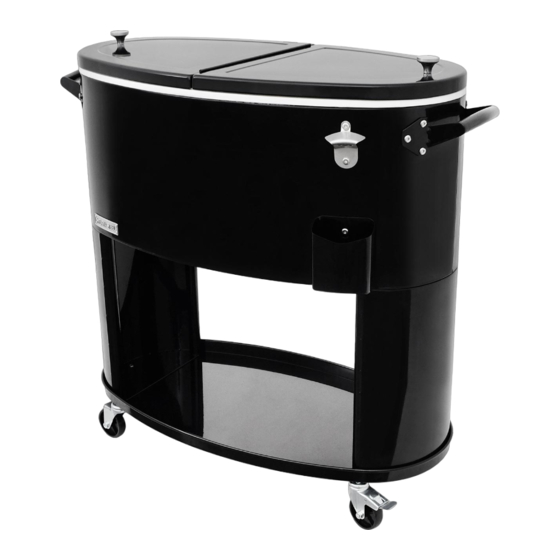
- Page 1 Permasteel 80QT Cooler Use & Care Guide Model number: PS-207, PS-207-80PE Thank you for purchasing your new patio cooler from Permasteel. We hope you enjoy your product. If you have any questions, please call us 1-888-287-0735 or visit www.permasteel.life...
-
Page 2: Table Of Contents
Table of content Important Information Thank you for your purchase of our Patio Cooler. Important Information We sincerely hope you will enjoy using our fine products. Parts List Please take time to read these instructions • Hardware thoroughly and follow each step carefully for safe and easy operation. -
Page 3: Parts List
M6 x 13 Bolt M6 x 15 Shoulder Bolt M4 x 32 Screw Flat Washer Hex Nut If you are missing any parts or have damaged parts, please call 1-888-287-0735 M-F 8:00-5:00 Pacific Time. For replacement, visit us at www.permasteel.life... -
Page 4: Hardware
Hardware The following hardware is provided in a poly bag. M6x13mm Bolt: 22 pcs M6x15mm Shoulder Bolt: 2 pcs M4X32mm Screw: 2 pcs (Note: Attached to lid knobs) Flat Washer: 4 pcs Hex Nut: 2 pcs Tools Included: Tools The following tools are required for assembly: •... -
Page 5: Assembly Steps
Assemble Steps Step 1 • Turn body (basin) upside down, place it on a clean, soft surface and attach 2 leg frames (G) to body (D) with (6) M6x13mm bolts (AA), 3 bolts for each leg frame, with the provided Allen wrench. Note: Do not fully tighten the bolts. - Page 6 Step 2: • Attach the bottom shelf (H) to the leg frames (G) with (2) M6x13mm bolts (AA), (4) flat washers (DD), and (2) hex nut (EE) with the provided hex wrench. Note: Do not fully tighten the bolts. Leg frames and bottom shelf should be loose so that it can be aligned with the holes for the casters.
- Page 7 Step 3 • Insert and thread casters (I) through the bottom panel holes and into leg frame using the provided open end wrench. • Insert and thread casters (J) through the bottom panel holes and into other leg frame using the provided open end wrench.
- Page 8 Step 4 • Attach the body handles (C) to body (D) using (12) M6x13mm bolts (AA), 6 bolts for each handle, and tighten with the provided Allen wrench. Allen Wrench...
- Page 9 Step 5 • Attach the bottle opener (E) to body (D) using (2) M6x13mm bolts (AA) and tighten with the Allen wrench. • Attach the cap catcher (F) to body (D) using (2) M6x15mm shoulder bolts (BB). Allen Wrench...
- Page 10 Step 6 • Note: The lid knobs (A) are pre-attached to the lid (B). They are upside down. • Please remove the knobs using a Phillips head screwdriver and re-assemble them on the lid right-side up.
-
Page 11: Care & Maintenance
1-888-287-0735, between 8:00 a.m. to 5:00 p.m. PST. Email: service@permasteel.life or visit us at www.permasteel.life Permasteel Inc. will ship parts free of charge for a period of 30 days from the date of purchase. The consumer is responsible for shipping & handling and processing of warranty claims after 30 days from the purchase date. - Page 12 We hope you enjoy your product and we are always here for you: Visit us at: www.permasteel.life Customer Service: 1-888-287-0735 Email: service@permasteel.life Distributed by Permasteel Inc. 100 Exchange Place Pomona, CA 91768 Designed in California, Made in China...
Need help?
Do you have a question about the PS-207 and is the answer not in the manual?
Questions and answers