Advertisement
Quick Links
Advertisement

Related Manuals for Topcon TRC-NW8Fplus


Summary of Contents for Topcon TRC-NW8Fplus
- Page 1 TRC-NW8Fplus Basic Operations...
- Page 2 TRC-NW8Fplus – Basic Operations - Overview This presentation will cover: • A general overview of the camera • Basic preparation of the patient • Operation of the controls and functions • Advanced features...
- Page 3 TRC-NW8Fplus – Basic Operations - Overview The TRC-NW8Fplus has the following features: • Can capture through pupils of 4.0mm in diameter or larger. (3.3mm or larger if the small pupil function is on) • Auto focus • Auto capture •...
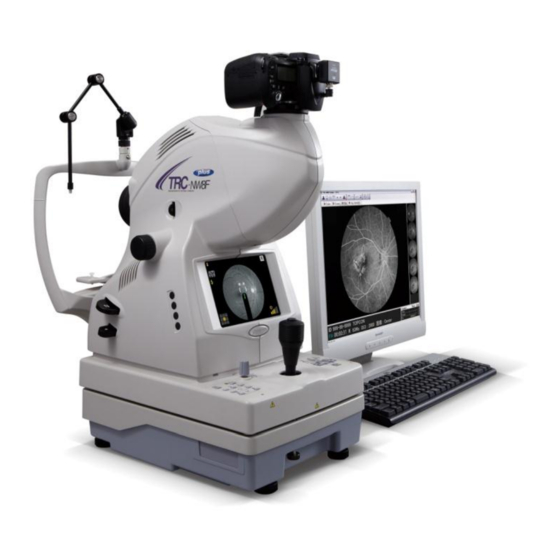
- Page 4 TRC-NW8Fplus – Basic Operations - Nomenclature Digital camera mount Diopter compensation selector Focusing knob LCD color monitor Screen adjustment controls FAF filter slider IR filter slider Control panels Joystick...
- Page 5 TRC-NW8Fplus – Basic Operations – Left Control Panel Menu display on screen Focusing bars on/off and auto function on/off Illumination intensity Flash intensity Chin rest position up/down...
- Page 6 TRC-NW8Fplus – Basic Operations – Right Control Panel Fixation targets and their position Photography mode: Color / FA Small pupil diaphragm Auto function switch: Auto on/off Timer switch for FA timing Stereo photography switch Electronic zoom on/off...
- Page 7 TRC-NW8Fplus – Basic Operations – Flash intensity Set the flash intensity Can be adjusted in four steps in the (+) and (-) When at factory default, value is displayed. Factory default for flash level is 3...
- Page 8 TRC-NW8Fplus – Basic Operations - Movements Movements of the base: back and forth and right and left, are performed by using the control lever. Before moving the optical head, make sure that the brake knob at the base is released.
- Page 9 TRC-NW8Fplus – Basic Operations – Illumination level Set the illumination level using the illumination level switch If the AUTO illumination level is on it is not necessary to set the illumination level manually. ("AUTO" is displayed for the illumination level.)
- Page 10 TRC-NW8Fplus – Basic Operations - Illumination level For manual setting, turn off the auto illumination using the AUTO button in the function panel. When the illumination level is set manually it is displayed in eleven steps, "1/11" to "11/11”...
- Page 11 TRC-NW8Fplus – Basic Operations – Flash Intensity Set the flash level using the Flash level switch The compensation value can be observed on the monitor. The compensation value has four steps in the (+) and (-) from the default value.
- Page 12 TRC-NW8Fplus – Basic Operations - Focusing Pull the instrument backwards using the control lever. Instruct the patient to look at the target in the center.
- Page 13 TRC-NW8Fplus – Basic Operations - Focusing Observe the anterior segment image on the monitor. Move the optical head using the control lever until you get the patient's eye centered in the monitor.
- Page 14 TRC-NW8Fplus – Basic Operations - Focusing Bring the ( ) brackets towards the patient's pupil Pupils should be larger than the brackets Comparison of the brackets and the pupil indicates whether the pupil is large enough to capture an image.
- Page 15 TRC-NW8Fplus – Basic Operations - Focusing Slowly bring the instrument closer to the patient: The retina image will appear on the monitor.
- Page 16 TRC-NW8Fplus – Basic Operations - Focusing Bring the instrument even closer to the patient; and two bright spots for distance alignment will appear on the screen.
- Page 17 TRC-NW8Fplus – Basic Operations – Auto focus When the auto focus is ON, the split lines align automatically. The auto focus function may not work in patients with dense cataracts, high myopia or corneal irregularities. When the auto focus function is OFF, **use the focusing knob to adjust the split lines into one line on the monitor.
- Page 18 TRC-NW8Fplus – Basic Operations - Focusing Move the control lever until the two alignment spots are merged into one single spot.
- Page 19 TRC-NW8Fplus – Basic Operations - Focusing Move the control lever and the optical head to bring the bright spot in the monitor into the brackets.
- Page 20 TRC-NW8Fplus – Basic Operations - Capturing When distance and centering are correct, the instrument automatically takes a picture.
- Page 21 TRC-NW8Fplus – Basic Operations – Diopter compensation When correction is higher than -13 or +12D, diopter compensation should be used...
- Page 22 TRC-NW8Fplus – Basic Operations – Diopter compensation Insert the diopter compensation lens to see a clearer image. *When the diopter compensation is used the split focusing lines are off and manual focusing is necessary. Also, all the automatic functions are disabled.
- Page 23 TRC-NW8Fplus – Basic Operations - Diopter compensation Bring the spot into the ( ) brackets Press the button on the joystick to take a picture.
- Page 24 TRC-NW8Fplus – Basic Operations - FA Photography Press the to set "FA photography". PHOTOGRAPHY MODE SWITCH Set the ISO sensitivity The compensation value can be seen by pressing the flash next to the ISO sensitivity display. intensity switch.
- Page 25 TRC-NW8Fplus – Basic Operations - FA Photography To perform Fluorescein Angiography, the patient’s eye needs to be dilated with appropriate mydriatic drops. Perform the FA procedure the conventional way.
- Page 26 TRC-NW8Fplus – Basic Operations - FA Photography If the fluorescein circulation needs to be observed, the IR filter can be removed from the light path. This will result in visible FA transit in the retina...
- Page 27 TRC-NW8Fplus – Basic Operations - FAF Photography Make sure that the TRC-NW8Fplus is set to "Color photography" and then pull out the FAF filter. The FAF icon will display in the upper right corner of the screen . FAF icon will display.
- Page 28 TRC-NW8Fplus – Basic Operations – Small pupil Small Pupil Photography When the pupil is too small use small pupil function.
- Page 29 TRC-NW8Fplus – Basic Operations – Small pupil Small Pupil Photography If small pupil selector is "ON", small pupil diaphragm is automatically set. Small pupil diameter is automatically detected...
- Page 30 TRC-NW8Fplus – Basic Operations – Small pupil Small Pupil Photography Capture images same as in “Color photography” Slight halo in the periphery may appear...
- Page 31 TRC-NW8Fplus – Basic Operations – Peripheral Photography The TRC-NW8Fplus can perform peripheral photography by changing the position of the internal target. The target can be positioned in 9 different locations allowing peripheral photography.
- Page 32 TRC-NW8Fplus – Basic Operations – Peripheral Photography Fixation target selector is in the right side panel...
- Page 33 TRC-NW8Fplus – Basic Operations – Peripheral Photography By pressing the central button the peripheral fixation is activated.
- Page 34 TRC-NW8Fplus – Basic Operations – Peripheral Photography The two side buttons rotate the target position clockwise or counterclockwise.
- Page 35 TRC-NW8Fplus – Basic Operations – Peripheral Photography The operator can change the position of the internal fixation targets to photograph peripheral and create composite images.
- Page 36 TRC-NW8Fplus – Basic Operations – Stereo Photography The stereo function captures a stereo pair without having to move the fixation target.
- Page 37 TRC-NW8Fplus – Basic Operations – Stereo Photography To activate the stereo photography function, press the button for Stereo Photography in the right control panel.
- Page 38 TRC-NW8Fplus – Basic Operations – Stereo Photography STEREO PHOTOGRAPHY SWITCH On the screen the brackets will be displayed vertically. Move the instrument to bring the alignment bright spot into the ( ) brackets to center and focus.
- Page 39 TRC-NW8Fplus – Basic Operations – Stereo Photography Brackets moves to the right. Then to left...
- Page 40 TRC-NW8Fplus – Basic Operations – Stereo Photography Bring spot into the ( ) brackets on right. Instrument takes a picture of the one side and the preview screen appears.
- Page 41 TRC-NW8Fplus – Basic Operations – Stereo Photography After checking the preview screen, press the trigger button. With this, the ( ) brackets moves to the left. Bring the alignment bright spot into the ( ) brackets, which have already moved to the left.
- Page 42 TRC-NW8Fplus – Basic Operations – Stereo Photography To exit stereo mode Press the STEREO PHOTOGRAPHY SWITCH. he normal monitor screen appears. Images are saved as a stereo pair...
Need help?
Do you have a question about the TRC-NW8Fplus and is the answer not in the manual?
Questions and answers