Godex EZ-1000 Plus User Manual
Output solutions ez-1000plus: user guide
Hide thumbs
Also See for EZ-1000 Plus:
- Programmer's manual (43 pages) ,
- User manual (43 pages) ,
- User manual (37 pages)
Table of Contents
Advertisement
Quick Links
Download this manual
See also:
User Manual
Advertisement
Table of Contents

Related Manuals for Godex EZ-1000 Plus


Summary of Contents for Godex EZ-1000 Plus
- Page 1 User’s Manual EZ-1000 Plus P/N. 920-012411-00 Rev. B, 12/05...
-
Page 2: Fcc Compliance Statement For American Users
FCC COMPLIANCE STATEMENT FOR AMERICAN USERS This equipment has been tested and found to comply with the limits for a CLASS A digital device, pursuant to Part 15 of the FCC Rules. These limits are designed to provide reasonable protection against harmful interference when the equipment is operated in a commercial environment. -
Page 3: Safety Instructions
Safety Instructions Bitte die Sicherheitshinweise sorgfältig lesen und für später aufheben. Die Geräte nicht der Feuchtigkeit aussetzen. Bevor Sie die Geräte ans Stromnetz anschließen, vergewissern Sie Sich, dass die Spannung des Geräts mit der Netzspannung übereinstimmt. Nehmen Sie das Gerät bei Überspannungen (Gewitter) vom Netz. Das Gerät könnte sonst Schaden nehmen. - Page 4 Safety Instructions Please read the following instructions seriously. Keep the equipment away from humidity. Before you connect the equipment to the power outlet, please check the voltage of the power source. Disconnect the equipment from the voltage of the power source to prevent possible transient over voltage damage.
- Page 5 EZ-1000 Plus User’s Manual Rev. B...
- Page 6 EZ-1000 Plus User’s Manual Rev. B...
- Page 7 EZ-1000 Plus User’s Manual Rev. B...
-
Page 8: Table Of Contents
1. BARCODE PRINTER... 8 1-1. Printer Accessories ... 8 1-2. General Specifications ... 8 1-3. Communication Interface ... 10 1-4. Printer Parts ... 12 2. PRINTER INSTALLATION... 14 2-1. Ribbon Installation ... 14 2-2. Label Installation ... 16 2-3. Label Roll Core Installation Instruction ... 17 2-4. -
Page 9: Barcode Printer
Type: transfer ribbons (wax, hybrid, and resin) in widths of 30mm to 110mm (1.88” to 4.33”) Core Inner Diameter: 25.4mm (1”) Printer Language EZPL (Firmware downloadable) Application: QLabel-IV(EZPL only) Software DLL & Driver: Microsoft Windows NT 4.0, 2000 and XP 11 resident alphanumeric fonts (included OCR A &... - Page 10 CE, FCC Class A, CCC, CB, cUL, BSMI Operation: 30-85%, non-condensing. Free air. Humidity Storage: 10-90%, non-condensing. Free air. Length: 285 mm (11.2”) Height: 171 mm (6.8”) Printer Dimension Width: 226 mm (8.9”) Weight: 2.72 Kg Rotary Cutter Module Stripper Module Options...
-
Page 11: Communication Interface
1-3. Communication Interface Parallel Interface Handshake : DSTB connects to the printer, BUSY connects to the host Interface cable : Parallel cable compatible to IBM PC Pin out : See below PIN NO. FUNCTION /Strobe Data 0-7 /Acknowledge Busy /Paper empty... - Page 12 Internal Interface UART1 wafer E_MD E_RST UART2 wafer EZ-1000 Plus User’s Manual Rev. B Ethernet module E_MD E_RST Expansion module...
-
Page 13: Printer Parts
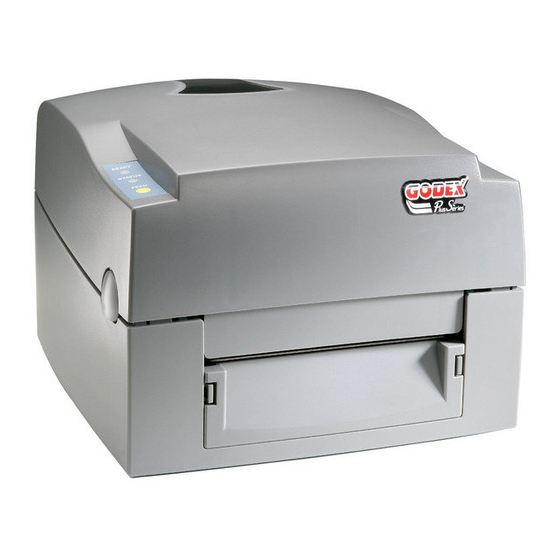
1-4. Printer Parts Cover Open Button Top Cover Label Roll Core Ribbon Rewind Wheel Print Mechanism Ribbon Rewind Shaft + Empty Ribbon Roll Locking Tenon (left/right) Front Cover Piece LED Light (Ready) LED Light (Status) FEED Key CF Card Slot Cover Print Head Pressure Adjustment Screw (left/right) EZ-1000 Plus User’s Manual Rev. - Page 14 Ribbon Supply Shaft Label Guide Platen Roller Print Line Adjustment Gear Label Sensor Fan-Fold Label Insert Power Switch Ethernet Socket (Option) USB Port Parallel Port Serial Port (RS-232) Power Socket * The communication ports may vary depending on product types. EZ-1000 Plus User’s Manual Rev.
-
Page 15: Printer Installation
2. Printer Installation This printer model has the following print modes: Thermal When printing, ribbon must be installed to transfer the print contents onto the Transfer (TT) media. Direct Thermal When printing, no ribbon is necessary; it only requires direct thermal media. - Page 16 Feed the ribbon from the Ribbon Supply Shaft under the Print Head. Wrap the ribbon around the Ribbon Shaft and stick the ribbon onto the Empty Ribbon Roll Core. Firmly close the upper print mechanism. EZ-1000 Plus User’s Manual Rev. B...
-
Page 17: Label Installation
2-2. Label Installation Open the top cover by pressing the Cover Open Buttons on both sides. Place the label roll onto the Label Roll Core. Loosen and lift the upper print mechanism by pressing the locking tenons. Feed the label through the two Label Guides to the Tear-off Bar. -
Page 18: Label Roll Core Installation Instruction
2-3. Label Roll Core Installation Instruction (A) 1” roll core installation (B) 1.5” roll core installation (C) 3” roll core installation EZ-1000 Plus User’s Manual Rev. B... -
Page 19: Card / Hang Tags Installation
Take the power cable, plug the cable switch to the power socket, and then connect the other end of the cable to the printer power socket. Connect the cable to the USB/parallel port on the printer and on the PC. Power on the PC and the printer and the printer’s LED light will shine. -
Page 20: Driver Installation
Insert the product CD, select ‘Specify a location’ and describe the path of the printer driver. Follow the instruction on the Window and complete the driver installation. EZ-1000 Plus User’s Manual Rev. B... -
Page 21: Accessory
3. Accessory 3-1. Stripper Installation Stripper Module Screw (TAP 3*8) x 2pcs 【 】 Note1 Please power off the printer before installing the stripper module. 【 】 Note2 Label liner thickness is recommended to be 0.06mm ± 10% with basic ㎡... - Page 22 Plug in the stripper connector onto the switchboard socket. (refer to the right figure) 【 】 Note There are 2 sockets on the converting boards (one is for stripper installation, and another one is for cutter), before plug the connector into socket, please check the pin first.
- Page 23 10. Follow the direction as shown in figure to feed the liner across the stripper. 11. Close the upper print mechanism and the stripper. 12. Press the FEED key to adjust the position of label and complete the installation. EZ-1000 Plus User’s Manual Rev. B...
-
Page 24: Cutter Installation
3-2. Cutter Installation Cutter Module Screw (TAP 3*8) x 2pcs 【 】 Note1 Please power off the printer before installing the cutter module. 【 】 Note2 Do not cut self-adhesive labels! The traces of adhesive will pollute the rotary knife and impair safe... - Page 25 Place the left side of the stripper first, and then fit the right side. Flip the cutter module downward to open the cutter. Hold the cutter module and lock it with screws After the screws are locked, flip close the cutter module.
-
Page 26: Cf Card Adapter Installation
3-3. CF Card Adapter Installation CF Card Adapter (Front) CF Card Adapter (Back) Open the top cover by pressing the Cover Open Buttons on both sides. Take off the label roll core. Open and remove the plastic cover from the inner base. -
Page 27: Cf Card Instruction
CF Card in FAT16. When the format is complete, the LED light will turn to green. If choose not to format the CF Card, just open the Top Cover of printer and wait for the turn-on procedure complete. -
Page 28: Control Panel
4. Control Panel 4-1. LED Status Press and hold the FEED key then power on the printer, the printer will beep 3 times and enter into Self-Test status. If keep holding the FEED key, the status will change in sequence to Auto Sensing Mode, Dump Mode, Direct Thermal Mode, Thermal Transfer Mode, See-through Sensor on/off, and then return to Self-Test again. -
Page 29: Feed Key
The Self-Test function in a printer will help user to figure out whether the printer is operating normally. In the Self-Test Mode, the printer will print out a test sample each time when the FEED key is pressed. To break off the Self-Test procedure, just turn off the printer. Below are the Self-Test procedures: Power off the printer, press and hold the FEED key. -
Page 30: Auto Sensing
Power off the printer, press and hold the FEED key. Power on the printer (while still holding the FEED key) and the printer will beep 3 times. Keep holding the FEED key, wait for the STATUS light turn orange and READY light flash orange, then release the FEED key. -
Page 31: See-Through Sensor On/Off
Power off the printer, press and hold the FEED key. Power on the printer (while still holding the FEED key) and the printer will beep 3 times. Keep holding the FEED key, wait for the STATUS light turn red and READY light flash green, then release the FEED key. -
Page 32: Error Messages
LED light will stop flashing. Make sure the printer is in the Direct Thermal mode. Replace with new ribbon roll. Make sure the movable sensor mark is at the correct position,... -
Page 33: Maintenance And Adjustment
Print head cleaning instructions are as follows: Power-off the printer. Open the top cover. Take out the ribbon. Open the print head by pressing the locking tenons. -
Page 34: Print Line Adjustment
Turn the power off and use a #M3 hexagon wrench inserted into hole “A”, and then turn it counter-clockwise. Power on the printer after clearing the paper jam, the cutter will reset automatically. 【 】... -
Page 35: Troubleshooting
5-5. Troubleshooting Problem Power on the printer, but the LED does not light up LED light turns red (power/status) after printing stops Printing started, but nothing was printed on the label When printing, label is jammed/tangled up When printing, only part of the...
Need help?
Do you have a question about the EZ-1000 Plus and is the answer not in the manual?
Questions and answers