
Subscribe to Our Youtube Channel
Related Manuals for Haier HWT12AD1


Summary of Contents for Haier HWT12AD1
- Page 1 TOP LOAD FULL-AUTOMATIC WASHING MACHINE USER’S MANUAL MODEL 12AD1 HW 10AD1 H T09AD1 HWT10ADB1 Please read this manual carefully before 0030517190B operating your washing machine and retain it for future reference.
-
Page 2: Table Of Contents
CONTENTS Product Description Safety Information Symbol Description Safety Warnings Installation & Adjustment Installing the bottom plate Balancing the washing machine Installation of the drain hose Installation of water inlet hoses Before Starting Check the following before washing Operation Loading your laundry Usage of detergent and softener Operation and Wash Cycles Explanation of the display... -
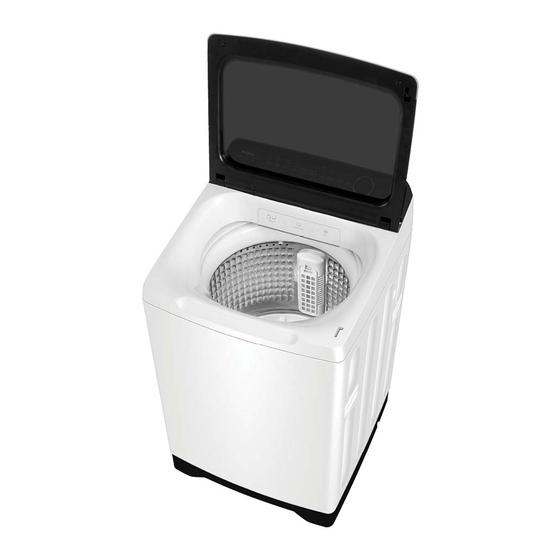
Page 3: Product Description
Product description Top lid Detergent and softener tray Lint Filter Box Outer tub cover Inner tub Top deck Pulsator Lid lock Cabinet Plinth Adjustable feet (2 pieces) Dial Control panel Cold water inlet valve Hot water inlet valve Hook Handle Power cord Back cover Drain hose connector... -
Page 4: Safety Information
Areas for communal use in blocks of flats or launderettes, Max. capacity 9 kg (HWT09AD1), max. capacity 10 kg (HWT10AD1) ,max. capacity 10 kg (HWT10ADB1), max. capacity 12 kg(HWT12AD1),water pressure Min. 30kPa,Max. 1MPa. Warnings A separate, earthed power socket is Ensure the plug is removed and the taps required for the power supply. - Page 5 Safety information Forbidden Do not install this appliance in a Do not connect to hot damp or wet environment. Do not water with temperature leave wet laundry on the Control higher than 60°C . Panel or spray water directly onto this appliance as this may cause the machine to malfunction, or cause an electrical fault.
-
Page 6: Installation & Adjustment
Safety information If power cord or other parts of this machine are damaged or broken, please contact a technician to have it repaired. Do not attempt repairs by yourself as this may cause personal harm or void the warranty. The new hose sets supplied by the appliance are to be used and the old hose sets should not be reused. -
Page 7: Balancing The Washing Machine
Installation & Adjustment Balancing the washing machine Installation on an uneven surface can lead to“out of balance”events, instability in the machine operation, or even failure to successfully complete a wash cycle. Please refer to the following steps for adjustment: 1. Confirm whether the machine is level. 2. -
Page 8: Installation Of Water Inlet Hoses
Installation & Adjustment Water inlet 1. Connect the cold hose (blue connector) to the cold tap and the hot hose (red connector) to the hot tap. You may have to use pliers to tighten the coupling. Do not over-tighten as this may cause damage to the valve or hose fittings. -
Page 9: Before Starting
Before washing Preparation before washing 1. Connect the water inlet hose. 2. Open the water faucet. 3. Insert the power plug into the wall power socket. 4. Ensure that the drain hose is installed at the correct height. 5. When the water pressure in the user's home is too low, it may not be able to flush detergents and softeners 1.2m... -
Page 10: Operation
Operation Loading your laundry The rated washing capacity refers to the largest dry weight of a load that can be washed. The thickness, size and type of clothes will influence the actual capacity. Do not select higher than water level“Med”for clothes less than 2.0kg, to avoid splashing of water. - Page 11 Operation Usage of detergent: Applicable only to HWT10AD1,HWT10ADB1 and HWT12AD1 Liquid detergent tray NOTE: Before using powder detergent, please remove "blue" liquid detergent tray which serves only for Washing powder liquid detergent. Smart-dose tray If powder or liquid detergent has been manually...
-
Page 12: Operation And Wash Cycles
Operation and Wash Cycles Explanation of buttons Indicator display Off : Indicates that the operation is complete or disabled. On : Indicates that the program is running and indcates the selected cycle and options. Flashing: When it pauses, it indicates the washing progress status of the current washing cycle. - Page 13 Operation and Wash Cycles B: "Water Temp" button Press the “Water Temp” button to select your wash temperature. Eco, Delicate and Wool cycles:“Warm hot” and“Hot”temperatures Water cannot be chosen. Temp Bulky cycle: “Hot” temperature cannot be chosen. (see page 15) During Hygiene and Drum Clean cycles,“Hot”is the only option available.
- Page 14 Operation and Wash Cycles E: "Spin Speed" button Use this button to select the spin speed, press“Spin Speed”button to choose “No Spin”“Low”“Med”“High” Spin No Spin: The machine will drain water out. Eco and Express can not choose Speed "No Spin". Delicate, Wool and Bulky cycles,“High”spin speed can not be chosen.
- Page 15 Operation and Wash Cycles I "Program" select : Set the program by rotating the dial Max Load Size A normal wash action for mixed everyday loads 9kg/10kg/12kg including cottons and blends. 9kg/10kg/12kg Cotton Warmer wash for cotton clothing. Gentle wash action with slow spin speed for delicate Delicate 3kg/3kg/5kg items.
- Page 16 (For example,“9kg/10kg/12kg”stands for“The Max load size of HWT09AD1 model under this cycle is 9kg”, “The Max load size of HWT10AD1 model under this cycle is 10kg”, “The Max load size of HWT12AD1 mode l under this cycle is 12kg” .) J "...
- Page 17 Operation and Wash Cycles Press the button to power on/off Rotate the dial to select automatic program After the power is turned on, the default is Mix program. Rotate the dial clockwise to select the Cotton, Delicate, Durable, Eco, Express, Bedding, Wool, Hygiene, Bulky, Drum Clean, and Downloaded programs.
- Page 18 When the Smart Dose detergent tray is almost out of detergent the display will flash FILL on the screen. The tank will need re-filling before another Auto Dose cycle is run. NOTE: The Auto Dose function only applies to HWT10AD1, HWT10ADB1 1 and HWT12AD1, but not HWT09AD1. When‘Soiled +’is selected,‘Wash’,‘Rinse’and‘Spin’is the default for the ‘Advance Wash’modifier.
- Page 19 Operation and Wash Cycles Press the button to start the cycle Press the button to select the delay wash program Delay display: After the delay is started, the remaining delay time is displayed. After the delay is started, it can be suspended, but parameters cannot be changed after the suspension.
- Page 20 Operation and Wash Cycles To release the child lock function: push down “Spin Speed” button and “Advance Wash” button at the same time for more than 1 seconds. The digital screen will display“CL”for 2 seconds. “ ” NOTE: After the child lock is released, press the button to open the lid.
- Page 21 Operation and Wash Cycles Wi-Fi & REMOTE To provision Wi-Fi, the user first needs to ensure the user interface is off. The user will then hold down the power button for 3 seconds until APP is displayed on the screen. The user will follow the prompts in the app.
- Page 22 Operation and Wash Cycles Display should show boot when OTA update enters the bootloader mode. It may show ERAS during the OTA erasing flash memories and may show counting time in seconds during the OTA writing flash memories. boot will show on the screen when OTA enters bootloader mode.
- Page 23 The energy test program was performed using the "Eco" cycle setting of : For HWT09AD1 model: High Water Level, Warm Water Temp, High Spin Speed; For HWT10AD1, HWT10ADB1, and HWT12AD1 model: High Water Level, no Wash+ options selected, Warm Water Temp, High Spin Speed; Please use low suds/high efficiency detergent.
-
Page 24: Cleaning And Maintenance
Cleaning and Maintenance Maintenance Remove the power plug before carrying out any cleaning or maintenance. Clean the lint filters and detergent box after each wash, otherwise it may influence the use of the machine. Both lint filters must be used during Clean the detergent box and set it on washing. -
Page 25: Troubleshooting
Troubleshooting If there is a fault or the machine does not operate correctly, remove the power plug before checking the machine. Using diagnostic list below, please check if the machine requires a repair. If a repair is required, please contact our customer care team, do not try to fix it by yourself. -
Page 26: Packing List
Troubleshooting Problem Cause Solution The display shows FA The water level sensor has failed. Please contact Customer Care. The display shows F2. Overflow Error Please contact Customer Care. The display shows E2-1. The door lock alarm Please contact Customer Care. The display shows FC1. -
Page 27: Specification
Technical data Type TOP LOAD FULL-AUTOMATIC WASHING MACHINE Model HWT12AD1 HWT10AD1 & HWT10ADB1 Rated voltage/frequency 220-240V/50Hz 220-240V/50Hz Rated washing power 420W 350W Rated spinning power 320W 300W Net weight 65Kg 49Kg 73Kg 56Kg Gross weight Dimensions(mm) W 640 D 650 H 1093...
Need help?
Do you have a question about the HWT12AD1 and is the answer not in the manual?
Questions and answers